After managers approve an employee expense or advance request, an expense administrator must review the request and post it to payroll before the employee can be reimbursed.
|
You have received notification from one of your managers that they have approved an expense request. After reviewing the expense items and verifying the receipts for each item, you are ready to approve the request for payment on the employee's next pay check. By posting the request, you are authorizing the payment to the employee. |
Note: Before starting this process, it may be an organization requirement for the payroll administrator to receive a print out of the expense request (signed by both manager and employee, if necessary) including all applicable receipts. Otherwise, an electronic copy of the receipts may be attached to the online expense request.
To post an approved employee expense or advance request:
1. On the Management Navigation Menu, click Wage & Tax > Expense ApprovalWage & Tax > Expense Approval.

The Expense ReimbursementsExpense Reimbursements page displays.

2. If necessary, adjust the filtersadjust the filters to change the expenses displayed in the Expense and Advance Requests table.
Select an employee from the Employee drop-down box to view requests for that employee only.
Enter a date in the Submitted Since text box to view requests submitted after the entered date.
Select a status from the Status drop-down box to view requests with the selected status only.
Select an option from the Sort By drop-down box to sort requests by specific criteria, including date submitted, the amount of the request, and so on.
Select the Ascending or Descending radio buttons to sort requests in ascending or descending order based on the other criteria you've selected.
The Expense and Advance RequestsExpense and Advance Requests table updates to display the expense requests you selected.

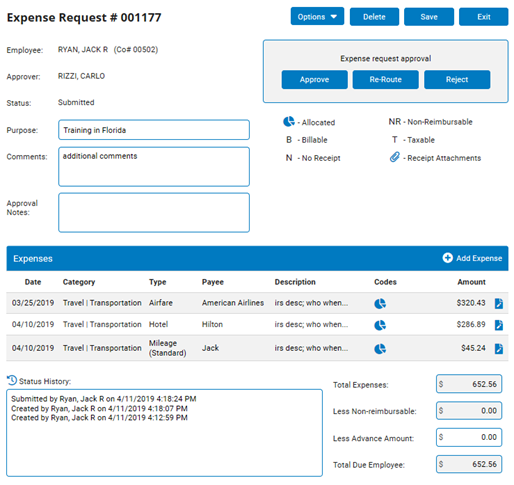
3. To review the approved request before posting it, click the EditEdit button on the row of the Expense and Advance Request table listing the request.
![]()
The Expense RequestExpense Request edit page displays.

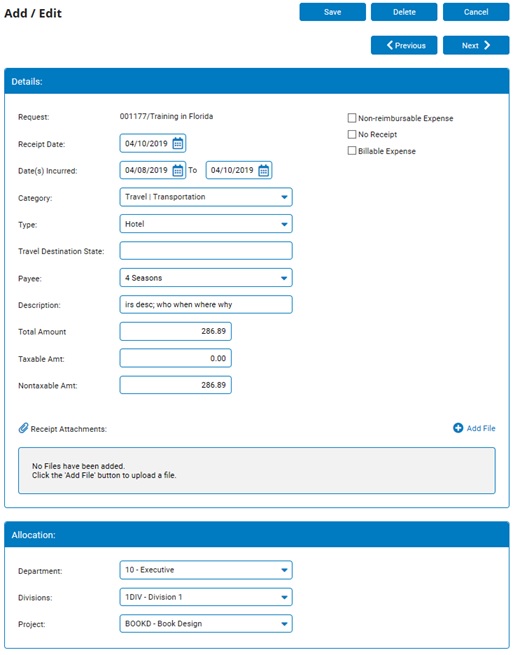
4. If you would like to edit or change any expense item in an expense request, click the EditEdit button in the row of the Expenses table listing the item.
![]()
The Add/Edit ExpenseAdd/Edit Expense page displays.

Note: Advance requests list only a single amount and do not include individual expense items.
Optional Setup: In your organization's ExponentHR setup, expense administrators may not have the ability to edit an approved expense item. If this is the case, the Edit button is not available.
5. If necessary, review the amount listed on the expense item and change any fields that are incorrect, including the category of the expense, the expense type, the amount and the description. Then, click the SaveSave button.

The edit page displays.
6. After you have reviewed the request, click the SaveSave button.

The Expense Reimbursements page displays.
7. When you are satisfied with the request, click the PostPost button on the row of the Expense and Advance Requests table listing the request.

To post multiple Expense/Advance Requests simultaneously, select the Multi-Record Posting feature from the Options drop-down menu. This feature provides the convenience of selecting which approved requests are ready to be paid out and place them all in Posted status with a single click.
Result: The approved request is posted to payroll and changed to Posted status. ExponentHR will add the reimbursement to the employee's pay check in the next applicable pay period. After the employee has been reimbursed, the status of the request will change to Paid and the pay date will be saved on the expense record.
Note: After Post, the reimbursement is visible to the employee and manager in the Time Clock Report as a Miscellaneous Adjustment. If needed, the Re-Open button within the request cancels the previous payout authorization of the request and returns it to Approved status for additional review or other necessary actions.