The default is for the notification for each plan, or plan group, to be on. All users designated to be on the notification distribution list will receive a notification in their Message Center if any transactions are generated that day. However, you can turn off the notification if you do not want your organization to be alerted when a benefits transaction has been made for a specific plan or plan group.
In addition, you can control what types of changes trigger notifications by re-configuring them. You can remove optional items and limit the number of transactions you want to monitor, so you will not receive notice of transactions that do not require your organization to take any action.
To edit the notification distribution list:
1. On the Management Navigation Menu, click Benefits > Portal Management > DashboardBenefits > Portal Management > Dashboard.
The Portal Management DashboardPortal Management Dashboard page displays, showing all current plans.
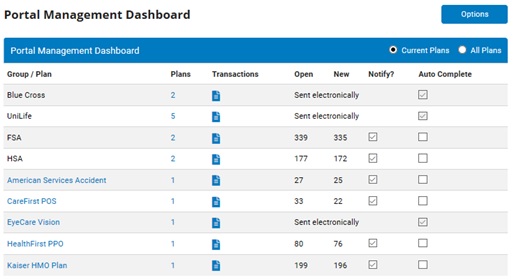
2. Click the OptionsOptions button and select Notification Recipients.

The Transaction Notification Recipient ListTransaction Notification Recipient List page displays, showing all current plans.
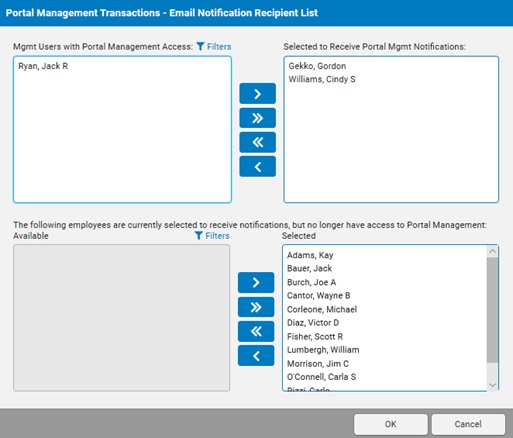
3. Use the arrow buttons to move the desired employees to or from the list of managers with access to the Portal Management Utility and the list of those selected to be on the notification distribution list.
Notes:
• To be eligible to receive notifications, an employee must have Grant Access rights to the Portal Management utility (either as an HR Administrator, Benefits Administrator, or with Portal Management functional rights provided in the Grant Access tool).
• Any future employee provided with Benefit Administrator rights in the Grant Access tool will be automatically included on the distribution list. (If desired, the employee can be removed from the distribution list from within the Portal Management Dashboard.)
To turn off notifications:
1. On the Management Navigation Menu, click Benefits > Portal Management > DashboardBenefits > Portal Management > Dashboard.
The Portal Management DashboardPortal Management Dashboard page displays, showing all current plans.
2. Click to clear the Notify? check box next to a plan (or plan group) if you do not want to be notified whenever there are new transactions for the plan (or plan group).
To re-configure notifications:
1. On the Management Navigation Menu, click Benefits > Portal Management > Plan ConfigurationBenefits > Portal Management > Plan Configuration.
The Portal Management Plan ConfigurationPortal Management Plan Configuration page displays.

2. Select the plan for which you want to reconfigure notifications in the Plan to View drop-down list.
The Portal Management Plan ConfigurationPortal Management Plan Configuration page expands.
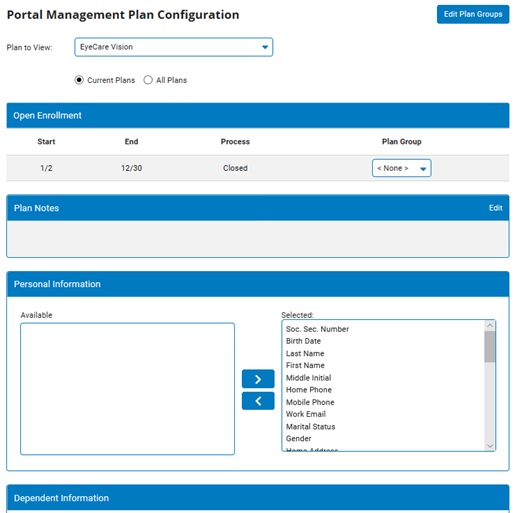
3. Add any necessary notes by clicking the Edit button in the Plan Notes area, typing the note, and then clicking the Save button.
4. Use the arrow buttons to move the fields between the Selected and Available lists in each of these categories:
Personal Information. Fields affecting the employee's personal information, such as phone number, address, and so on.
Dependent Information. Fields affecting any of the employee's dependents, such as full-time student status or dependent address.
Enrollment Information. Fields specifying the enrollment status, coverage amount, employee cost, and employer cost.
Primary Care Provider Information. Fields with the Primary Care Provider ID and name.
Benefit Salary Information. The employee's benefit salary, in case any coverage is based on benefit salary rather than annual salary.
Note: The fields in red are required; you will continue to receive transactions if the values in any of these fields change.
Result: Based on the fields remaining in the Selected lists, you will receive notification whenever a change has been made that involves one of these fields.