Time and Billing Allocation allows you to apportion the hours an employee works to various classification codes such as Department, Location, Cost Center, or Activity.
All hours an employee works automatically receive a default allocation. This allocation is typically assigned by ExponentHR using the classification codes assigned to the employee in your Employee Personal Records page. For most employees, this default allocation is sufficient to properly allocate the employee's time to suit the needs of the company’s business environment.
Time and Billing allocations allow you to handle occasions where employees may be splitting their work between two job locations. ExponentHR allows you to create and modify employee time and billing allocations. You may also select specific cost centers that employees may select during a time punch override.
To set up a default time and billing allocation for an employee:
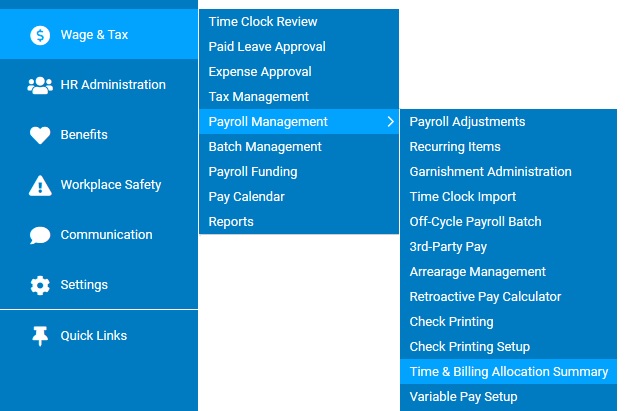
1. On the Management Navigation Menu, click Wage & Tax > Payroll Management > Time & Billing Allocation SummaryWage & Tax > Payroll Management > Time & Billing Allocation Summary.
The Time & Billing Allocation SetupTime & Billing Allocation Setup page displays.
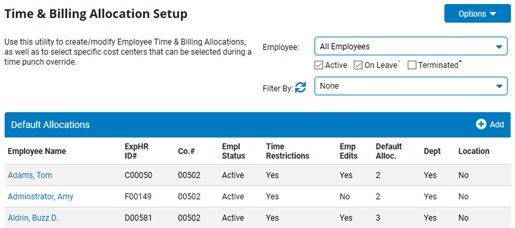
2. If necessary, adjust the way the employee's hours are allocated.
Adding Default Time & Billing AllocationsAdding Default Time & Billing Allocations
In
order to limit the daily interaction required for the Time
and Billing specification entered by the employee or manager,
default allocations can be set up to represent the standard
works hours an employee works. Once the default allocations
are set up, the employee only has to interface with the allocations
in the event that the allocations have differed on that particular
day. |
To adjust time and billing allocations for an employee:
1. Click the AddAdd button.

The Employee Time and Billing Allocation SetupEmployee Time and Billing Allocation Setup page displays.
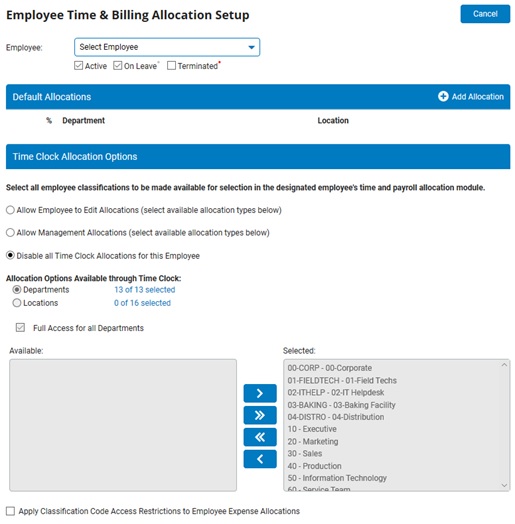
2. Select the employee from the Employee drop-down box.
Note: By default, the employee's hours will be allocated to their current work location.
3. If necessary, adjust the way the employee's hours are allocated.
Adjusting Time and Billing AllocationsAdjusting Time and Billing Allocations
To adjust time and billing allocations for an employee:
1. Click the Add AllocationAdd Allocation button.

A new Employee Cost Allocation SetupEmployee Cost Allocation Setup page displays.

Note: If you want to change an allocation that already exists, click the EditEdit button by that allocation instead.
![]()
2. Enter the percentage of the employee's hours to be allocated to the new location in the Percentage text box.
3. Select the department to which the hours should be allocated from the Department drop-down box.
4. If your office has more than one work location, select the work location to which the hours should be allocated from the Work Location drop-down box.
5. Click the SaveSave button.

Result: The employee time and billing allocation you just entered is saved.
4. If necessary, manage employee time clock allocation options.
Managing Time Clock Allocation OptionsManaging Time Clock Allocation Options
To manage employee time clock allocation options for an employee:
1. Configure time clock allocation overrides as necessary.
To Prevent Any Time Clock AllocationsTo Prevent Any Time Clock Allocations
If you want to prevent all time clock allocations for this employee's hours:
1. Select the Disable All Time Clock Allocations for This Employee radio button.
Result: Neither managers or employees may assign changes to this employee's allocations.
If you want to allow managers to set up time clock allocations for this employee's hours:
1. Select the Allow Management Allocations (select available allocation types below) radio button.
2. Select the Departments or Locations radio button to view departments or locations at your company.
3. Uncheck the Full Access to All [Departments/Locations] checkbox (if you leave this checkbox checked, the employee's manager receives access to all departments and or locations).
All departments or locations at your company will display in the Available box.
4. Select the department or location you would like to allow a manager to allocate hours to from the Available box, then click the right arrow button.
The department or location appears in the Selected box.
5. Repeat step 4 for all departments and locations at your company to which you would like a manager to be able to allocation employee hours.
Result: This employee's manager(s) may allocate the employee's hours to the departments and locations you placed in the Selected box only.
If you want to allow the employee and the employee's manager(s) to set up time clock allocations for the employee's hours:
1. Select the Allow Employee to Edit Allocations (select available allocation types below) radio button.
2. Select the Departments or Locations radio button to view departments or locations at your company.
3. Uncheck the Full Access to All [Departments/Locations] checkbox (if you leave this checkbox checked, the employee's manager and employee receive access to all departments and or locations).
All departments or locations at your company will display in the Available box.
4. Select the department or location you want to allow the employee and the employee's manager to allocate hours to from the Available box, then click the right arrow button.
The department or location appears in the Selected box.
5. Repeat step 4 for all departments and locations at your company to which you would like the employee and the employee's manager(s) to be able to allocation employee hours.
Result: This employee and the employee's manager(s) may allocate the employee's hours to the departments and locations you placed in the Selected box only.
Result: The employee and the employee's manager(s) may allocate the employee's hours based on the settings you selected.
5. Click the SaveSave button.
Result: The Employee Time and Billing Allocation Setup page updates to display the new allocation you just entered.
Note: You may edit any existing allocations by clicking the EditEdit button next to the allocation. Follow the steps above to edit allocations.
![]()
Editing Time & Billing AllocationsEditing Time & Billing Allocations
One
of your employees has been splitting their time 50/50 between
the Sales and Marketing department. Due to a recent decrease
in the amount of work that is required in the Marketing department,
the managers of the departments have agreed to allow the employee
to devote 15% of their time to relieving the receptionist.
By editing the default allocation, the employee will not have
to enter the hours they work at each department on a daily
basis. |
To edit time and billing allocations:
1. Click the on the name of the individual's time and billing allocation options you want to edit.
The Employee Time and Billing Allocation SetupEmployee Time and Billing Allocation Setup page displays.
2. If necessary, adjust the way the employee's hours are allocated.
Adjusting Default Cost AllocationsAdjusting Default Cost Allocations
To adjust cost allocations for an employee:
1. Click the Add AllocationAdd Allocation button.
A new Employee Cost Allocation SetupEmployee Cost Allocation Setup page displays.
Note: If you want to change an allocation that already exists, click the name of that allocation instead.
2. Enter the percentage of the employee's hours to be allocated to the new location in the Percentage text box.
3. Select the department to which the hours should be allocated from the Department drop-down box.
4. If your office has more than one work location, select the work location to which the hours should be allocated from the Work Location drop-down box.
5. Click the SaveSave button.
Result: The Employee Cost Allocation Setup page updates to display the new allocation you just entered.
3. If necessary, manage employee time clock allocation options.
Managing Time Clock Allocation OptionsManaging Time Clock Allocation Options
To manage employee time clock allocation options for an employee:
1. Configure time clock allocation overrides as necessary.
To Prevent Any Time Clock AllocationsTo Prevent Any Time Clock Allocations
If you want to prevent all time clock allocations for this employee's hours:
1. Select the Disable All Time Clock Allocations for This Employee radio button.
Result: Neither managers or employees may assign changes to this employee's allocations.
If you want to allow managers to set up time clock allocations for this employee's hours:
1. Select the Allow Management Allocations (select available allocation types below) radio button.
2. Select the Departments or Locations radio button to view departments or locations at your company.
3. Uncheck the Full Access to All [Departments/Locations] checkbox (if you leave this checkbox checked, the employee's manager receives access to all departments and or locations).
All departments or locations at your company will display in the Available box.
4. Select the department or location you would like to allow a manager to allocate hours to from the Available box, then click the right arrow button.
The department or location appears in the Selected box.
5. Repeat step 4 for all departments and locations at your company to which you would like a manager to be able to allocate employee hours.
Result: This employee's manager(s) may allocate the employee's hours to the departments and locations you placed in the Selected box only.
If you want to allow the employee and the employee's manager(s) to set up time clock allocations for the employee's hours:
1. Select the Allow Employee to Edit Allocations (select available allocation types below) radio button.
2. Select the Departments or Locations radio button to view departments or locations at your company.
3. Uncheck the Full Access to All [Departments/Locations] checkbox (if you leave this checkbox checked, the employee's manager and employee receive access to all departments and or locations).
All departments or locations at your company will display in the Available box.
4. Select the department or location you want to allow the employee and the employee's manager to allocate hours to from the Available box, then click the right arrow button.
The department or location appears in the Selected box.
5. Repeat step 4 for all departments and locations at your company to which you would like the employee and the employee's manager(s) to be able to allocate employee hours.
Result: This employee and the employee's manager(s) may allocate the employee's hours to the departments and locations you placed in the Selected box only.
Result: The employee and the employee's manager(s) may allocate the employee's hours based on the settings you selected.
4. Click the Save and ExitSave and Exit button.

Result: The Time & Billing Allocation Setup page displays. Your changes to the employee's time and billing allocations are now reflected in the allocation table.