
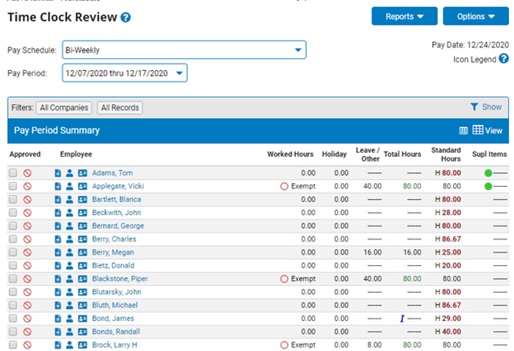
Managers may need to adjust hours worked by employees each pay period. The Time Clock Review page allows managers to adjust hours reported by non-exempt employees, as necessary.
|
In reviewing the time clock review for your employees, you notice that one of your employees has reported they worked 15 hours in a single day. After speaking to the employee, you realize that they mis-entered their leave time on the day in question. By editing the time clock entry, you are able to adjust the hours that will be reported to payroll. |
To adjust employee hours in a pay period:
1. On the Menu, click Wage & Tax > Time Clock ReviewWage & Tax > Time Clock Review.
2. Select the appropriate pay schedule from the Pay Schedule drop-down list.
The Time Clock ReviewTime Clock Review page displays a current summary of employee reported time for the pay schedule selected.
3. If necessary, select the appropriate pay period from the Pay Period drop-down list.
The Time Clock Review page updates.
4. Filter the list of employees, as needed.
Filtering EmployeesFiltering Employees
1. Click the FilterFilter icon and select the criteria by which you want to filter the employees.

2. Select the specific value you want in the Filter By drop-down list to change the display of the Time Clock Review screen.
Note: Any selection aside from All Records in the Filter By drop-down list will bring up a second drop-down list to allow you the option to filter by a specific criterion within the filter topic chosen.
3. Check the box next to the one or more Other Filters Options to further control what data is included in the results.
Note: If you choose All for a criterion, the results will be grouped and sub-totaled by that criterion.
4. Check the box next to the one or more Other Show Options to further control what data is displayed in the results.
Note: If an employee’s Calculated Work Hours are not equal to their Actual Worked Hours, the employee's hours will be highlighted;you may mouse-over the highlighted hours to show a hovering link with the employee’s Calculated Worked Hours.
5. Check the Save Filter Values box to have the selected filter options stored and automatically applied when you return to the Time Clock Review page. If the save option is not used, the selected filters will apply to your current session, but the system will revert to the prior filter settings the next time you return to the Time Clock Review.
6. Click the Apply button.
Result: The Time Clock Review page displays the employees meeting the classification filter(s) you selected. The selected filters are also displayed in the filter header bar above the list of employees for easy reference.
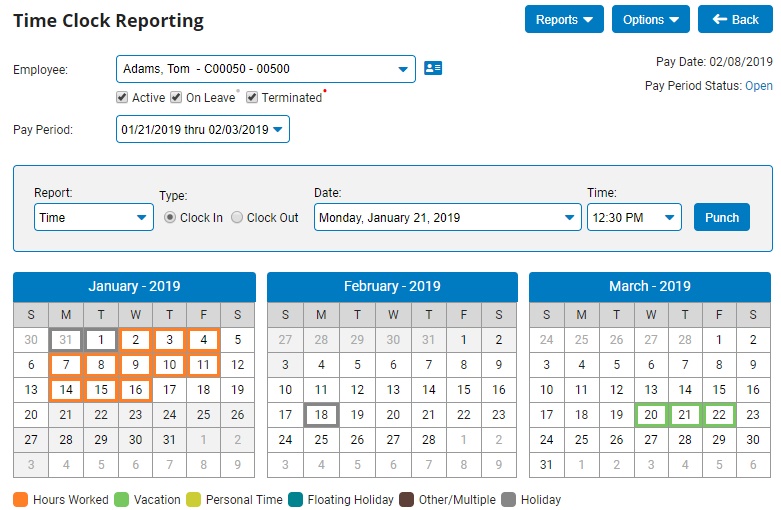
5. Click the employee name link to open the employee's Time Clock detail and edit employee time, as necessary.
The Time Clock ReportingTime Clock Reporting page displays.
6. If necessary, adjust display options by clicking the Options button.
Click the Show Calendar link to display a calendar with all pay dates, paid holidays, and other information for the employee.
Click the Show Notes Box link to display a notes text box in which you can enter information pertaining to the employee's time entries.
Click the Show Deleted Records link to display time entries that have previously been deleted.
Click the Show Overtime Adjustment link to display overtime adjustments for the employee.
7. Adjust employee time for the selected pay period as necessary.
Reporting Missing PunchesReporting Missing Punches
|
While reviewing one of your employees' reported time for the ending pay period, you notice that one of your employees has not reported any time worked. Instead of relying on the employee to enter the missing hours worked, you are able
to report the known hours worked on the employee's behalf. |
To manually insert a single missing punch:
1. Click the Report Missing Punch option from the Options button.
The Report Missing PunchReport Missing Punch page displays.
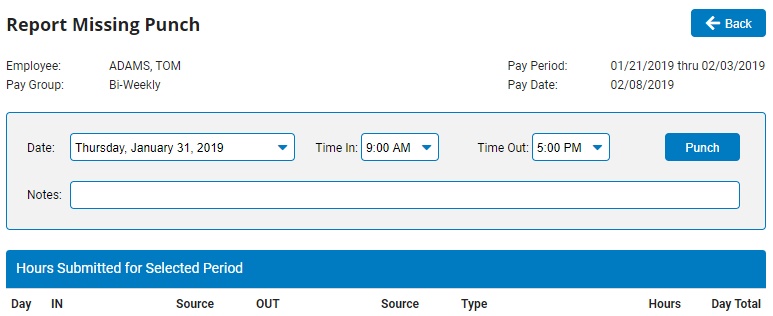
2. In the Date pull-down menu, select the appropriate date.
Note: The Date pull-down defaults to the current date.
3. In the Time In pull-down menu, select the appropriate time in for the retroactive punch.
4. In the Time Out pull-down menu, select the appropriate time out time for the retroactive punch.
5. Click the Punch button to record the retroactive time clock punch.
Result: The time punch is retroactively added to your calendar on the day you selected.
To automatically insert a missing punches for all work days:
Select the Auto-Punch Standard Hours option from the Options button.
Result: ExponentHR automatically adds an Hours-Only time entry to each weekday within the respective pay period. The hours for each daily punch are derived from the Standard Hours designation on the employee record (also assuming a standard 5-day work week). If hours (or leave) have already been recorded on any days in the week, the auto-punch will be adjusted to account for those existing reported hours. With the auto-punch hours in place, the manager can then perform edits to the employee’s time clock entries for any day(s) where the employee did not work a standard day
Notes:
This feature is only available to management users that have access rights to enter Hours-Only time punches for an FLSA Non-Exempt employee.
The Auto-Punch Standard Hours feature does not record any punch in/out times for the employee.
Adding Missing HoursAdding Missing Hours
|
One of your employees comes to you on payday and tells you that they were shorted six hours of OT from their pay check. After reviewing the hours with the employee, you determine that the employee failed to clock in for the six hours they
worked on the final Saturday of the paycheck. The employee is okay waiting for their next pay check to reconcile the hours. Therefore, it is necessary to enter an additional amount of hours on the upcoming payroll period to be paid on the
next check. By using the miscellaneous adjustment feature of ExponentHR, these hours can be entered very easily. |
To add additional hours to an employee's pay check from the Paid Leave Reporting page:
1. Select the Misc. Adjustment option from the Report type drop-down box.
The Type drop-down box displays new options.
2. Select the type of hours to be added (for example, regular hours, overtime hours, holiday pay) from the TypeType drop-down box.

3. If necessary, enter an explanation of why the hours are being added in the DescDesc (description) text box.

Note: If you would like to hide this adjustment from the employee, check the Hide checkbox. The adjustment will not be visible to the employee until the pay day.
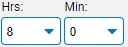
4. Select the amount of time to be added from the Hours and MinutesHours and Minutes drop-down boxes.
5. If necessary, enter in an hourly rate in the Override RateOverride Rate text box to be used instead of the employee's default hourly rate when processing the adjustment.

6. If necessary, add any additional details about the entry in the NotesNotes text box.

7. Click the SubmitSubmit button.

Result: The miscellaneous adjustment you just added displays on the Hours Submitted for Selected Period table. The employee will now be compensated for these hours as necessary.
Adjusting Time in Current Pay PeriodAdjusting Time in Current Pay Period
|
In reviewing the time clock review for your employees, you notice that one of your employees has reported they worked 15 hours in a single day. After speaking to the employee, you realize that they mis-entered their leave time on the day in
question. By editing the time clock entry, you are able to adjust the hours that will be reported to payroll. |
To adjust any time entry already reported in an open pay period from the Paid Leave Reporting page:
1. Click the EditEdit button on the row of the Hours Submitted for Selected Period table by the hours you would like to change.
![]()
An edit page displays for the type of time entry you selected.
2. Change the fields on the edit page as necessary.
3. If necessary, add any additional details about the entry in the NotesNotes text box and click the AddAdd button to record these changes on the edit.

4. Click the SaveSave button.

Result: The changes you made to the time entry will be reflected in the hours entry on the Hours Submitted for Selected Period table.
Adjusting Imported Time in Grid Format (Separate Punches)Adjusting Imported Time in Grid Format (Separate Punches)
|
After uploading and importing time clock punches, you see that there are several changes you need to make to an employee's punches. Use the Time Punch Grid Edit to make mass changes. |
To split punch pairs into distinct IN and OUT punches so you can adjust, move, separate, or delete them:
1. Click the Options button, and then select the Time Punch Grid Edit option.
The Time Punch Grid Edit informational pop-up messageTime Punch Grid Edit informational pop-up message displays.
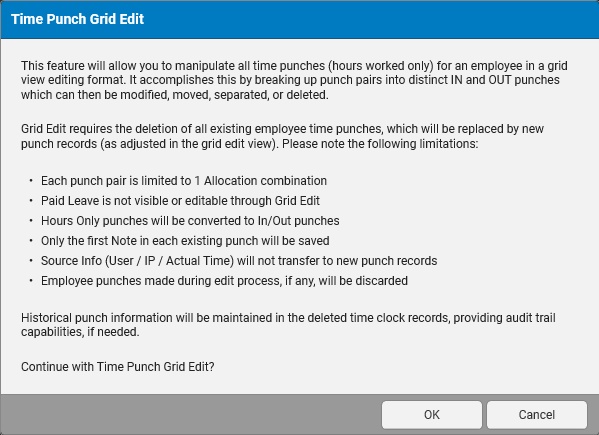
2. Click the OK button to continue.
The Time Punch Grid EditTime Punch Grid Edit page displays.
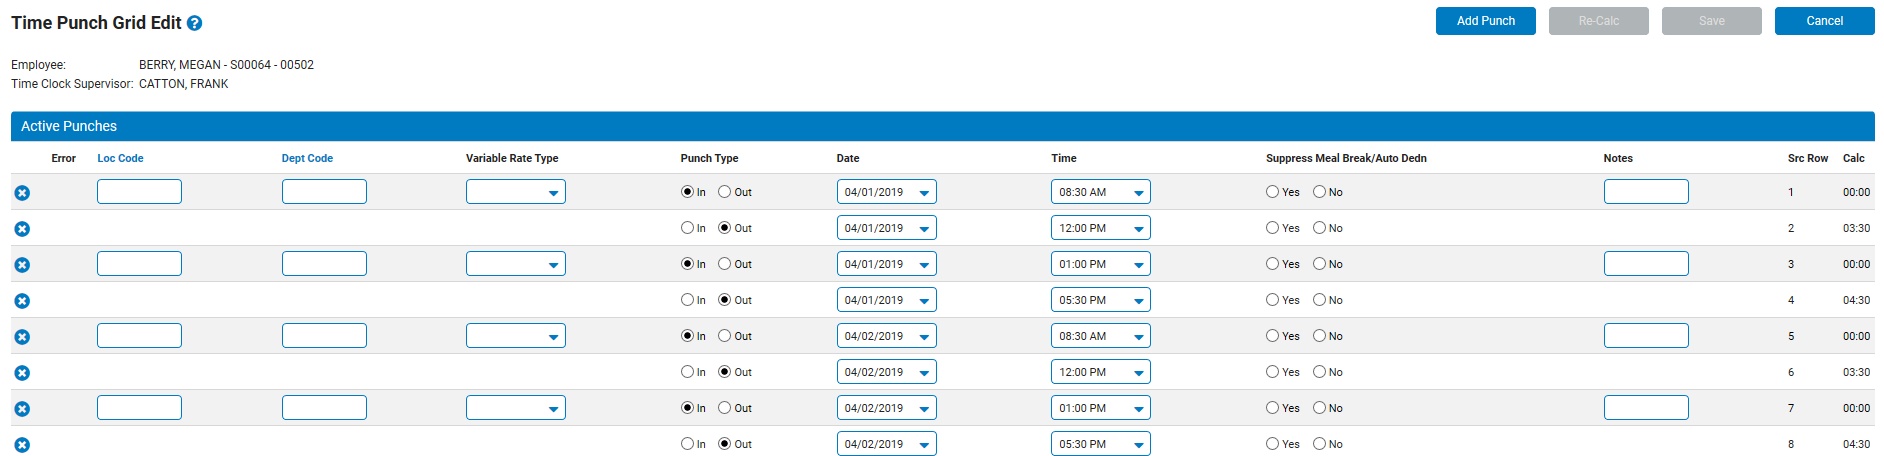
2. Change the fields on the edit page, as necessary.
3. Click the X button to delete a punch, if necessary.
4. Click the Add Punch button to add another IN or OUT punch.
5. Click the Re-Calc button.
6. Click the Save button.
Result: The changes you made to the time entries will be reflected on the Hours Submitted for Selected Period table.
Correcting Time Already PaidCorrecting Time Already Paid
|
In reviewing the recent pay details, you realize that one of your employees was paid for 3 hours more than they were supposed to be. Since the pay period is closed, you will need to use the miscellaneous adjustment feature on the current
pay period to subtract the hours for this employee in the upcoming pay period.
|
If an employee was paid for more hours than they worked in a prior pay period, or if you need to correct the amount of hours paid, you may deduct hours from an employee's upcoming pay check to correct the imbalance by doing the following:
1. Select the Misc. Adjustment option from the report type drop-down box.
The Type drop-down box displays new options.
2. Select the type of hours for which the employee was overpaid (for example, regular hours or overtime hours) from the TypeType drop-down box.
3. If necessary, enter an explanation of why the employee was overpaid in the DescDesc (description) text box.
Note: If you would like to hide this adjustment from the employee, check the Hide checkbox. The adjustment will not be visible to the employee until the pay day.
4. Select the amount of time to be added from the Hours and MinutesHours and Minutes drop-down boxes.
Note: To deduct hours, select a negative number of hours from the drop-down boxes.
5. If necessary, enter in an hourly rate in the Override RateOverride Rate text box to be used instead of the employee's default hourly rate when processing the adjustment.
Note: The Override Rate text box is only visible to managers that have been provided the appropriate rights.
6. If necessary, add any additional details about the entry in the NotesNotes text box.
7. Click the SubmitSubmit button.
Result: The miscellaneous adjustment you just added displays on the Hours Submitted for Selected Period table. The designated number of hours will now be deducted from the employee's current pay check to compensate for the hours the employee was overpaid in the prior paycheck.
Overriding Automatic Holiday HoursOverriding Automatic Holiday Hours
|
If an employee was automatically credited for pay on a holiday but worked on the holiday, you may credit the employee for additional holiday pay since they did not take the automated holiday off. |
To override automatic holiday hours:
1. Select the Misc. Adjustment option from the report type drop-down box.
The Type drop-down box displays new options.
2. Select the type of holiday pay which the employee did not take (Paid Holiday or Unpaid Holiday) from the TypeType drop-down box.
3. If necessary, enter an explanation of why the employee worked on the paid holiday in the DescDesc (description) text box.
Note: If you would like to hide this adjustment from the employee, check the Hide checkbox. The adjustment will not be visible to the employee until the pay day.
4. Select the amount of holiday pay to be credited to the employee from the Hours and MinutesHours and Minutes drop-down boxes.
5. If necessary, enter in an hourly rate in the Override RateOverride Rate text box to be used instead of the employee's default hourly rate when processing the holiday adjustment.
Note: The Override Rate text box is only visible to managers that have been provided the appropriate rights.
6. If necessary, add any additional details about the entry in the NotesNotes text box.
7. Click the SubmitSubmit button.
Result: The miscellaneous adjustment you just added displays on the Hours Submitted for Selected Period table. The designated number of holiday pay will now be added to the employee's total amount of leave hours.
Allocating Time WorkedAllocating Time Worked
1. If the Cost AllocationCost Allocation table does not already display, click the EditEdit button in the row of the reported hours you want to allocate.
![]()

2. Without any overrides, the time clock entry will be allocated to the employee's default cost allocation(s). Click on the View DefaultsView Defaults button to view the employee's default cost allocation(s).

Result: a pop-up window will appear displaying the employee’s current default allocationscurrent default allocations.
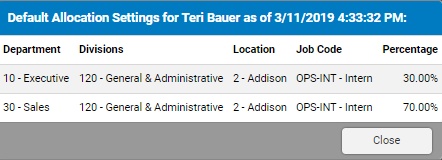
Note: Assuming that there is no change to the employee’s default allocation setup prior to the submission of the applicable pay period, the allocation percentages displayed in the pop-up will be the same allocations applied during payroll process.
3. To make an override to the default allocation for the specific time clock entry, either edid the existing data and/or click the Add AllocationAdd Allocation button.

A new row/rows displays in the Cost Allocation tableCost Allocation table.

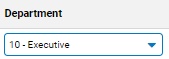
4. Select the categories (department, location, etc.) to which you would like to allocate hours worked from the categorycategory drop-down boxes.
5. Enter the number of hours (or percentage of hours) to be allocated to the selected categories in the Amount (or Percent)Amount (or Percent) text box.
The Total Allocated and Amount RemainingTotal Allocated and Amount Remaining text boxes update to show how many hours you have allocated by category, and how many hours remain to be allocated.

6. Repeat steps 1 to 5 for all additional hours that you wish to allocate.
Note: Any hours you do not specifically allocate through these steps will be automatically allocated to their default category (department, location, and so on).
7. After allocating hours as necessary, click the SaveSave button.
Result: The hours you edited are allocated to the categories you selected. A small arrow (![]() ) displays
by the time clock entry to show that you have applied cost allocation to the hours.
) displays
by the time clock entry to show that you have applied cost allocation to the hours.
Removing Meal PunchesRemoving Meal Punches
|
One of your employees has opted to work through their lunch hour. Because your company is set up to automatically deduct time for meal breaks, you must edit the employee's Time Clock record to add back in the time taken away for the
meal break. You do this by removing the meal punch. |
To remove a meal punch:
1. Click the EditEdit button on the row of the Hours Submitted for Selected Period table by the hours you would like to change.
![]()
An edit page displays for the type of time entry you selected.
2. If necessary, add any additional details about the entry in the Optional Notes text box, click the Add button, and click the Save button to record these changes on the edit.
3. Click the ![]() icon to remove the meal punch.
icon to remove the meal punch.
Result: The changes you made to the time entry will be reflected in the hours entry on the Hours Submitted for Selected Period table.
Your changes to employee time are saved.
8. If necessary, select another employee for which you would like to adjust time from the EmployeeEmployee drop-down box.

The Paid Leave Reporting page displays information for the selected employee in the selected pay period.
Note: This field defaults to the employee you selected on the Time Clock Reporting page. This drop-down box allows managers to adjust time for multiple employees without having to return to the Time Clock Reporting page after each adjustment.
9. After adjusting employee time as necessary, click the BackBack button.
![]()
Result: The Time Clock Review page displays the changes you have made to the employee's reported time.
Related Help Topics: