Viewing and Approving Employee Time
The Time Clock Review page allows you to review, edit, print, and approve worked and paid leave hours for employees in the current pay period.
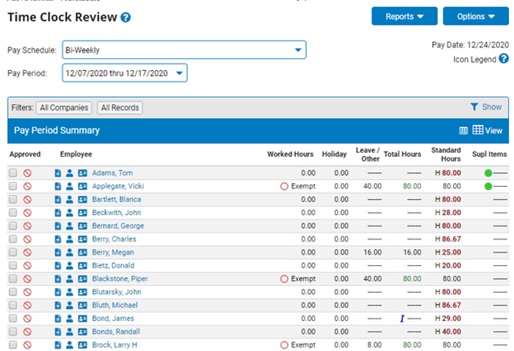
The Time Clock Review defaults to the current pay period and displays all employees included in your management level access rights. The summary information identifies all worked and paid leave hours reported for each employee, including overtime and paid holidays.The review page displays a number of additional componentsnumber of additional components as well as some helpful legend iconslegend icons to aid in your review.
These legend icons will appear on an employee's row when applicable for the employee in the selected pay period.
-
 Not Approved: The respective employee's time clock entries have not yet been approved and therefore not ready for payroll batch submission/processing.
-
 Insufficient Leave Hours: The respective employee has submitted a paid leave request in the selected pay period, but does not have enough available hours in the paid leave balance to adequately support the leave request
-
 Overtime Exists: The respective employee has worked hours within the selected pay period that are being paid with an overtime calculated pay rate.
-
 Arrears Balance Exists: When an employee does not have enough earnings to support all applicable payroll deductions (ex Medical, Dental, Vision, etc.), those amounts go into arrears and are to be collected on all future payroll cycles until the arrearage balance has been cleared. Arrearage balances can be reviewed and maintained through the Arrearage Management utility.
-
 Leave Not Reported: The respective employee has not yet indicated that all (if any) leave requests have been submitted for the selected pay period.
-
 Leave Reported: The respective employee has indicated that all (if any) leave requests have been submitted for the selected pay period and his/her time entries are ready for review.
-
 Minimum Wage Gross Up Applied: The ExponentHR system has automatically applied a miscellaneous payroll adjustment to increase the earnings amount to ensure that the gross wages result in the employee being paid at the applicable minimum wage rate (gross wages divided by total hours worked = minimum wage pay rate).
Note: The Minimum Wage Gross Up calculation is an optional feature that must be activated for your organization for it to appear on an employee's time clock page.
-
 Minimum Wage Gross Up Suppressed: The ExponentHR miscellaneous payroll adjustment that was applied to increase the respective employee's wages to an minimum wage rate has been manually suppressed by your organization.
Note: The Minimum Wage Gross Up calculation is an optional feature that must be activated for your organization for it to appear on an employee's time clock page.
-
 Override Rate Exists: An hourly rate that differs from the respective employee's standard hourly rate has been applied to some or all of the employee's time clock entries.
-
 Corrective Action Recommended: The respective employee's time should be reviewed to determine if any correction action is needed before processing payroll. Hover over the displayed icon to see what specifically may need to be reviewed (ex. Salary/Non-Exempt employee's effective rate of pay is less than the employee's minimum wage rate).
-
 International Employee: The respective employee is designated in the ExponentHR system as an international employee.
-
 Import Notice: An informational warning occurred when the respective employee's time was imported through the Time Clock Import utility. The employee's time should be further reviewed to ensure that no corrective action is needed.
-
 Employee Tax Overrides Exist: The respective employee has a tax override being applied within the selected pay period.
-
 State Execption Premiums Exist: The respective employee has a premium pay adjustment related to a state's break legislation being applied within the selected pay period.
-
The Approved check box allows the approving manager to select and approve recorded hours.
Note: Once approved, this field is disabled and displays the initials of the approving manager.
-
The Worked Hours column displays the total hours worked in the current pay period.
-
The Holiday column displays the holiday hours reported in the current pay period.
-
The Leave/Other column displays leave hours reported in the current pay period.
-
The Total Hours column displays the total hours and overtime reported in the current pay period.
-
The Standard Hours column displays the total anticipated work hours per pay period. An H displayed next to the hours indicates this is an hourly employee.
-
The Supl Income column displays any additional reported income that is to be applied during the displayed pay period.
-
On-Screen Alert icons may also be present to highlight certain employees related to time worked, report leave, and other payroll-related items. (These icons are summarized in the on-screen Legend.)
Note: The Time Clock Review does not include salary information, but will display supplemental income such as commissions earned.
To view and approve employee time:
1. On the Menu, click Wage & Tax > Time Clock ReviewWage & Tax > Time Clock Review.
2. Select the appropriate pay schedule from the Pay Schedule drop-down list.
The Time Clock ReviewTime Clock Review page displays a summary of employee reported time for the current pay period.
3. If necessary, select the appropriate pay period from the Pay Period drop-down list.
The Time Clock Review page updates.
4. If viewing a future pay period, the Calculate HoursCalculate Hours button will be available to select, which will calculate all information available at that time to display on the Time Clock Review page.
Notes:
-
This step is only needed to review up-to-date information for the future payroll you have selected.
-
You may still select individual employees to review or make adjustments without selecting this option.
5. If necessary, select a subsidiary in the Company drop-down list.
6. Filter the list of employees, as needed.
Filtering EmployeesFiltering Employees
1. Click the FilterFilter icon and select the criteria by which you want to filter the employees.
2. Select the specific value you want in the Filter By drop-down list to change the display of the Time Clock Review screen.
Note: Any selection aside from All Records in the Filter By drop-down list will bring up a second drop-down list to allow you the option to filter by a specific criterion within the filter topic chosen.
3. Check the box next to the one or more Other Filters Options to further control what data is included in the results.
- Hide Contractors - Check this box to remove contract individuas from the display.
- Hide International Employees - Check this box to remove international employees from the display.
- Note: This filtering option is only available if your organization selects to activate the ExponentHR international option.
- Supervised Employees Only - Check this box to limit the dislayed list of individuals to just those who work directly for you. When selected, the Pay Schedule select list on the Time Clock Review page will limit the listed Pay Groups to only ones that contain at least one employee that directly reports to you.
- Note: This is checked by default for all users without Payroll Function and HR Administration rights.
- Employees w/o Required Affirmation Only - Check this box to limit the dislayed list of individuals to just those who have not yet electronically signed/acknowledged their time sheet for the respective pay period.
- Employees with Leave/Other - Check this box to limit the displayed list of individuals to just those who have leave (paid or unpaid) reported within the selected pay period.
- Unapproved Employees Only - Check this box if you want to limit your view to employees whose time you have not yet approved.
- Employees with OT Hours Only - Check this box to limit the dislayed list of individuals to just those who received overtime pay in this period only.
- Employees with 0.00 Total Hours Only - Check this box to limit the dislayed list of individuals to just those who did not report any hours in the pay period.
- Employees with 0.00 Worked Hours Only - Check this box to limit the dislayed list of individuals to just those who did not work any hours in the pay period.
- Employee with Supplemental Items Only - Check this box to limit the dislayed list of individuals to just those who have supplemental pay posted in the pay period.
- Employee with Min Wage Gross Up Only - Check this box to limit the dislayed list of individuals to just those whom the minimum wage gross-up applies.
- Employees with State Exception Prems Only - Check this box to limit the dislayed list of individuals to just those who have received a calculated premium pay adjustment related to state regulations (ex. CA Meal Breaks).
- Employees with Open Punches Only - Check this box to limit the displayed list of individuals to just those who are presently clocked in for work.
-
Note: If you choose All for a criterion, the results will be grouped and sub-totaled by that criterion.
4. Check the box next to the one or more Other Show Options to further control what data is displayed in the results.
- Actual Worked Hours - Check this box if you want to display the actual REG/OT/DT hours (from the Time Clock Report) that the listed employees punched—this option does not use the Standard Hours base amount.
Note: If an employee’s Calculated Work Hours are not equal to their Actual Worked Hours, the employee's hours will be highlighted;you may mouse-over the highlighted hours to show a hovering link with the employee’s Calculated Worked Hours.
- Show REG Hours Column - Check this box if you want to include a REG Hours column showing all regular hours.
- Show O/T Hours Column - Check this box if you want to include an O/T Hours column showing all overtime hours.
- Show D/T Hours Column - Check this box if you want to include a D/T Hours column showing all double-time hours.
- Show All On-Leave Employees - Check this box to have all individuals who are presently on extended leave of absence be included in your Time Clock Review display.
5. Check the Save Filter Values box to have the selected filter options stored and automatically applied when you return to the Time Clock Review page. If the save option is not used, the selected filters will apply to your current session, but the system will revert to the prior filter settings the next time you return to the Time Clock Review.
6. Click the Apply button.
Result: The Time Clock Review page displays the employees meeting the classification filter(s) you selected. The selected filters are also displayed in the filter header bar above the list of employees for easy reference.
Note: When an employee is terminated or placed on-leave, they are automatically removed from the Time Clock Review page for all future pay periods. To make the employee accessible from the Time Clock Review page for payment adjustments, you may click the Options button and select the Add Employee to Batch item.
7. To view an employee's reported time for the pay period, click the Time Clock ReportTime Clock Report button on the employee row.
The Time Clock Report page displays a summary of all the employee's reported time for the pay period.
Note: To print a compiled list of all Time Clock Reports for the employees included in your selected view, click the Reports button and select the Multi-Employee Time Clock Report option. After a few minutes (depending on size of report), you will be presented with a time sheet for each individual ready for printing. Alternatively, you can select the Multi-Empl. Time Clock Rpt (signature-ready) option to generate the same time sheet pages, but now with the inclusion of signature lines for the employee and approver on the bottom of each individual's time sheet. Both of these reports are also available when accessing from the View/Print Reports button on an individual's Time Clock reporting page.
8. To see an employee's Time Clock supervisor, mouse over the SupervisorSupervisor button on the employee row.
Note: To see the "up-level" chain of command, click the button.
9. To modify the employee's reported time, click the employee name link to open the employee's Time Clock detail and edit employee time, as necessary.
Note: For more information on editing reported employee time and employee leave, see the Related Help topics below.
10. To approve the employee's time, select the Approved check box in the row of the Time Clock Review table corresponding to the employee.
11. After approving all employee time as necessary, click the Save Approvals button.
Result: The reported time for all employees for which you checked the Approve check box will be marked as approved in the pay period you selected. After management has approved all hours, the Payroll Manager must perform final review and submit the Time Clock batch to ExponentHR for processing. See the Related Help Topic.
Notes:
Related Help Topics:
Adjusting Employee Time
Adjusting Employee Pay
Adjusting Employee Leave
Suppressing Employee Pay
Submitting a Time Clock Batch
Reviewing Payroll Batches