
You may set up a group review schedule so managers can review a group following a time line other than the Standard Corporate Schedule. Before you can set up the group review schedule, you must define which members to include in the group.
Note: To exclude an employee from the Performance Management utility so they will not belong to any corporate or group schedule, create a Change Employment Information EAN for them and select Yes in the Exclude from Performance Mgmt drop-down box.
Your organization has a different performance review schedule for upper management in the Dallas area. To manage this review cycle, you need to set up a schedule group with multiple, layered filters. Select Dallas for the Location and include all positions above manager for the OSM Level. To be included in the group, the employee must not only be a director level or above but also have Dallas as their work location.
To create a group that will allow you to set up a Group Review Schedule for performance reviews instead of the Standard Corporate Review schedule:
1. On the Management Navigation Bar, click HR ADMINISTRATION > Applications > Performance ManagementHR ADMINISTRATION > Applications > Performance Management.
The Performance ManagementPerformance Management page displays.
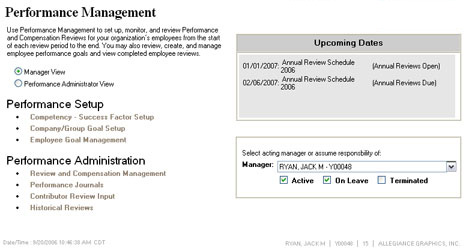
2. Select the Performance Administrator ViewPerformance Administrator View radio button.
![]()
New options display on the page.
Note: If you do not have Performance Administrator rights, this radio button will not be visible.
3. Click the Schedule and Allocation Budget SetupSchedule and Allocation Budget Setup link under Performance Setup.
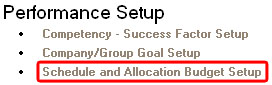
The Schedule and Allocation Budget SetupSchedule and Allocation Budget Setup page displays.
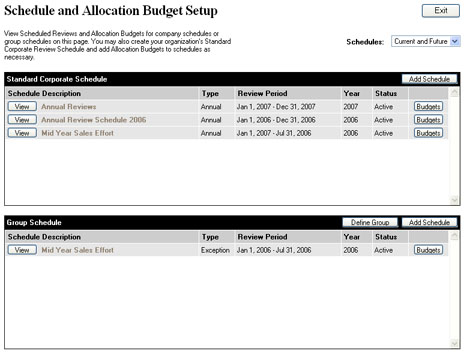
4. Click the Define Group button on the Group Schedule table.
The Group Schedule Setup - Define a GroupGroup Schedule Setup - Define a Group page displays.
5. Click the Add Group button on the Group Schedule table.
The Group Schedule Setup - Add a GroupGroup Schedule Setup - Add a Group page displays.
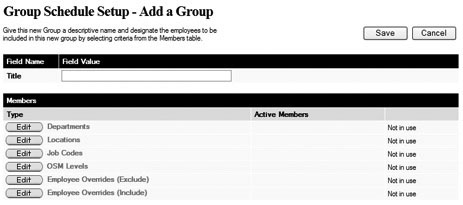
6. Type a description for the group in the Title box.
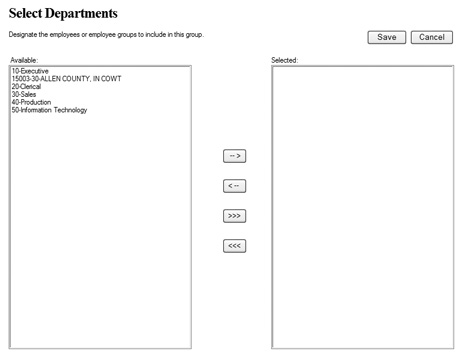
7. Click the Edit button next to the type of members you want to include in the group.
The SelectSelect page displays.
Note: To include or exclude specific employees from the group, click the applicable Edit button next to Employee Overrides in the Members table. Employees who have been excluded from the Performance Management utility (via an EAN) do not appear in the Employee list.
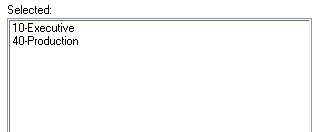
8. Highlight each criterion you want to add to the group from the AvailableAvailable box, then click the right arrowright arrow button to add that criterion to the Selected box.
![]()
All criteria you place in the SelectedSelected box will be included in the schedule group.
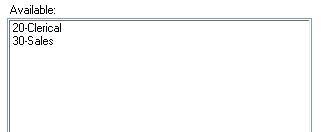
Note: Highlight criteria in the Selected box and click the left arrowleft arrow to remove criterion from the group.
![]()
9. Click the Save button to save the criteria you added as part of the schedule group.
Note: Click the Cancel button to exit without making any changes.
10. Repeat steps 7-9 for each type of member you want to add to the schedule group.
11. After adding all necessary types of members to the group, click the SaveSave button.
![]()
Result: The Group Schedule Setup - Define a Group page displays. Your new schedule group is listed in the Group Schedules table.
Note: You may click the right side View button to view a list of all employees in the group.
Related Help Topics