The OSM 'What If' feature provides a tool to reorganize a group of employees within the company in a temporary environment, without actually affecting the live company OSM hierarchy. In What If mode, employees can be pulled out of the tree, detached from existing positions, and placed in new positions, with few restrictions.
Your
organization is preparing for a fairly large reorganization. In
attempting to determine the effect of the reorganization on potential
RIFs (Reduction in Force), you can create a 'What If" scenario
to determine the position details of the company after the reorganization,
as well as clearly see the employees or managers who will be affected
by a RIF. |
Note: No changes applied in a What If scenario will be made effective unless/until the What If scenario is applied over the Live OSM Tree.
To open the What If view:
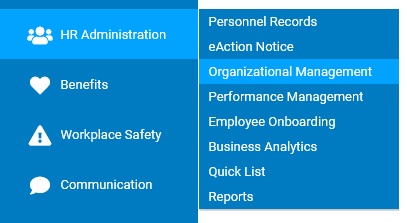
1. On the Management Navigation Menu, click HR Administration > Organizational ManagementHR Administration > Organizational Management.
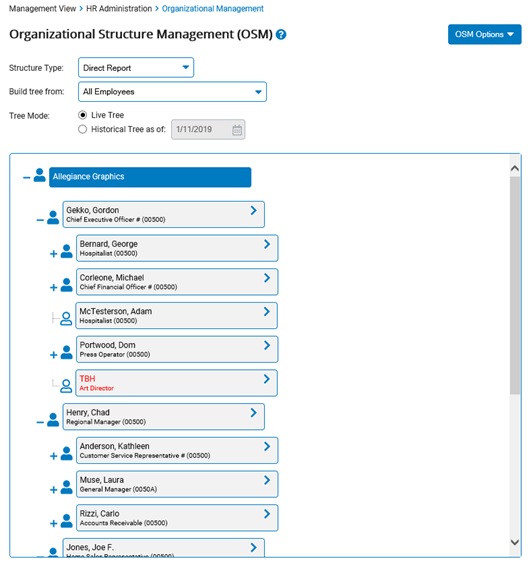
The Organizational Structure Management (OSM)Organizational Structure Management (OSM) page displays.
2. Select Create/Edit What If Scenario from the OSM OptionsOSM Options button.
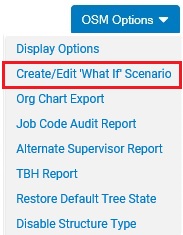
Result: The "What If" Mode page displays. You may make a number of changes to the OSM tree in a 'What If' scenario, listed below.
Changing the OSM Tree View
Changing What If OSM Tree and HierarchyChanging What If OSM Tree and Hierarchy
You may edit either a Direct Report 'What If' OSM tree and a Time Clock Reporting 'What If' tree.
After
a reorganization meeting, your board of directors has decided
that the RIF will need be smaller in number to allow the business
to continue to provide a high level of customer satisfaction.
The 'What If' scenario will need to be changed to accommodate
the new requirements of the reorganization. By editing the
existing 'What If' scenario, you will be able to maintain
a through description of the affected positions. |
To change a 'What If' OSM tree:
1. Select the OSM tree you would like to modify from the Structure TypeStructure Type drop-down box.

The OSM tree you selected displays.
Notes:
The number of OSM trees your company maintains may vary. In some cases, you may have only one OSM tree.
None of the changes you make to a 'What If' OSM tree will be applied to the live tree until you apply the What If scenario.
2. If necessary, change how much of the 'What If' OSM tree displays by selecting an employee from the Build Tree FromBuild Tree From drop-down box.

The OSM tree updates to show the employee you selected and all employees who report to that person.
Result: The OSM tree updates to display based on the options you selected.
Creating and Editing What If Scenarios
Create a new What If scenario or, if necessary, open a previously created What If scenario.
Creating New What If ScenariosCreating New What If Scenarios
Your
organization is preparing for a fairly large reorganization.
In attempting to determine the effect of the reorganization
on potential RIFs, you can create a 'What If" scenario
to determine the position details of the company after the
reorganization, as well as clearly see the employees or managers
who will be affected by a RIF. |
To create a new What If scenario:
1. Select Create New What If from the What If ScenarioWhat If Scenario drop-down box.

The Create What If box displays.
2. Enter a description (name) for the What If Scenario in the Description text box, then click the Create What IfCreate What If button.
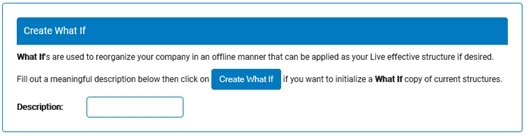
Result: A new What If scenario displays.
Opening Saved What If ScenariosOpening Saved What If Scenarios
To open a previous created What If scenario:
1. Select the description (name) of the scenario from the What If ScenarioWhat If Scenario drop-down box.

The OSM tree will appear as it did in the What If Scenario you previously created.
Reorganizing the OSM Tree
You may reorganize the OSM tree to reflect changes in your company's job hierarchy.
Reorganizing the OSM Chart using Cut and Paste OptionsReorganizing the OSM Chart using Cut and Paste Options
In
evaluating the OSM tree, you notice that a change needs to
be made to the reporting relationship of an employee. The
new manager is many levels below the current manager on your
screen, therefore, the cut and paste feature would be the
simplest way to make the change to the reporting relationship. |
To reorganize the OSM tree using cut and paste options:
1. Locate the employee you would like to move from the OSM tree.
2. Click the arrow next to the employee's name and select the Cut Position from the Position OptionsPosition Options drop-down menu.
The position is copied to your clipboard.
3. Locate the manager to which you would like the employee you just selected to report from the OSM tree.
4. Click the arrow next to the manager's name and select the Paste Position from the Position OptionsPosition Options drop-down menu.
A confirmation dialog will display.
Notes:
Moving an employee in the OSM tree will also move all employees reporting to that employee.
You must click directly on the Folder icon to drag and drop.
5. If the move is correct, click the OK button.
If you have multiple OSM trees, a confirmation dialog will display asking you if you would like to apply this change to other OSM trees as well. If you wish to apply the change to other OSM trees as well, click the OK button.
Note: Clicking the Cancel button will only prevent the current change from being applied to other OSM trees. Regardless of whether you select the OK button or Cancel button, the change will still be applied to the OSM tree you are currently viewing.
Result: The employee (and all employees reporting to that employee) are moved to the new location in the OSM tree, and the OSM tree updates to display the change.
Removing Employees from PositionsRemoving Employees from Positions
In
working with the reorganization parameters, you would like
to remove employees from their positions to determine the
structure of the company after the employees have been removed.
By using the holding place of Employees without Positions,
you will be able to remove the employee names from their positions
and hold them in a folder for later use. |
To remove an employee from a position in the OSM tree:
1. Locate the employee you would like to move from the OSM tree.
2. Click the arrow next to the employee's name and select the Cut Position from the Position OptionsPosition Options drop-down menu.
The position is copied to your clipboard.
3. Click on the corresponding arrow in the Employees Without Positions section and select the Paste Position option from the Position OptionsPosition Options drop-down menu.
Result: The employee is moved to the Employees Without Positions box. The employee remains in this box until you assign the employee to a position within the OSM tree.
Removing Supervisors (and Employees) from PositionsRemoving Supervisors (and Employees) from Positions
In
working with the reorganization parameters, you would like
to leave a supervisor's organization intact, but temporarily
remove them from the OSM tree. By using the holding
place of Supervisors without Positions, you will be able to
remove the employee names from their positions and hold them
in a folder for later use. |
To remove a supervisor (and all reporting employees) from a position in the OSM tree while retaining the employee reporting hierarchy beneath that supervisor:
1. Locate the employee you would like to move from the OSM tree.
2. Click the arrow next to the employee's name and select the Cut Position from the Position OptionsPosition Options drop-down menu.
The position is copied to your clipboard.
3. Click on the corresponding arrow in the Unassigned Employees in Positions section and select the Paste Position option from the Position OptionsPosition Options drop-down menu.
Result: The supervisor (and all reporting employees) are moved to the Unassigned Employees in Positions box. The reporting hierarchy for all employees reporting to the supervisor is retained. The supervisor (and all reporting employees) remain in this box until you assign them to a position within the OSM tree.
Removing Unfilled PositionsRemoving Unfilled Positions
In
working with the reorganization parameters, you have several
TBH positions that you would like to remove from the OSM tree
so that you will be able to view the organization with viewing
the TBH positions. By placing these positions in the holding
area of "Removing Unfilled Positions" you will be
able to hold them for future use after evaluation. |
To remove an unfilled position from the OSM tree:
1. Locate the employee you would like to move from the OSM tree.
2. Click the arrow next to the employee's name and select the Cut Position from the Position OptionsPosition Options drop-down menu.
The position is copied to your clipboard.
3. Click on the corresponding arrow in the Positions without Subordinates section and select the Paste Position option from the Position OptionsPosition Options drop-down menu.
Result: The position is moved to the Positions Without Subordinates box. The position remains in this box until you add the position back into the OSM tree.
Adding Unfilled Positions to SupervisorsAdding Unfilled Positions to Supervisors
To add an unfilled position to a supervisor in the OSM tree:
1. Locate the unfilled position you would like to move from the Positions without Positions section.
2. Click the arrow next to the employee's name and select the Cut Position from the Position OptionsPosition Options drop-down menu.
The position is copied to your clipboard.
3. Click on the arrow next to the manager's name on the OSM tree and select the Paste Position option from the Position OptionsPosition Options drop-down menu.
Result: The unfilled position appears in the OSM tree and now reports to the supervisor you selected. You may now assign employees to the position as necessary.
Assigning Employees to Unfilled PositionsAssigning Employees to Unfilled Positions
To add a supervisor (and all reporting employees) to a supervisor in the OSM tree:
1. Locate the manager you would like to move from the Unassigned Employees in Positions section and place on the OSM tree.
2. Click the arrow next to the manager's name and select the Cut Position from the Position OptionsPosition Options drop-down menu.
The position is copied to your clipboard.
3. Click on the arrow next to the manager's name on the OSM tree and select the Paste Position option from the Position OptionsPosition Options drop-down menu.
Result: The supervisor you selected (and all their reporting employees) appear in the OSM tree and now report to the supervisor you selected.
Working with Positions in the OSM Tree
You my add, edit, or delete positions on the OSM chart for the 'What If' scenario.
Adding Jobs (Positions)Adding Jobs (Positions)
In
working with the reorganization parameters, you will be adding
several new positions to your organization. By adding these
positions to the OSM tree, you will be able to show the recruiting
pipeline as well as easily fill the positions when you are
ready to complete a New Hire EAN. |
To add a new position to the OSM tree:
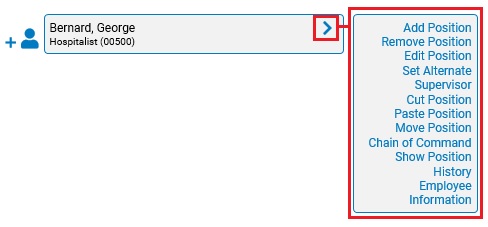
1. Locate the employee who will manage the position from the OSM tree.
2. Click the arrow next to the manager's name and select the Add Position option from the Position drop-down menuPosition drop-down menu.
The Add PositionAdd Position window displays.
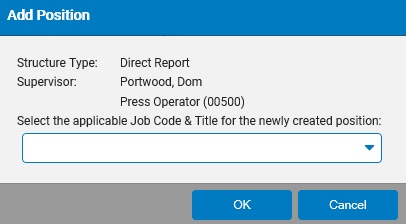
3. Select a job code for the new position from the Job Code drop down box.
4. Click the OK button.
The Confirm Supervisor Selections page displays.
5. If necessary, change the Direct Report or Time Clock supervisor for the position.
To Select a New Direct Report SupervisorTo Select a New Direct Report Supervisor
To select a new Direct Report Supervisor for the position:
1. Click the Change SupervisorChange Supervisor button in the Direct Report column.

The OSM page displays allowing you to select a new supervisor.
2. Select the new Direct Report Supervisor from the list of employees in the OSM tree.
3. Click the OK button.
The Confirm Supervisor selections page displays and the new supervisor is now listed.
To Select a New Time Clock SupervisorTo Select a New Time Clock Supervisor
To select a new Time Clock Supervisor for the position:
1. Click the Change SupervisorChange Supervisor button in the Time Clock column.
The OSM displays allowing you to select a new supervisor.
2. Select the new Time Clock Supervisor from the list of employees in the OSM tree.
3. Click the OK button.
The Confirm Supervisor Selections page displays and the new supervisor is now listed.
Note: The default supervisor for both positions is the employee you selected earlier.
6. After changing supervisors as necessary, click the Save & Return to OSMSave & Return to OSM button.

Result: A new, empty position is created in the OSM tree under the selected employee. You may leave the position empty until it is filled or assign an employee to it by editing the position.
Editing Jobs (Positions)Editing Jobs (Positions)
One
of the positions in your organization will be reclassified
as part of the reorganization. You may edit the position to
reflect the appropriate job code without removing the individual
from the current position. |
To edit a position in the OSM tree:
1. Locate the position you wish to edit from the OSM tree.
2. Click the arrow next to the position and select the Edit Position option from the Position drop-down menuPosition drop-down menu.
The Edit PositionEdit Position window displays.
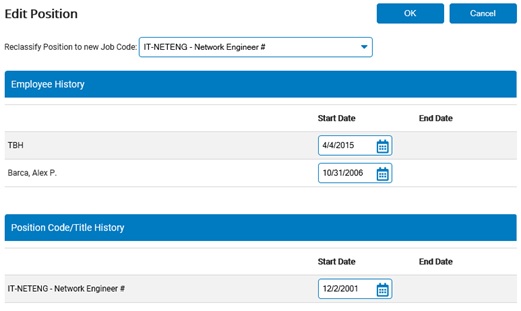
3. Edit position information as necessary.
Note: You may change the job code for the position as well as the start date and/or termination date for the employee who currently holds the position.
4. When done editing the position, click the OK button.
Result: Your changes to the position are saved and the Organizational Structure Management (OSM) page displays.
Deleting Jobs (Positions)Deleting Jobs (Positions)
After
removing an employee from a position due to a reorganization,
you will have the ability to delete the position so that it
will not appear as a TBH in the reorganization structure. |
To delete a position to the OSM tree:
1. Locate the position you wish to edit from the OSM tree.
2. Click the arrow next to the position and select the Remove Position option from the Position drop-down menuPosition drop-down menu.
A confirmation window displays.
3. Click the OK button to remove the position.
Result: The position you removed is deleted, and the OSM tree updates to show the position no longer exists.
Note: You may click the Cancel button to avoid removing the position.
Related Help Topics:
Applying 'What If' Scenarios to OSM Trees