
In order to get the Performance Review Process off to a start, you will need to create the corporate and group schedules for use during the review process. This will determine some key elements of the review process including:
The Review Year to be used
When the Draft and Approval Process will begin
When Reviews will be presented to the employees
You will have the ability to create a schedule to be used for the entire company, or you can create separate schedules for groups of employees within your organization. This will allow you to administer reviews at the appropriate time for each employee.
Note: To exclude an employee from the Performance Management utility so they will not belong to any corporate or group schedule, create a Change Employment Information EAN for them and select Yes in the Exclude from Performance Mgmt drop-down box.
To create a new Standard Corporate Schedule for performance reviews:
1. On the Menu, click HR Administration > Performance ManagementHR Administration > Performance Management.
The Performance ManagementPerformance Management page displays.
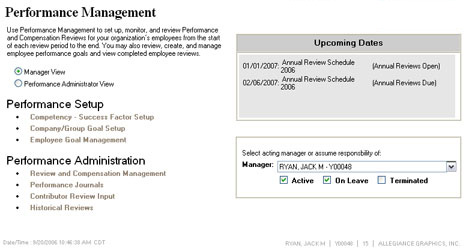
2. Select the Performance Administrator ViewPerformance Administrator View radio button.
![]()
New options display on the page.
Note: If you do not have Performance Administrator rights, this radio button will not be visible.
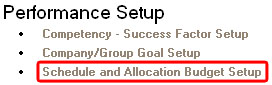
3. Click the Schedule and Allocation Budget SetupSchedule and Allocation Budget Setup link under Performance Setup.
The Schedule and Allocation Budget SetupSchedule and Allocation Budget Setup page displays.
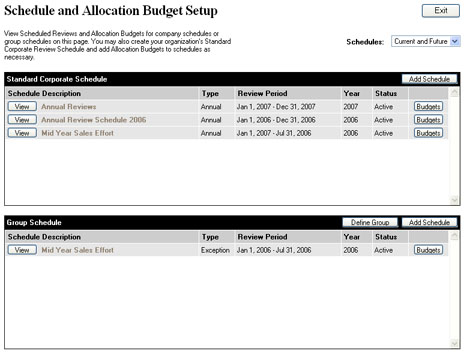
4. Click the Add Schedule button on the Standard Corporate Schedule table.
The Standard Corporate Schedule SetupStandard Corporate Schedule Setup page displays.
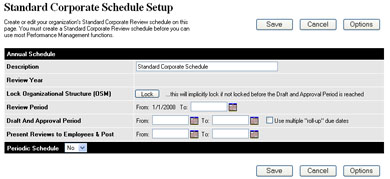
5. If necessary, enter a new descriptive name for the schedule in the DescriptionDescription text box.
![]()
Notes:
By default, the schedule will be called Standard Corporate Schedule.
The Review Year field will be set automatically based on your current settings, which are set by ExponentHR when activating performance management functions for your organization.
6. If you want to lock the org chart now (rather than having it lock just prior to the Draft and Approval period), click Lock.
7. Enter an end date (the end of the time period which the upcoming employee reviews will cover) for the review schedule in the Review Period To:Review Period To: text box.
![]()
Notes:
The start date for the review schedule is set automatically when ExponentHR activates performance management functions for your organization.
A Standard Corporate Schedule must be in place for Performance Management to function. ExponentHR will automatically begin another review period with the same approximate duration the day after the End Date you designate.
You may also select the date from a calendar by clicking on the CalendarCalendar button.
![]()
8. Define the time period in which managers will be expected to complete reviews for their employees.
To define a single review period for all managers in your organization:
1. Enter a start date and end date for the review period in the Draft and Approval PeriodDraft and Approval Period text boxes.
![]()
Note: You may also select the date from a calendar by clicking on the CalendarCalendar button.
![]()
To define a roll-up draft and approval period where each level of managers in your organization has a set time period to complete reviews:
1. Check the Use multiple "roll-up" due datesUse multiple "roll-up" due dates checkbox.
![]()
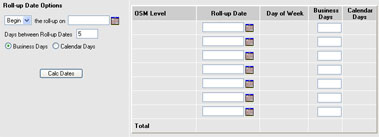
The Roll-Up Date OptionsRoll-Up Date Options table appears.
2. Enter a start date for the period in the Draft and Approval PeriodDraft and Approval Period text boxes.
![]()
Note: You may also select the date from a calendar by clicking on the CalendarCalendar button.
![]()
3. Select Begin or End from the Roll-Up Date OptionsRoll-Up Date Options drop-down box.
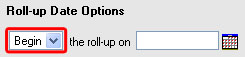
This will designate whether the date you enter in step 4 is the start or end of the draft and approval periods.
4. Enter a date to begin or end the series of draft and approval periods in the Roll-Up Date Options Roll-Up Date Options textbox.

Note: You may also select the date from a calendar by clicking on the CalendarCalendar button.
![]()
5. Enter the number of days to allocate for each draft and approval period in the Days Between Roll-Up DatesDays Between Roll-Up Dates textbox.
![]()
Note:
Select the Business Days radio button to create the schedule in business days, adding in extra days to account for weekends and holidays.
Select the Calendar Days radio button to create the schedule in calendar days, without adding in any additional days to account for weekends or holidays.
6. Click the Calc DatesCalc Dates button.
![]()
Result: A schedule is generated starting or ending (designated in Step 3) on the date you entered (in Step 4) allowing the number of calendar days you entered (in Step 5) for each specific Draft and Approval period (with one period created for each level of manager in your organization).
Note: You may edit any of the automatically generated dates as necessary in the Roll-Up Date Options table.
The OSM must be locked before the Draft and Approval period begins. For more information, see Related Help Topics below.
9. Define the time period in which managers will be expected to present employee reviews to their employees in the Present Reviews to Employees & PostPresent Reviews to Employees & Post text boxes.
![]()
Note: You may also select the date from a calendar by clicking on the CalendarCalendar button.
![]()
10. Define this schedule as either an annual schedule (one review period each year) or a periodic schedule (one review each quarter, multiple reviews throughout the year).
Defining an Annual ScheduleDefining an Annual Schedule
Define an annual schedule if you want managers to review your organization's employees once per year (or schedule).
1. Select No from the Period SchedulePeriod Schedule drop-down box.
![]()
Result: This Standard Corporate Schedule will be used for an annual review schedule.
Defining a Periodic ScheduleDefining a Periodic Schedule
Define a periodic schedule if you want managers to review your organization's employees multiple times in the same year (or schedule), for example, once each quarter.
1. Select Yes from the Period SchedulePeriod Schedule drop-down box.
![]()
The Periodic SchedulePeriodic Schedule table displays.
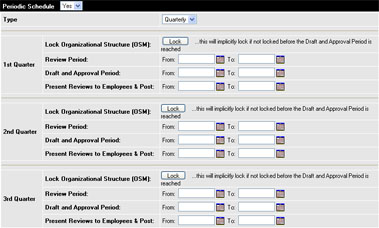
2. Select a periodic schedule type (quarterly or mid-year) from the TypeType drop-down box.
![]()
The Periodic Schedule table updates to display dates for all applicable review periods.
Note: You may lock the OSM for individual Review Periods if necessary, or ExponentHR may lock the OSM automatically. For more information, see Related Help Topics at the bottom of this page.
3. Enter the start and end dates for the first Review Period within the Standard Corporate Schedule in the Review PeriodReview Period text boxes.
![]()
Notes:
The start and end dates for all Review Periods in a periodic schedule must fall within the Standard Corporate Schedule.
Review Periods may not overlap with other Review Periods within the Standard Corporate Schedule.
You may select the dates by clicking the CalendarCalendar button, if necessary.
![]()
4. Enter the start and end dates for the Draft and Approval period within the first Review Period in the Draft and Approval PeriodDraft and Approval Period text boxes.
![]()
Note: You may select the dates by clicking the CalendarCalendar button, if necessary.
![]()
5. Enter the start and end dates for the Review Presentation Period in the Present Reviews to Employees & PostPresent Reviews to Employees & Post text boxes.
![]()
Notes:
The start and end dates for the Review Presentation Period must take place after the Draft and Approval period (specified in step 4) closes.
You may select the dates by clicking the CalendarCalendar button, if necessary.
![]()
6. Repeat steps 3 to 5 for each additional Review Period falling within the Standard Corporate Schedule.
Result: This Standard Corporate Schedule will be used for a periodic review schedule, with each period taking place within the date ranges you specified in the steps above.
11. Click the SaveSave button.
![]()
Result: The Standard Corporate Schedule for your organization's employee reviews is saved. You and other managers may now use performance management functions to monitor employee performance throughout the year and complete employee reviews.
Related Help Topics: