
To assist with organizing business incurred expenses, each expense item is assigned to an expense category and account. These values are selected from a predefined drop-down list that is managed by your company's expense administrators.
Within the Expense Account Setup tool, expense administrators can:
Specify the types of reimbursable expenses available to your company's employees.
Allow employees to allocate reimbursable expenses to budgets set aside for specific company locations, departments, and projects, if necessary.
Set rates paid for mileage-based expense items.
The creation of the expense accounts is typically completed when the expense reimbursement tool is initially activated; however, administrators may choose to continue to add, edit, or inactivate categories/accounts, as needed.
To Manage Expense Reimbursement Setup:
1. On the Management Navigation Menu, click Wage & Tax > Expense ApprovalWage & Tax > Expense Approval.
The Expense ReimbursementsExpense Reimbursements page displays.
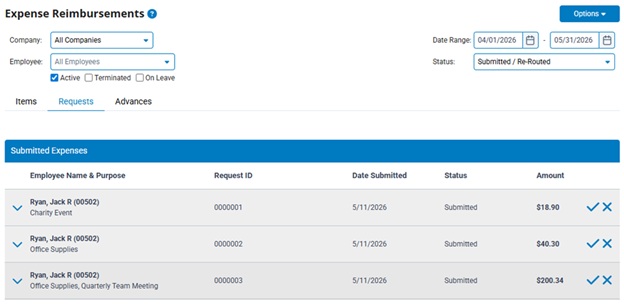
2. Select Expense Account Setup from the OptionsOptions drop-down menu.

The Expense Account SetupExpense Account Setup page displays.
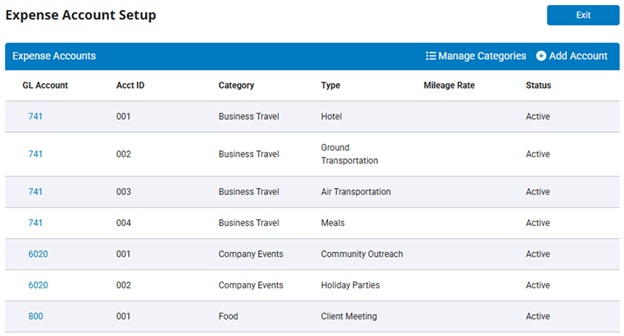
3. As necessary, add, edit, or inactivate expense categories.
Manage Expense CategoriesManage Expense Categories
1. Click the Manage CategoriesManage Categories button.

The Edit Expense CategoriesEdit Expense Categories page displays.
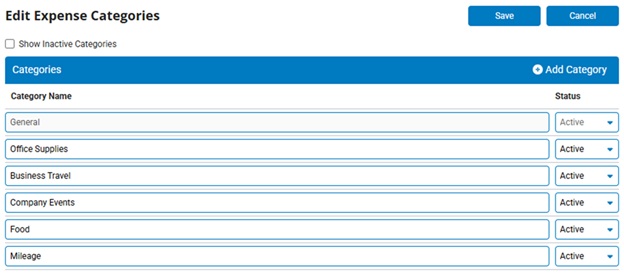
2. Click the Add CategoryAdd Category button.

A new category line appears at the bottom of the Category Name table.
3. Enter the name of the new expense category in the text box.
Note: You may inactivate any category by changing its status to Inactive. This will make the category unavailable to employees for selection. You may later change the status back to Active to allow employees to access it again by checking the Show Inactive Categories box and updating the status of the desired category.
4. Repeat steps 2 and 3 until you have added all necessary categories.
5. After adding categories as necessary, click the SaveSave button.
Result: Your categories are saved. The Expenses Account Setup page displays.
Your expense categories are saved.
4. Add new expense account (and assign these items to categories) as necessary.
Adding Expense AccountsAdding Expense Accounts
1. Click the Add AccountAdd Account button.

The Edit Expense AccountEdit Expense Account page displays.
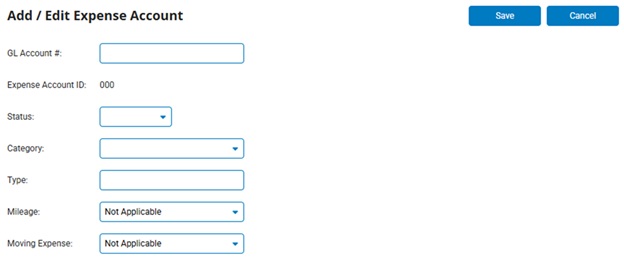
2. Enter the General Ledger account number associated with reimbursements for the expense you are setting up in the GL Account # field.
Notes:
3. Select whether to make the new account initially Active or Inactive in the Status drop-down box.
4. Select the category for this expense from the Category drop-down box.
Note: You must create expense categories before you can assign them to expense items.
5. Enter the type of expense in the Type text box (for example: hotel, meals, and airfare might be accounts belonging to a "Business Travel" expense category).
6. If employees will use this expense account to request reimbursement for mileage accrued while traveling on company business, make the appropriate selection in the Mileage drop-down list and enter the amount to be paid for each reported mile (and the effective date associated with the rate). If the rate is set to or has already changed, click the Add Mileage Rate button to enter the new rate and its effective date.
Notes:
7. If employees will use this expense to request reimbursement for moving expenses, select Taxable or Nontaxable from the Moving Expense drop-down list.
Notes:
8. After entering all necessary fields, click the Save button.
Result: Your new expense item is saved. The Expenses Account Setup page displays.
Your expense accounts are saved.
5. Change the sort order of the expense accounts, if necessary.
Changing the Order of Expense AccountsChanging the Order of Expense Accounts
The expense accounts can be rearranged so that they are displayed to users in a preferred sort. This is done using a drag-and-drop method.
1. Click the drag handle icon ( ) on the expense account row you are wanting to move.
Note: The icon is located to the left of the GL Account value and will appear when hovering over it.
2. While holding down the drag handle icon, drag the expense account to the new desired placement within the list.
Result: The Expense Account Setup page displays, with the new sort order.
6. After creating all necessary expense categories and expense types, click the Exit button.
Result: You have now set up categories and expense accounts for which employees at your company may request reimbursement. You may edit these categories and accounts as necessary as your company's policies change.
Related Help Topics:
Company Configuration - Expense Reimbursements
Administrative Configuration of User Options and Default Settings