The OSM utility provides a management tool for the designation of positional relationships between employees and supervisors. Changes to employee positions and/or supervisors can be completed through an EAN change request or directly through this OSM utility.
All employees must be included in the Direct Report OSM tree structure. Optionally, a separate reporting structure may be maintained for Time Reporting (Time Approval) and Performance Management (Employee Performance Reviews).
The preferred method for working with OSM is to create a 'What If' scenario, make changes to the scenario until you are happy with the results, then apply the 'What If' scenario to the live tree. See Related Help Topics for more information.
ALERT: Any changes you make to the Organizational Management Chart will take effect immediately. Do not make changes to the live OSM tree unless you want the change to be applied immediately.
To view the OSM tree:
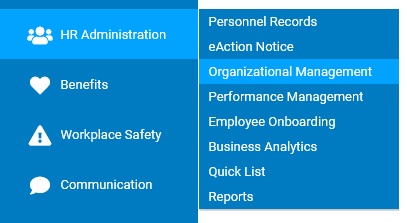
On the Management Navigation Menu, click HR Administration> Organizational ManagementHR Administration> Organizational Management.
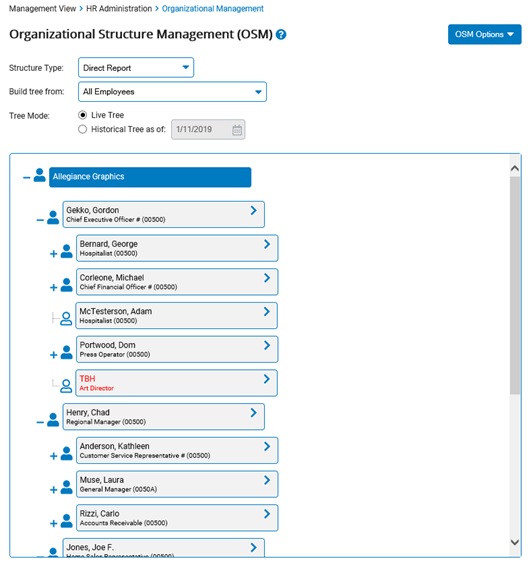
Result: The Organizational Structure Management (OSM)Organizational Structure Management (OSM) page displays. If equipped with the appropriate ExponentHR access rights, you may make a number of changes to OSM trees from this screen, listed below.
Changing the OSM Tree View
You may change how the OSM tree displays and which OSM tree displays.
Changing OSM Tree And HierarchyChanging OSM Tree And Hierarchy
You may maintain both a Direct Report OSM tree and a Time Clock Reporting tree. You may also build the OSM tree from a specific employee or view an archived version.
As
part of your organizational hierarchy, you have two reporting
structures, the Direct Report tree and the Time Clock Supervisor
tree. By loading the Direct Report tree, you may view the
reporting relationship that exists between members of your
organization. You may also view the individuals responsible
for time keeping activities (paid leave reporting and time
clock review) for members of your organization. |
To change an OSM tree:
1. Select the OSM tree you want to view (Direct Report or Time Clock) from the Structure TypeStructure Type drop-down box.

The OSM tree you selected displays.
2. You may change how much of the selected OSM tree displays by selecting an employee from the Build Tree FromBuild Tree From drop-down box.

The selected OSM tree updates to show the employee you selected and all employees who report to that person only.
3. You may display a previous version of the selected OSM tree instead of the current (Live) tree by selecting the Historical Tree as ofHistorical Tree as of radio button and entering a date in the text box.

The OSM tree will appear as it did on the date you specified, and will not reflect changes made since that date.
Note: To display the current (Live) tree, leave the Live TreeLive Tree radio button selected.

Result: The OSM tree updates to display based on the options you selected.
When selecting the Restore Default Tree State feature in the OSM Options list, the view of the OSM tree will automatically refresh and display the initial view of the OSM tree per the default display options (which can be set up through the OSM Options).
Changing Display Options for OSM TreesChanging Display Options for OSM Trees
You may change how the currently displayed OSM tree is presented, if necessary.
In
viewing the OSM tree, you often need to look up employee information
to ensure employees are assigned to the proper managers in
the OSM tree. Rather than viewing each employee's record separately
from the OSM tree, you may activate the display options and
turn on the employment fields. This allows you to view more
detailed information about each employee as you mouse over
the employee's name. |
1. Select Display Options from the OSM OptionsOSM Options button.
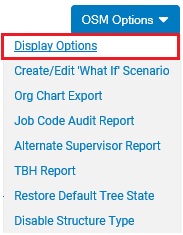
The Display OptionsDisplay Options pop up window displays.
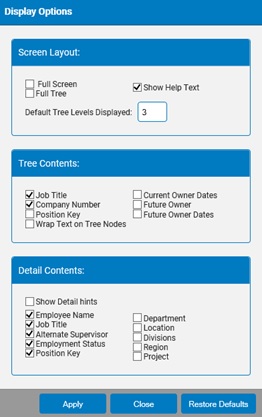
2. You may change how the Organizational Structure Management (OSM) page displays, if necessary.
To enlarge the page to fill the entire screen, check the Full Screen text box.
To enlarge the OSM tree box to show the entire OSM tree (without a scrollbar), check the Full Tree text box.
To remove the help text from the top of the page, uncheck the Show Help Text checkbox.
3. You may change the information displayed for each employee in the OSM tree, if necessary.
To remove the employee's job title from the OSM view, uncheck the Job Title checkbox.
To display the date when the listed employee started in the position, check the enlarge the OSM view to show the entire OSM tree (without a scrollbar), check the Current Owner Dates text box.
To display the name of a future employee that will replace the employee currently in the position, check the Future Owner checkbox (if there is no future employee scheduled to start in this position, no information will display).
To display the date a future employee will replace the employee currently in the position, check the Future Owner Dates checkbox (if there is no future employee scheduled to start in this position, no information will display).
If you would like the displayed text to wrap so as to take up less horizontal space, check the Wrap Text on Tree Nodes checkbox.
4. If you would like to view employee detail pop ups in the OSM tree, first check the Show Detail Hints checkbox, then check additional checkboxes as necessary.
Check the Employee Name checkbox to show the employee's name in the pop up.
Check the Job Title checkbox to show the employee's job title in the pop up.
Check the Alternate Supervisor checkbox to show the employee's alternate supervisor in the pop up (if one exists).
Check the Employment Status checkbox to show the employee's employment status in the pop up.
Check the Department checkbox to show the employee's department in the pop up.
Check the Location checkbox to show the employee's location in the pop up.
Check the Position Key checkbox to show the positions unique number identifier that is systematically generated for each newly created position on the OSM tree.
When you mouse-over any employee in the OSM tree, a detailed pop up displays the information you checked for that employee.
5. After checking or unchecking boxes as necessary, click the Apply button.
Result: The way the Organizational Structure Management (OSM) page displays changes based on the display options you selected.
When selecting the Restore Default Tree State feature in the OSM Options list, the view of the OSM tree will automatically refresh and display the initial view of the OSM tree per the default display options (which can be set up through the OSM Options).
Reorganizing the OSM Tree
You may reorganize the OSM tree if necessary to reflect changes in your company's job hierarchy.
Reorganizing the OSM Chart using Cut and Paste OptionsReorganizing the OSM Chart using Cut and Paste Options
In
evaluating the OSM tree, you notice that a change needs to
be made to the reporting relationship of an employee. The
new manager is many levels below the current manager on your
screen, therefore, the cut and paste feature would be the
simplest way to make the change to the reporting relationship. |
To reorganize the OSM tree using cut and paste options:
1. Locate the employee you would like to move from the OSM tree.
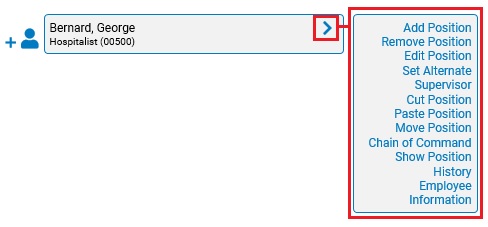
2. Click the arrow next to the employe's name and select the Cut Position option from the Position drop-down menuPosition drop-down menu.
The position is copied to your clipboard.
3. Locate the manager to which you would like the employee you just selected to report from the OSM tree.
4. Click on the arrow next to the manager's name and select the Paste Position option from the Position drop-down menuPosition drop-down menu.
A confirmation dialog will display.
Note: Moving an employee in the OSM tree will also move all employees reporting to that employee.
5. If the move is correct, click the OK button.
If you have multiple OSM trees, a confirmation dialog will display asking you if you would like to apply this change to other OSM trees as well. If you wish to apply the change to other OSM trees as well, click the OK button.
Note: Clicking the Cancel button will only prevent the current change from being applied to other OSM trees. Regardless of whether you select the OK button or Cancel button, the change will still be applied to the OSM tree you are currently viewing.
Result: The employee (and all employees reporting to that employee) are moved to the new location in the OSM tree, and the OSM tree updates to display the change.
Working with Positions in the OSM Tree
You may add, edit, or delete positions on the OSM chart.
Adding Jobs (Positions)Adding Jobs (Positions)
You
have received a recruiting request from one of your managers
to add several new positions to their team. By adding
these positions to the OSM tree, you will be able to show
the recruiting pipeline as well as easily fill the positions
when you are ready to complete a New Hire EAN. |
To add a new position to the OSM tree:
1. Locate the employee who will manage the position from the OSM tree.
2. Click the arrow next to the manager's name and select the Add Position option from the Position drop-down menuPosition drop-down menu.
The Add PositionAdd Position window displays.
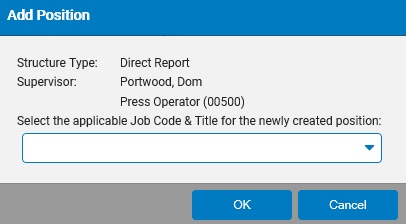
3. Select a job code for the new position from the Job Code drop down box.
4. Click the OK button.
The Confirm Supervisor Selections page displays.
5. If necessary, change the Direct Report or Time Clock supervisor for the position.
To Select a New Direct Report SupervisorTo Select a New Direct Report Supervisor
To select a new Direct Report Supervisor for the position:
1. Click the Change SupervisorChange Supervisor button in the Direct Report column.

The OSM page displays allowing you to select a new supervisor.
2. Select the new Direct Report Supervisor from the list of employees in the OSM tree.
3. Click the OK button.
The Confirm Supervisor selections page displays and the new supervisor is now listed.
To Select a New Time Clock SupervisorTo Select a New Time Clock Supervisor
To select a new Time Clock Supervisor for the position:
1. Click the Change SupervisorChange Supervisor button in the Time Clock column.
The OSM displays allowing you to select a new supervisor.
2. Select the new Time Clock Supervisor from the list of employees in the OSM tree.
3. Click the OK button.
The Confirm Supervisor Selections page displays and the new supervisor is now listed.
Note: The default supervisor for both positions is the employee you selected earlier.
6. After changing supervisors as necessary, click the Save & Return to OSMSave & Return to OSM button.

Result: A new, empty position is created in the OSM tree under the selected employee. You may leave the position empty until it is filled or assign an employee to it by editing the position.
Editing Jobs (Positions)Editing Jobs (Positions)
One
of the TBH positions in your organization will be filled by
a lower job classification than the individual that held the
position before. In order to ensure that the next employee
is correctly classified into the role they will fill, you
may edit the position to reflect the appropriate job code
that the position will hold. |
To edit a position in the OSM tree:
1. Locate the position you wish to edit from the OSM tree.
2. Click the arrow next to the position and select the Edit Position option from the Position drop-down menuPosition drop-down menu.
The Edit PositionEdit Position window displays.
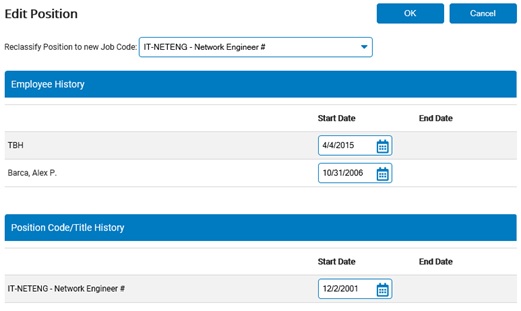
3. Edit position information as necessary.
Note: You may change the job code for the position as well as the start date and/or termination date for the employee who currently holds the position.
4. When done editing the position, click the OK button.
Result: Your changes to the position are saved and the Organizational Structure Management (OSM) page displays.
Deleting Jobs (Positions)Deleting Jobs (Positions)
An
employee in your organization has been terminated. As a result
their position now appears as a TBH in the OSM tree. After
evaluating the employee's job functions, the manager of this
group has decided that the position does not need to be filled.
By deleting the position from the OSM, you will show an accurate
recruiting pipeline in the OSM tree. |
To delete a position to the OSM tree:
1. Locate the position you wish to edit from the OSM tree.
2. Click the arrow next to the position and select the Remove Position option from the Position drop-down menuPosition drop-down menu.
A confirmation window displays.
3. Click the OK button to remove the position.
Result: The position you removed is deleted, and the OSM tree updates to show the position no longer exists.
Note: You may click the Cancel button to avoid removing the position.
Other OSM Tree Functions
The OSM tree provides additional functionality, listed below.
Setting an Alternate Supervisor for an EmployeeSetting an Alternate Supervisor for an Employee
In some cases, it may be necessary to set an alternate supervisor for an employee.
One of your managers is on extended leave of absence, or is no longer employed with your organization, leaving the former manager's position vacant. ExponentHR will automatically assume that the next level manager will take over the management responsibilities of the lower team that now report to the vacant position. However, if
it is desired to supersede this and have another peer manager
be responsible for monitoring the employees who now report
to the vacant position instead, an alternate supervisor can
be assigned. By setting the peer manager as an
alternate supervisor, the correct manager will have access
to the employees for management purposes until the primary
manager returns from "On Leave" status or the vacant
position is filled. |
To select an alternate supervisor for an employee in the OSM tree:
1. Locate the position for which you wish to assign an alternate supervisor in the OSM tree (for instances when the position is either unfilled or assigned to a manager in "On Leave" employment status).
2. Click the arrow next to the manager's name and select the Set Alternate Supervisor option from the Position drop-down menuPosition drop-down menu.
The Set Alternate SupervisorSet Alternate Supervisor window displays.
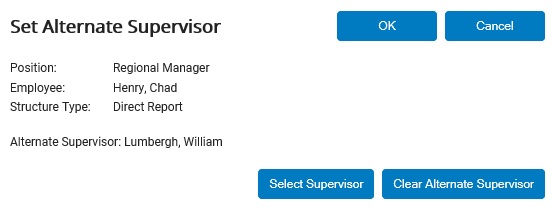
Note: If the employee has an existing alternate supervisor, you may click the Clear Alternate SupervisorClear Alternate Supervisor button to remove the supervisor.
![]()
3. Click the Select SupervisorSelect Supervisor button in the Direct Report column.

The OSM window displays.
4. Select the alternate supervisor from the list of employees in the OSM tree.
5. Click the OK button.
A confirmation window displays.
6. Click the OK button to confirm your selection.
Result: The employee you selected from the Select New Supervisor window is assigned as the alternate supervisor for the employee you selected from the OSM tree.
Note: You may click the Cancel button to abort the selection of the new alternate supervisor.
Exporting OSM TreesExporting OSM Trees
You may export a copy of any of your company's OSM trees in Excel format, and then import this information into a third party organizational management tool so you can reformat it into an org chart.
Your
organization is presenting an Organizational Chart to your
board of directors. To ensure that the Org Chart is up-to-date
with the correct employee names and titles, you can export
the OSM tree from ExponentHR into Excel and then import it
into another third party tool. |
To export a copy of your company's OSM tree:
1. Select the OSM tree you would like to export from the Structure TypeStructure Type drop-down box.
The OSM tree you selected displays.
Note: The Time Clock OSM tree and Performance Management OSM tree will be identical to your Direct Report OSM tree unless you have implemented a separate tree. for either one.
2. If necessary, change how much of the OSM tree displays by selecting an employee from the Build Tree FromBuild Tree From drop-down box.
The OSM tree updates to show the employee you selected and all employees who report to that person.
3. If you want to display a previous version of the OSM tree instead of the current (Live) tree, select the Historical Tree as ofHistorical Tree as of radio button and enter a date in the text box.
The OSM tree will appear as it did on the date you specified, and will not reflect changes made since that date.
Note: To display the current (Live) tree, leave the Live TreeLive Tree radio button selected.
4. After changing OSM tree display options as necessary, select Org Chart Export from the OSM OptionsOSM Options button.
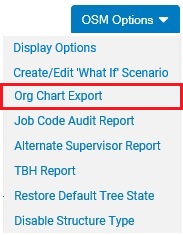
A File Download window displays. Click the file name and select a folder in which to save the Excel file. An Excel export of the displayed OSM tree is saved to the folder you specified.
Disabling Structure Type for a TreeDisabling Structure Type for a Tree
In addition to the employee hierarchy saved in your Direct Report OSM tree, ExponentHR allows you to maintain a separate employee hierarchy in both the Time Clock OSM tree and Performance Management OSM tree, if necessary.
If at any time you wish to disable the separate OSM tree and revert either the Time Clock OSM tree or Performance Management OSM tree to the structure of the Direct Report OSM tree, you may disable structure type for the OSM tree.
To disable either the Time Clock OSM tree or Performance Management OSM tree:
1. Select the OSM tree you would like to disable from the Structure TypeStructure Type drop-down box.
The OSM tree you selected displays.
2. Select Disable Structure Type from the OSM OptionsOSM Options button.
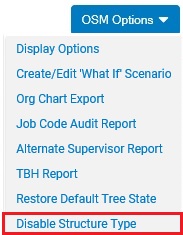
A confirmation window displays.
3. If you want to disable the selected OSM tree, click the OK button.
Result: The selected OSM tree now has an employee hierarchy identical to the employee hierarchy specified in the Direct Report OSM tree.
Notes:
This will delete all separate employee hierarchy information saved in the selected OSM tree. This information may not be recovered.
If you initialize a new OSM tree after disabling it, the OSM tree will be based on the Direct Report OSM tree and not on the information in the tree before you disabled it.
Related Help Topics:
Using the Performance Management Tree
Related Help Topics:
Using the Performance Management Tree