In certain cases, managers may need to change an employee's direct deposit information on behalf of the employee.
Note on Completion: After the EAN is submitted to ExponentHR, it will immediately complete unless:
The EAN is Approved during a scheduled Payroll Processing Period.
A pre-note verification is required. (The Pending EAN will display an effective date, which is based on the number of business days required to complete the Pre-Note validation.)
An earlier EAN for the same employee is pending.
To check the expected completion date for the EAN, refer to the eAction Notice (EAN) Details page for the EAN. See the Related Help Topic.
To edit direct deposit settings for an employee:
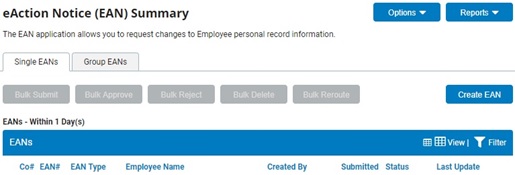
1. On the Menu, click HR Administration > eAction NoticeHR Administration > eAction Notice.

The eAction Notice (EAN) SummaryeAction Notice (EAN) Summary page displays.

2. Click the Create EANCreate EAN button.

The Create New EAN(s)Create New EAN(s) window displays.

3. Select the employee whose direct deposit information you want to change from the Employee drop-down box.
4. Select the Direct Deposit Authorization EAN from the EAN type selection box and click the Create EAN button.
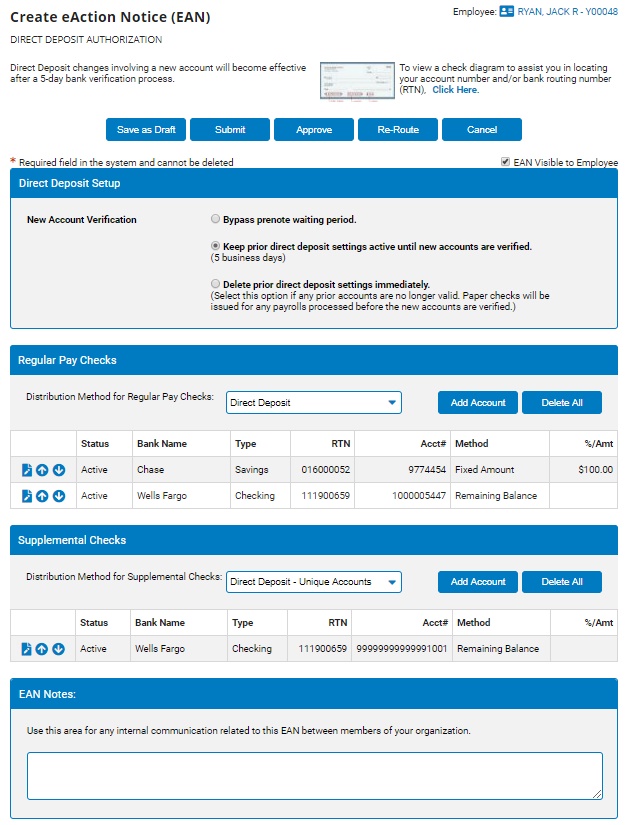
The Direct Deposit AuthorizationDirect Deposit Authorization page for the employee you selected displays in a new window.

5. Designate whether or not the EAN will be visible to the employee from the EAN Visible to EmployeeEAN Visible to Employee check box.

Note: If you check the box, the employee can see that you have submitted a change to their direct deposit information.
6. In the Direct Deposit Setup area, choose the option for new account verification:
Bypass prenote waiting period. The new direct deposit information takes effect immediately upon completion of the EAN. (The prior direct deposit settings are discarded.)
Keep prior direct deposit settings active until new accounts are verified. The old direct deposit information remains in effect until the new account is verified (in about 5 business days).
Delete prior direct deposit settings immediately. Paper checks will be issued in lieu of direct deposit until the new account is verified (in about 5 business days). (If the pre-note fails, the prior direct deposit settings will be maintained indefinitely.)
7. Specify how the employee's regular payroll checks should be distributed by selecting Direct Deposit or Paper Check from the Distribution Method for Regular Payroll Checks drop-down box.
8. If you selected Direct Deposit, add as many bank accounts as necessary for direct deposit of regular payroll checks.
Add bank accounts for regular payroll checksAdd bank accounts for regular payroll checks
1. Click the Add Account button in the Regular Payroll Checks area.
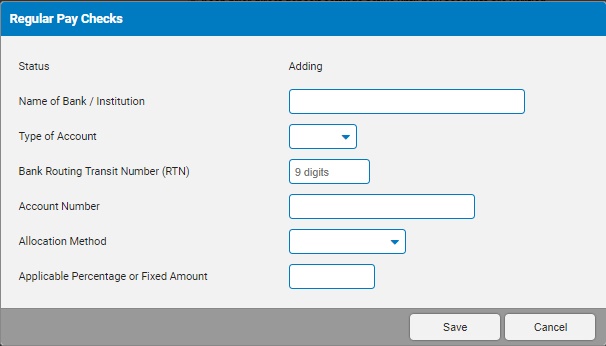
The Add Direct Deposit Account InformationAdd Direct Deposit Account Information box displays.

2. Type the name of the bank in the Name of Bank/Institution text box.
3. Select Checking, Savings, or Pay Card in the Type of Account drop-down box.
4. Type the bank's 9-digit RTN in the Bank Routing Transit Number (RTN) text box.
5. Type the account number.
6. Select Percentage, Fixed Amount, or Remaining Balance in the Allocation Method drop-down box.
Notes:
Only one account can have the Remaining Balance allocation method.
If you select Remaining Balance, the bank account will receive funds from the payroll check only if all other accounts have received sufficient funds to meet the set percentage or fixed amount allocation.
7. If you select Percentage or Fixed Amount, type the number in the Applicable Percentage or Fixed Amount text box.
8. Click the Save button.
Notes:
To inactivate an account, click the EditEdit button and select Inactive in the Status drop-down box. Making an inactive account active does not trigger pre-note validation again.
![]()
To arrange the order of the accounts such that one is funded before another, click the arrow buttons. The accounts will receive funding in the order they are listed (unless designated as Remaining Balance.)
9. Specify how the employee's supplemental payroll checks should be distributed by selecting Same as Regular Check, Direct Deposit - Unique Accounts, or Paper Check from the Distribution Method for Supplemental Checks drop-down box.
10. For direct deposit of supplemental checks in unique accounts, add as many bank accounts as necessary.
Add bank accounts for supplemental checksAdd bank accounts for supplemental checks
1. Click the Add Account button in the Supplemental Checks area.
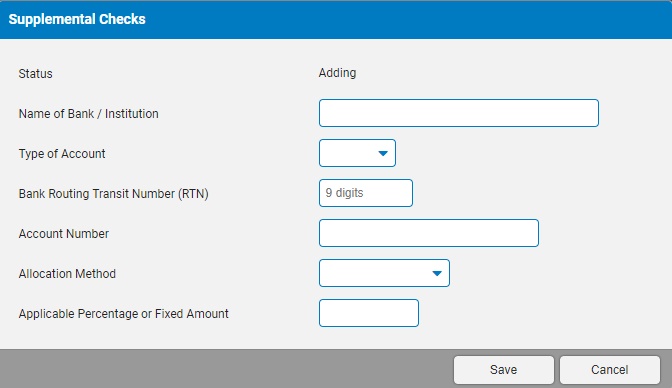
The Add Direct Deposit Account InformationAdd Direct Deposit Account Information box displays.

2. Type the name of the bank in the Name of Bank/Institution text box.
3. Select Checking, Savings, or Pay Card in the Type of Account drop-down box.
4. Type the bank's 9-digit RTN in the Bank Routing Transit Number (RTN) text box.
5. Type the account number.
6. Select Percentage, Fixed Amount, or Remaining Balance in the Allocation Method drop-down box.
Notes:
Only one account can have the Remaining Balance allocation method.
If you select Remaining Balance, the bank account will receive funds from the payroll check only if all other accounts have received sufficient funds to meet the set percentage or fixed amount allocation.
7. If you select Percentage or Fixed Amount, type the number in the Applicable Percentage or Fixed Amount text box.
8. Click the Save button.
11. Enter any notes related to the EAN in the EAN Notes text box.
12. Click the Save as DraftSave as Draft button at the top or bottom of the page to keep the requested change in a drafted status so that it may be edited and submitted for completion at a later time.

Note: When an EAN is put in a drafted status, a Draft EAN NoticeDraft EAN Notice with a link to the unsubmitted EAN is provided on the ExponentHR Dashboard.

13. After entering all necessary changes to the Direct Deposit Authorization EAN, click the Submit button to submit it for approval.
Result: The EAN you just created is now visible on the eAction Notice (EAN) Summary page. An HR administrator must approve the EAN and submit it to ExponentHR for completion. After the EAN is completed, the changes you made to the employee's direct deposition information are implemented in ExponentHR and the affected employee will be informed with a system-generated notification.
Notes: If you need multiple managers to review this EAN before you submit it, you may re-route the EAN. See Related Help Topics for more information.
Related Help Topics:
Checking the Expected Completion of an EAN