Managers may complete benefits enrollment for their new hires, if necessary.
One
of your newly hired employees does not have a computer at home,
and does not have access to a computer on his job site. In order
to enroll him correctly into the benefits options of your organization,
you may enroll (or edit a previous enrollment) on behalf of the
employee. |
To Enroll an Employee in Benefits:
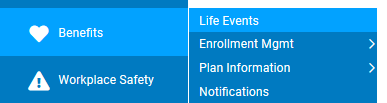
1. On the Management Navigation Menu, click Benefits > Life EventsBenefits > Life Events.
The Life EventsLife Events page displays, and the Pending Life Events table displays all pending life events for your employees.
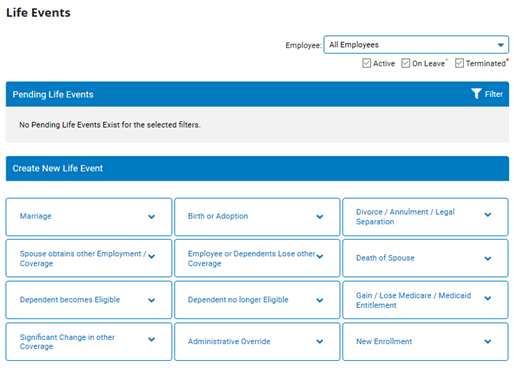
2. Select the employee whom you would like to enroll in benefits from the EmployeeEmployee drop-down box.

3. In the Create New Life Event section, select New Enrollment Life Event type..
The New Enrollment WizardNew Enrollment Wizard displays.
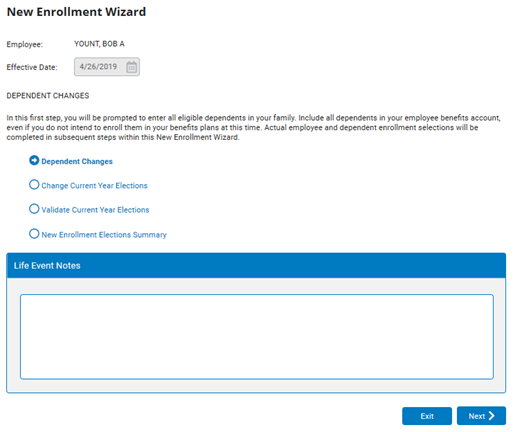
4. Enter any pertinent notes in the New Enrollment NotesNew Enrollment Notes text box.
5. Click the NextNext button.

The New Enrollment - Add Dependents page displays.
6. Add dependents, if necessary.
Adding DependentsAdding Dependents
1. Click the Add DependentAdd Dependent button.

The Add New DependentAdd New Dependent page appears.
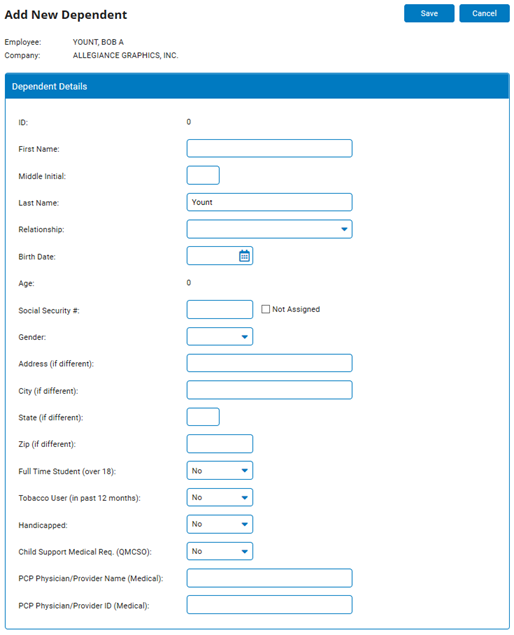
2. Complete the Dependent Details fields.
Note: You are required to provide First Name, Relationship, Birth Date, Gender and Social Security # at a minimum.
3. Click the SaveSave button.

The New Enrollment - Add Dependents page displays.
Notes: After you select the "OK" button on the dialog that displays, the Add Dependent process will delay your screen navigation for about 5 to 15 seconds while the system calculates eligibility for this new dependent. Please be patient; do not press the 'Save' button again.
4. Repeat steps 1 to 3 for each dependent you need to add, including your spouse and any children.
Note: The new dependent must be separately added to each applicable benefit plan through the Open Enrollment, New Enrollment, or Life Events functions.
7. Click the NextNext button.
The Life Event Wizard page displays. If applicable, enter any additional information in the New Enrollment Notes box.
8. Click the NextNext button.
The Medical Plans page displays.
9. Select the SelectSelect radio button by the medical plan in which you wish to enroll the employee from the Eligible Medical Benefits Options table.
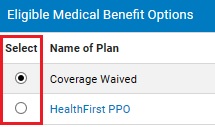
The Covered Persons table displays.
Note: Depending on the employee's tobacco status, the employee may only be eligible for certain plans. If you are unsure which medical coverage plan your company uses for smokers, contact your Benefits Administrator.
10. Check the Select checkbox next to each employee dependent you wish to include in the plan.
The dependents you selected will be enrolled in the medical plan you selected when you complete the wizard.
11. Click the Save and ContinueSave and Continue button.

The Dental Plans page displays.
12. Select the Select radio button by the dental plan in which you wish to enroll the employee from the Eligible Dental Benefits Options table.
The Covered Persons table displays.
13. Check the Select checkbox next to each employee dependent you wish to include in the plan.
The dependents you selected will be enrolled in the dental plan you selected when you complete the wizard.
14. Click the Save and ContinueSave and Continue button.
If your company offers a vision plan, the Vision Plans page displays.
15. If necessary, select the Select radio button by the vision plan in which you wish to enroll the employee from the Eligible Vision Benefits Options table.
The Covered Persons table displays.
16. Check the Select checkbox next to each employee dependent you wish to include in the plan.
The dependents you selected will be enrolled in the vision plan you selected when you complete the wizard.
17. Click the Save and ContinueSave and Continue button.
The Basic Life Election Details page displays. Review this information for accuracy.
Note: It is up to the employee to designate a primary beneficiary for their life insurance plan. Managers may not designate this beneficiary from the New Enrollment wizard. The Basic Life Election Details displays for informational purposes only.
18. If necessary, click the Override EOI and/or Age Reduction Coverage LimitsOverride EOI and/or Age Reduction Coverage Limits link.

The Basic Life Election Details page updates to Coverage Override mode, allowing you to change basic election information as necessary.
19. After reviewing the basic life election details, click the Save and ContinueSave and Continue button.
The Supplemental Life Election Details page displays. Review this information for accuracy.
Note: It is up to the employee to designate a primary beneficiary for their supplemental coverage plan. Managers may not designate this beneficiary from the New Enrollment wizard. The Supplemental Life Election Details displays for informational purposes only.
20. If necessary, click the Override EOI and/or Age Reduction Coverage LimitsOverride EOI and/or Age Reduction Coverage Limits link.
The Supplemental Life Election Details page updates to Coverage Override mode, allowing you to change supplemental election information as necessary.
21. After reviewing the supplemental life election details, click the Save and ContinueSave and Continue button.
The Supplemental Life Election Details page updates to display the first dependent for the employee you are enrolling in benefits.
22. If necessary, enter supplemental life elections for the employee's dependent in the Elected Annual Coverage field.
Note: Before proceeding to step 24, you must repeat steps 22 to 23 for each dependent the employee has included with their benefits coverage.
23. Click the Save and ContinueSave and Continue button.
The Long Term Disability page displays.
24. Review the information on the Long Term Disability page for accuracy. If more than one long term disability plan is available, select that plan from those listed.
The employee you are enrolling in benefits will be added to the Long Term Disability plan shown on this page when you complete the New Enrollment Wizard.
25. Click the Save and ContinueSave and Continue button.
The Short Term Disability page displays.
26. Review the information on the Short Term Disability page for accuracy. If more than one short term disability plan is available, select that plan from those listed.
The employee you are enrolling in benefits will be added to the Short Term Disability plan shown on this page when you complete the New Enrollment Wizard.
27. Click the Save and ContinueSave and Continue button.
The FSA Medical Plan page displays.
28. To enroll the employee in an FSA Medical benefits plan, enter the estimated eligible expenses in the Estimated Annual CostEstimated Annual Cost text boxes of the FSA Medical Plan worksheet.
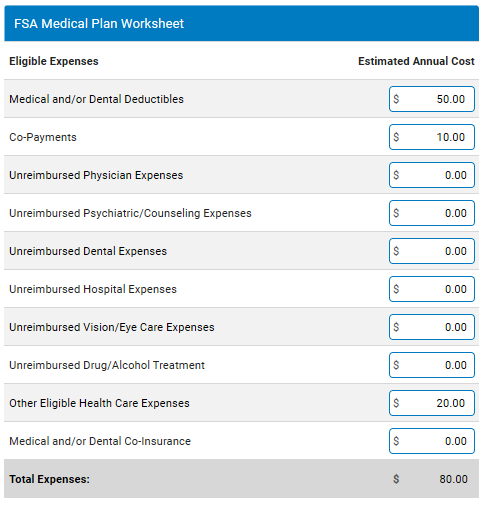
The total of all expenses displays in the Total Expenses text box of the FSA Medical Plan Worksheet.
Note: The worksheet is intended to total the amounts only, and does not assign the amount to be deducted as part of an FSA Medical Plan.
29. Enter the total from the Total Expenses text box in the Annual Contribution text box of the Eligible FSA Medical Benefits Options table.
The total amount that will be deducted from each of the employee's paychecks displays in the Deduction Per Paycheck field. This amount will be deducted from each employee pay check to finance the FSA Medical Plan.
30. Click the Save and ContinueSave and Continue button.
The FSA Dependent Care Plan page displays.
31. To enroll the employee's dependent in an FSA Dependent Care Plan, enter the estimated eligible expenses in the Estimated Annual Cost text boxes of the FSA Medical Care Plan worksheet.
The total of all expenses displays in the Total Expenses text box of the FSA Medical Plan Worksheet.
Note: The worksheet is intended to total the amounts only, and does not assign the amount to be deducted as part of an FSA Dependent Care Plan.
32. Enter the total from the Total Expenses text box in the Annual Contribution text box of the Eligible FSA Dependent Care Benefit Options table.
The total amount that will be deducted from each of the employee's paychecks displays in the Deduction Per Paycheck field. This amount will be deducted from each employee pay check to finance the FSA Dependent Care Plan.
33. Click the Save and ContinueSave and Continue button.
The New Enrollment - Current Year Elections page displays.
34. Review the benefits enrollments settings you have created for the employee. If you need to change any settings, click the Change button and make the appropriate changes.
35. When you are satisfied with employee benefits enrollment, click the NextNext button.
The New Enrollment Wizard page displays.
36. Enter any pertinent notes in the New Enrollment Notes text box.
37. Click the NextNext button.
38. After reviewing the benefits plans in which you have enrolled the employee, click the NextNext button.
The New Enrollment Wizard page displays.
39. Enter any pertinent notes in the New Enrollment Notes text box.
40. Click the NextNext button.
The New Enrollment Summary page displays.
41. If you are satisfied with the employee's benefits enrollments options, click the ApproveApprove button.

Result: A new Life Event EAN for the employee you selected is created and the Life Events page displays. The employee will now be enrolled in the benefits plans you selected.
Notes:
You may click the EditEdit button to change employee benefits.

You may click the DeleteDelete button to delete the EAN.

You may click the ExitExit button to exit the EAN (this does not delete the EAN). The EAN will remain in the system until it is deleted or approved.

Changes will not occur until the designated effective date of the Life Event is reached. After the approval date or effective date (whichever is later) all changes will be reflected in the employee's records.
Related Help Topics:
Viewing Employee Benefits Enrollment