
As business expenses are incurred, employees are able to record the expense along with the necessary information to request reimbursement. When ready, the expense items may be submitted for management review and reimbursement approval.
If one of your employees does not have access to a computer or is in need of assistance, you may document on the expense items on the employee's behalf.
To record an incurred expense item:
1. On the Management Navigation Menu, click Wage & Tax > Expense ApprovalWage & Tax > Expense Approval.
The Expense ReimbursementsExpense Reimbursements page displays.
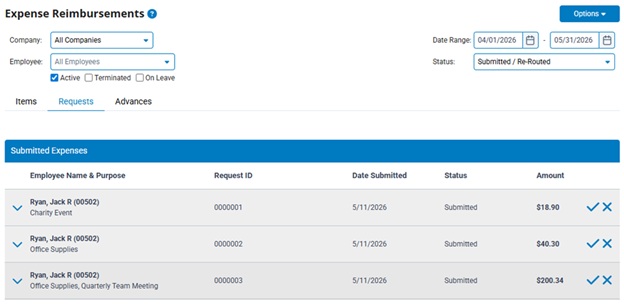
2. Navigate to the Items tab of the Expense Approval utility.
3. Click the Add Expense ItemAdd Expense Item button and choose which method you would like to use for recording your expense.

Adding Expenses Manually
1. Click the Add Expense Item button and select Add Manually drop-down list option.
The Add/Edit Expense ItemAdd/Edit Expense Item page displays.
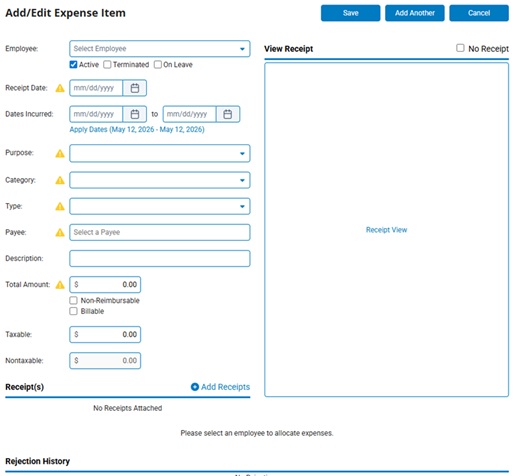
2. In the Employee drop-down list, select the individual on whose behalf you are entering the expense item.
Adding Expenses from a File
1. Click the Add Expense Item button and select Import from a file drop-down list option.
The Import Expense FileImport Expense File page displays.
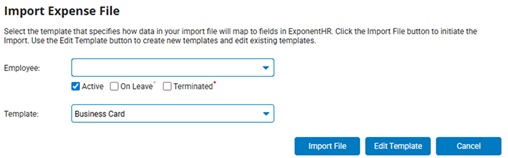
2. In the Employee drop-down list, select the individual on whose behalf you are entering the expense item.
3. Select the appropriate template from the available options in the TemplateTemplate drop-down box that matches the expense import file that you are wanting to import.

Note: If a template matching your expense import file is not yet available, or if an existing template needs to be updated, click the Edit Template button to open the Expense Import Template Setup page to perform any of the following actions.
Add New TemplateAdd New Template
Rename TemplateRename Template
Delete TemplateDelete Template
3. Click the Import FileImport File button.

4. Click the Choose FileChoose File button and locate the expense statement you want to import.

5. Click the Upload FileUpload File button.

The Expense Import ReviewExpense Import Review page displays.
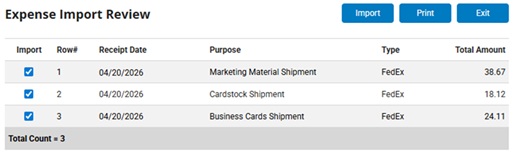
When reviewing the expense items, ExponentHR marks any imported items that contain an informational noteinformational note, a warning messagewarning message, or a critical errorcritical error that may require your attention.
 Information: Signifies items that will be imported, but may require action.
Examples:
 Warning: Signifies an invalid value that will not be imported.
Examples:
 Critical Error: Signifies an invalid value that will prevent the expense item or field from being imported.
Examples:
6. Validate the expenses to be uploaded into the Expense Reimbursement Request by checking check box next to each desired expense.
7. Once all desired expenses have been checked, click the Import button.
An onscreen message will appear once the selected items have been successfully imported are available on the Items tab of the Expense Reimbursement utility.
Note: If changes need to be made, click the Exit button and make the desired adjustments to the file or template.
8.
To add any missing information from the expense item, to attach a receipt, and/or allocate the expense, locate and click on the respetive expense from the Items tab of the utilty.
4. In the expense item fieldsexpense item fields, enter the respective information related to the expense.
| Field | Description |
| Receipt Date: |
Enter the date on the receipt (date that the expense was paid). |
| Dates Incurred: |
If the expense was incurred over multiple days (ex. hotel stay for business trip), enter the first and last day of the expense. |
| Purpose: |
Enter why the expense was incurred by either selected from the available options in the drop-down list or manually typing the purpose in the field (which also adds the purpose to the drop-down list for future use). |
| Category: |
Select the category that best matches your expense from the options made available by your company in the drop-down list. |
| Type: |
Select the expense type that best matches your expense from the options made available by your company in the drop-down list. |
| Payee: |
Enter the business or individual who was paid as a result of the expense. You may do so by either selecting from the available options in the drop-down list or manually typing the payee's name in the field (which also adds the payee to the drop-down list for future use). |
| Description: |
Enter a brief explanation of the expense that may be useful for when the item being reviewed for approval of reimbursement. |
| Miles: |
If your company provides a set reimbursement amount per business-related mile driven, enter the total distance (in miles) associated with the expense. The number of miles will be multiplied by the respective reimbursement rate to calculate the amount you are owed. |
| Total Amount: |
Enter the total amount of the incurred expense that is to be reimbursed |
| Taxable: |
If taxes are to be withheld from the reimbursement amount, enter the portion of the expense that is to be subject to taxation. |
| Non-Reimbursable: |
Check if the expense is not an expense your company will reimburse (ex. personal expenses that may be on the receipt but which your company is not associated with). |
| Billable: |
Check this box if the expense is to be billed to another source (ex. a business trip billed to a client). Note: This option may not be available, depending on your company policy. |
5. Click the Add ReceiptsAdd Receipts button to attach an image/file of the receipt to the expense item. If using the same receipt multiple times (ex. separating items from a single receipt into multiple expense items), the onscreen promptonscreen prompt provides the convenience to either upload a new file or to simple reuse the same receipt that has been attached to a different expense item.
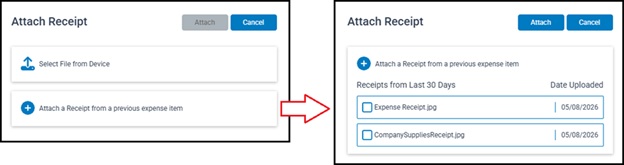

Once attached, the receipt file is listed in the Receipt(s) section and a preview of the receipt is displayed in the View Receipt section for easy reference and review.
Note: If a copy of the receipt is not available, check the No ReceiptNo Receipt checkbox. Your company policy may determine if an expense is eligible for approval without a receipt.

6. To allocate the expenses to a cost center, such as a location, department, or other, select the appropriate options in the AllocationsAllocations.

7. When finished click the respective button to perform the desired action.
| If you woud like to... | Click... |
|
Exit the view of the current expense item so that it may be edited or submitted later: |
 →  |
|
Proceed with submitting the entered expense item for review/approval: |
 →  |
|
Exit the current expense item without saving any progress you have made: |
 |
Related Help Topics
Submitting a Request for Reimbursement
Reviewing a Submitted Expense Request
Re-Routing a Submitted Request for Review by Other Managers
Providing a Manager access rights to the Expense Approval utility