
Your employees submit Expense Requests when seeking reimbursement for business expenses. The Expense Reimbursements screen allows you to approve or reject Expense Requests.
|
You have received a system notification alerting you that one of your employees has submitted an Expense Request. You may review the expense request to determine if the request is appropriate for payment. You can either approve, edit, or reject the request within the utility. |
To review a submitted Expense Request:
1. On the Management Navigation Menu, click Wage & Tax > Expense ApprovalWage & Tax > Expense Approval.
The Expense ReimbursementsExpense Reimbursements page displays.
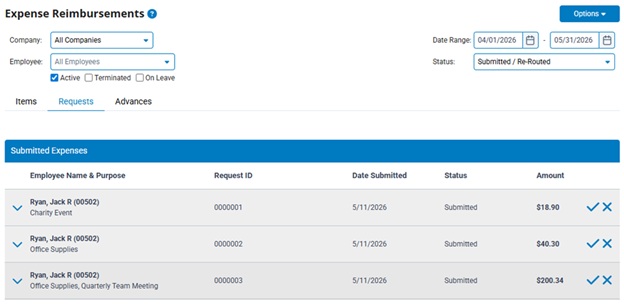
2. If necessary, adjust the filtersadjust the filters to change the requests displayed in the Submitted Expenses table.
The Submitted Expenses table updates to display the expense requests you selected.
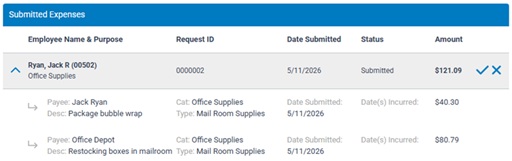
3. For a quick summary reviewsummary review of the request, click the down arrow ( ) next to the request to display all the expense item(s) included in the total reimbursement amount. If the summary provides enough information to make a decision, you can approve (
 ) or reject (
 ) the request directly from this view by clicking the appropriate action icon.
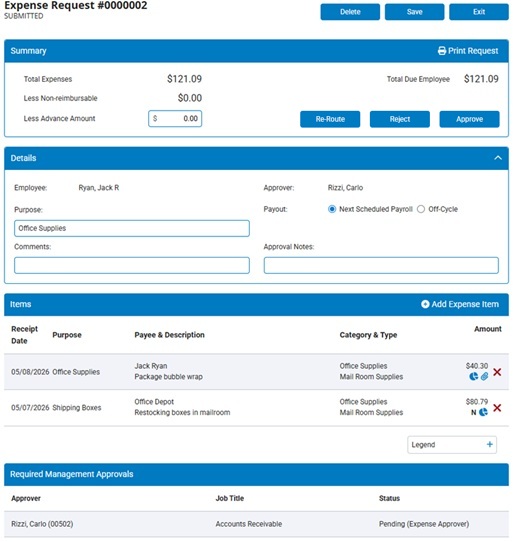
For a more detailed review of the request, click the expense request row to open the Expense RequestExpense Request details page. From this view, you can review attached receipts, allocation selections, and any applied advance payments, as well as add/edit/remove expense items and re-route the request for secondary review or approval.
Notes:
 ), or has been allocated (
 ).
In the Expense Request Detail view:
4. If the employee previously received an advance payment that should be applied to offset this expense, enter the amount in the Advance Amount Received field.
5. The Purpose and Comments fields may be used to provide any supplemental information related to the expense.
6. If available for selection, use the Payout field to specify whether the reimbursement should be paid on the employee's next scheduled paycheck or issued as a separate paycheck outside the normal payroll cycle .
7. In the Items section, click on any expense item to see or edit the specifics of that item.
The Add/Edit Expense ItemAdd/Edit Expense Item page displays.
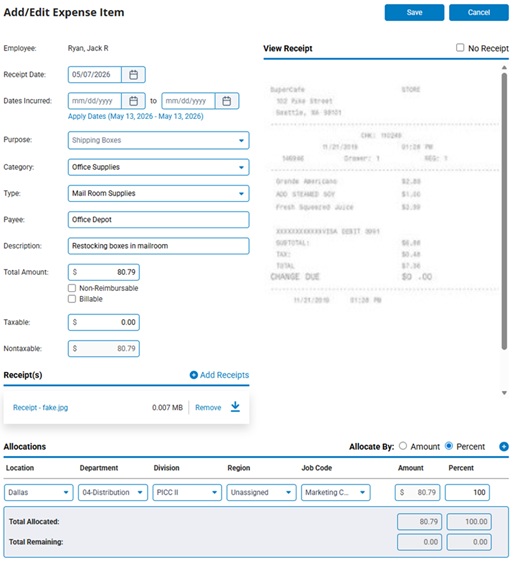
Review the amount listed in the expense and change any fields that you feel are incorrect, including the category of the expense, the expense type, the amount, and the description.
8. The View Receipt section automatically displays the first receipt attached to the expense item. If multiple receipts are present, click on the desired receipt to change which receipt is being displayed.
To attach a receipt, click the Add ReceiptsAdd Receipts button and follow the onscreen prompts.

Note: If a copy of the receipt is not available, check the No ReceiptNo Receipt checkbox. Your company policy may determine if an expense is eligible for approval without a receipt.

9. After reviewing the expense item and making changes as necessary, click the SaveSave button.

The Expense Request details page displays.
10. To add an additional expense item to the request, click the Add Expense ItemAdd Expense Item button. (see Related Help Topic)

11. To remove/reject a specific expense item from the request, click the remove icon ( ) next to the respective item.
The Expense Request page displays.
12. If desired, click the Re-Route button to forward the request to other managers to obtain their review/consent prior to approving the reimbursement. (see Related Help Topic)
13. When you are satisfied with the expense request the employee has reported on the expense request, enter any desired comments in the Approval Notes text box and click the ApproveApprove button.

Result: The Expense Request is approved and sent to Finance/Accounting for final review and posting (see the Related Help Topic). When the request is processed by Finance/Accounting, the status will change to Posted. Your employee will be reimbursed on their next scheduled paycheck (unless otherwise selected), at which time the status of the request will change to Paid.
Note: If you believe the expense request is incorrect, click the RejectReject button instead and enter the reason for rejection in the Rejection Notes text box prompt. ExponentHR will notify the employee that their expense request was rejected so the employee may correct and resubmit the request, if necessary.

Related Help Topics
Recording Business Incurred Expenses
Bypassing the Need to Obtain a Manager's Consent in the Re-Route Process
Posting an Approved Expense for Payout