Assigning Management Grant Access Rights
You have three different ways to assign management grant access rights to an employee — bundled rights based on the employee's functional role, custom group rights, and assigning individual rights to an employee (such as functional utilities, exports/uploads & EDI, reports, EANs, applicant tracking, and more).
Assigning Rights Based on Functional RolesAssigning Rights Based on Functional Roles
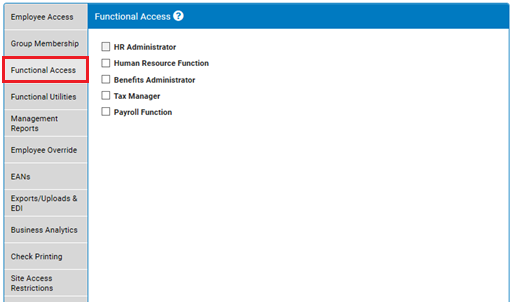
Use the Functional Access tab to give managers a specialized bundle of management access rights based on the manager's unique job responsibilities. A description of the rights given based on each type of functional access is included on the Functional Access tab on the Grant Access Rights page.
|
As the HR Administrator, you have several individuals in the Payroll, Tax, HR and Benefit areas that will need access to ExponentHR for their primary work function. Instead of assigning each right separately, you will be able to assign each member to the functional group that best fits their job description.
|
Notes:
- You may assign more than one functional role in grant access if the manager handles more than a single function.
- The functional role(s) are in addition to any other functional utilities you may have set for the manager.
1. Click the Functional Access tab.
The Functional AccessFunctional Access tab displays.
2. Provide the manager with the Human Resource Function, Benefits Administrator Function, Tax Manager, or Payroll Function.
Human Resource FunctionHuman Resource Function
The Human Resource functional access package provides the ability to:
- Create, re-route, and approve all eAction Notices (EANs) (you may restrict which EANs are available on the EANs tab)
- View employee personal records
- Access the following report groups: HR Administration, EEO, Workplace Safety, Benefits, and Quick List
Note: The functions will remain limited to the Employee Access restrictions you set for this user.
To assign a manager to the Human Resource Function functional access package:
1. Check the Human Resource Function checkbox .
2. Click the Save Changes button.
Result: After you save changes, the manager you selected is given the Human Resource Function bundle of rights.
Note: Although you may designate managers as HR personnel with Human Resource Function Access, you may not assign any manager as an HR Administrator. Only ExponentHR may designate your organization's HR Administrators.
Benefits Administrator FunctionBenefits Administrator Function
The Benefits Administrator functional access package provides the ability to:
- Manage employee benefit plan enrollment for New Enrollment and Open Enrollment
- Create and edit Life Events
- Use benefits applications such as Eligibility Overrides, Non-Group Plans, and Benefits Notifications
- View employee information related to benefits administration (dependents, SSN, ethnicity, marital status, and date of birth)
- Access Benefits reports
Note: The functions will remain limited to the Employee Access restrictions you set for this user.
To assign a manager to the Benefits Administrator functional access package:
1. Check the Benefits Administrator checkbox .
2. To expand the user's rights to include access to the Benefits Plan Setup utility (where the rules and settings of your organization's benefit plans can be reviewed, check the Allow access to the Benefit Plan Setup Utility checkbox.
3. Click the Save Changes button.
Result: After you save changes, the manager you selected is given the Benefits Administrator bundle of rights.
Tax Manager FunctionTax Manager Function
The Tax Manager Function functional access package provides the ability to the Tax Management utility, which includes the ability to:
- Create, review, and address tax-related cases
- Generate tax-related reports
- Access all available tax resources online
This will override any Employee Access assignments for these tax functions; however, the visibility of tax information (through generating reports or viewing uploaded tax documents) can be limited to just the company in which the tax manager is currently employed or expanded to any combination of (including all) companies within the organization (for multi-company organizations).
To assign a manager the Tax Manager functional access package:
1. Check the Tax Manager check box.
The Tax Manager visibility options display.
2. To limit the Tax Manager's visibility of tax information (tax report results and uploaded tax documents) to just certain companies with your organization, click the Edit Companies button and make your desired selection from the available list of companies associated with your organization. Alternatively, by selecting the Entire Organization (All EINs) option, the Tax Manager will have full visibility to all information that is contained within the Tax Management utility.
This option is only available for multi-company organizations.
3. If desirable, designation as a Tax Manager also offers the option to assign access rights to the General Ledger Management utility. This additional right may be granted with full visility or refined to just specific companies within your organization.
Note: If the manager is separately provided access to the GL Managment utility (granted through the Functional Utilies tab), the user automatically obtains access to all companies.
4. Click the Save Changes button.
Result: After you save changes, the manager you selected is given a specific bundle of Tax Manager rights.
Payroll FunctionPayroll Function
The Payroll Function functional access package provides the ability to:
- Process payroll batches and perform the selected actions (re-open/edit and/or approve payroll batches)
- Approve timesheets
- Access all management reports, paid leave reports, and payroll funding reports under the Wage & Tax heading
- Print checks remotely
This access will override any Employee Access assignments for these payroll functions, allowing this manager to view all employees and execute payroll functions on a company-wide basis. However, you can use filters to limit the manager's access to employees.
To assign a manager the Payroll Function functional access package:
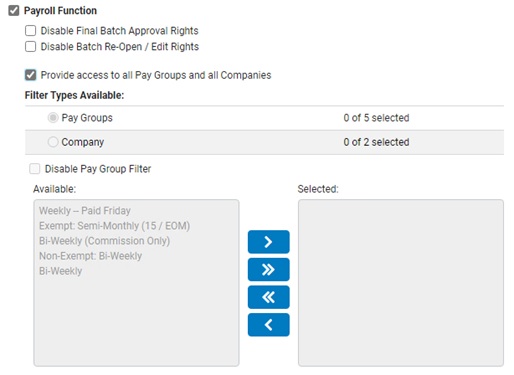
1. Check the Payroll Function check box.
The Payroll Function selection boxesselection boxes display.
2. By default, Payroll Function users inherit the ability to perform all actions within a payroll batch. If desired, the following options allow you to restrict the actions a Payroll Function user can do:
- Disable Final Batch Approval Rights: Restricts the user from approving (posting) a pending payroll batch
- Disable Batch Re-Open/Edit Rights: Removes the Make Changes button within a pending payroll batch, inhibiting the ability to re-open the pending batch and/or make any changes. The user will also be restricted from editing batch settings of any pending/re-opened batch or adding new state tax rates
Note: When both options are selected, a view-only access for any pending payroll batch will be effectively created for the Payroll Function user.
3. To limit a manager's access to all pay groups and companies, uncheck the Provide Access to All Pay Groups and All Companies check box.
Notes:
- To give the manager access to all pay groups and companies within your organization, leave the Provide Access to All Pay Groups and Companies check box checked and skip the steps that follow.
- If your organization does not have multiple companies, the check box is named "Provide Access to All Pay Groups."
4. Select the Filter Types Available radio button next to the criteria (Pay Groups or Company) to which you would like to limit manager access.
5. Uncheck the Disable [Pay Group or Company] Filter check box.
The Available box will display all available pay groups or companies in your organization, based on which Filter Type you selected in step 3.
Note: No pay groups or companies are available by default. Once you uncheck the Disable Filter check box, you must add all pay groups or companies to which you would like the manager to have access.
6. Select the appropriate pay group or company in the Available box.
The criteria you selected will be highlighted.
7. Click the right arrow button to move the highlighted pay group or company to the Selected box.
The manager may access all pay groups and companies you place in the Selected box, but may not access any pay groups or companies left in the Available box.
Note: Mixing these filters provides powerful customization options. For instance, you could give a manager access to all pay groups, but limit their access to employees in a single company. Or, you could give a manager access to one pay group, but allow them to access that pay group across all companies.
8. Repeat steps 5 to 6 for all pay groups or companies to which you want to give this manager access.
9. Click the Save Changes button.
Result: After you save changes, the manager you selected is given a specific bundle of payroll function rights (listed at the top of the page) and given access to as many pay groups and companies as you selected.
Assigning Managers to Custom Group RightsAssigning Managers to Custom Group Rights
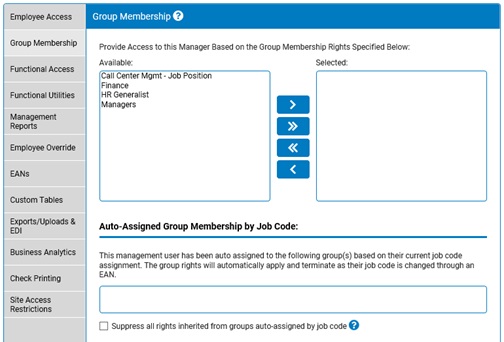
Use the Group Membership tab to assign a preset group of management access rights to a manager. To create group rights, see the Related Help Topic at the bottom of this page.
In addition, an individual may be automatically assigned to a management group if that group uses the Job Code Auto-Assignment feature, which automatically assigns a predetermined set of rights based on a manager's job code.
|
In your organization, you have multiple managers that will need to do the same functions in ExponentHR. Instead of assigning the same rights to the managers multiple times, you can use the Group Rights function to create a group with the appropriate
rights and then assign the appropriate managers to the group.
|
1. Click the Group Membership tab.
The Group MembershipGroup Membership tab displays.
2. To manually change which group(s) the manager is a member of, use the arrows to add or remove a group to the Selected box.
3. The Auto-Assigned Group Membership by Job Code section displays each group the manager has automatically been assigned to based on his/her current job code. If desirable, this automatic membership assignment can be removed by
activating the Suppress all rights inherited from groups auto-assigned by job code option.
4. Click the Save button.
Result: After you save changes, the manager you selected has all the management access rights provided by the group(s) you selected.
Notes:
- The group access rights given to a manager are in addition to any other rights you grant to the manager, including Functional Access, Functional Utilities, and so on.
- You may assign more than one group of rights to the same manager.
Related Help Topics:
Viewing Group Rights
Creating Group Rights
Granting Access to Functional UtilitiesGranting Access to Functional Utilities
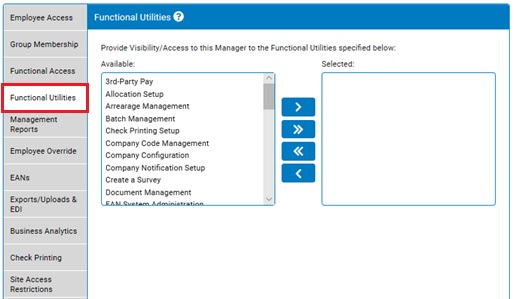
Use this tab to grant managers access to Functional Utilities in the ExponentHR Management View. Managers may only use these Functional Utilities in regard to those employees to whom they have access.
|
One of your managers has been assigned to a special project in which they will need to get feedback on management-level employee communication within your organization. You need to grant them access to the functional utilities Create a Survey and View Survey Results so they can administer a survey to other managers.
|
See the Related Help Topics section at the bottom of this page for more information about Functional Utilities.
1. Click the Functional Utilities tab.
The Functional UtilitiesFunctional Utilities tab displays.
2. Select the Functional Utility to which you would like to provide this manager access from the Available box.
The Functional Utility you selected is highlighted.
3. Click the right arrow button to move the Functional Utility to the Selected box.
Note: You may remove Functional Utilities from the Selected Box by selecting the Functional Utility and clicking the left arrow button to move that Functional Utility to the Available box.
4. Click the Save button.
Result: After you save changes, the manager you selected may access all Functional Utilities listed in the Selected box. The manager may not access any functional utilities that remain in the Available box.
Related Help Topics:
Glossary of Management Grant Access Rights
Granting Access to Create and Submit EANsGranting Access to Create and Submit EANs
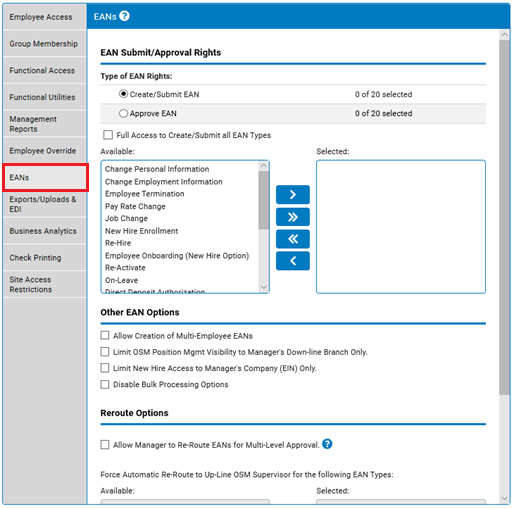
Use the EANs tab to allow managers to create and submit specific EAN types.
|
In order to be notified of certain actions taken by a manager (such as pay rate changes, new hires, or terminations), you will be able to give the manager the ability to submit an EAN for your review and approval. Granting a manager the ability
to submit an EAN will not change any information in ExponentHR unless you approve the requested action.
|
1. Click the EANs tab.
The
EANsEANs tab will display.
2. Select the
Create/Submit EAN radio button from the Type of EAN Rights section of the tab.
Notes:
-
If you select the Approve EAN radio button, the manager will be able to create and submit specific EANs, as well as approve and submit them directly to ExponentHR for processing.
-
To give a manager access to create and submit all EAN types (including EAN types that may later be added to the system), check the Full Access to Create/Submit all EAN
Types checkbox.
3. Select the appropriate EAN type in the Available box.
The EAN type you selected will be highlighted.
4. Click the right arrow button to move the highlighted EAN type to the Selected box.
Note: You may remove EAN types from the Selected box by selecting the EAN type and clicking the left arrow button to move that EAN type back to the Available box.
5. Check the
List OSM Position Mgmt Visibility
to Manager's Down-line Branch Only box to restrict a manager’s view of the OSM tree within an EAN when assigning an employee to a new or unfilled position. When activated for a specific manager, only a subordinate (down-line) position
that is directly or indirectly beneath the manager's own position in the same OSM tree will be an available option when choosing a position for an employee.
6. Check the
Limit New Hire Access to Manager's
Company (EIN) Only box to limit a manager to hiring employees only into the same company as the manager.
Note:
This restriction option only applies to organizations with more
than one Company/EIN.
7. Activating the Allow Manager to Re-Route EANs
for Multi-Level Approval option will permit the manager creating the EAN to select a list of "approvers" to review the employee change request. When the manager Re-Routes the EAN, it will be automatically re-directed to each management-level
user specified by the manager. After all additional approvers have noted their approval, the EAN will be queued for a final HR approval prior to completion.
Note: Managers will not have the ability to edit an EAN (or change the approver list) after saving the EAN and initiating the Re-Route process. If changes are required for an EAN in Re-Routed status, it must
either be rejected back to the originator, or modified by an HR user with appropriate rights.
8. The Force Automatic Re-Route to Up-Line OSM
Supervisor option will make it where an EAN is forced
into the Re-Route status each time the manager submits one of the
specified EAN types. Once submitted, the EAN will be re-routed
to the manager's direct supervisor for approval consent. Once
approved by that direct supervisor, the EAN will then proceed to HR
for final review and approval. By moving the EAN types to the Selected box
within the manager's access rights setup, HR personnel are able to
determine which EAN types are required to go through this automatic
re-route process.
Note: This feature is only available when the Allow Manager to Re-Route
EANs for Multi-Level Approval check box has been activated
and for EAN Types that the manager has access rights to create.
9. Click the
Save button.
Result: After you save changes, the manager may approve all EAN types you moved to the Selected box. The manager may not approve EAN types that remain in the Available
box.
Granting Access to Approve EANsGranting Access to Approve EANs
Use the EANs tab to allow managers to approve specific EAN types.
|
One of your HR Representatives will need to submit and approve changes in ExponentHR. By granting the ability to approve an EAN, the representative will be able to approve EANs directly without review or approval by you. In granting a representative
approval rights, be sure to review the EANs you grant this individual so the proper audit/approval process will remain in place.
|
Note: Giving a manager the right to approve EANs does not make them HR personnel with HR Function functional access. Managers may approve EANs they create (either for themselves or on behalf of employees)
only. Even with approval rights, managers may not approve EANs created by others. That right is reserved for HR personnel.
1. Click the EANs tab.
The
EANsEANs tab will display.
2. Select the
Approve EAN radio button from the Type of EAN Rights section of the tab.
Note: To give a manager access to approve all EAN types (including EAN types that may later be added to the system), leave the Full
Access to Approve all EAN Types checkbox checked.
3. Select the appropriate EAN type in the Available box.
The EAN type you selected will be highlighted.
4. Click the right arrow button to move the highlighted EAN type to the Selected box.
Note: You may remove EAN types from the Selected box by selecting the EAN type and clicking the left arrow button to move that EAN type back to the Available box.
5. Activating the Allow Manager to Re-Route EANs
for Multi-Level Approval option will permit the manager creating the EAN to select a list of "approvers" to review the employee change request. When the manager Re-Routes the EAN, it will be automatically re-directed to each management-level
user specified by the manager. After all additional approvers have noted their approval, the EAN will be queued for a final HR approval prior to completion.
Note: Managers will not have the ability to edit an EAN (or change the approver list) after saving the EAN and initiating the Re-Route process. If changes are required for an EAN in Re-Routed status, it must
either be rejected back to the originator, or modified by an HR user with appropriate rights.
6. Check the
List OSM Position Mgmt Visibility
to Manager's Down-line Branch Only box to restrict a manager’s view of the OSM tree within an EAN when assigning an employee to a new or unfilled position. When activated for a specific manager, only a subordinate (down-line) position
that is directly or indirectly beneath the manager's own position in the same OSM tree will be an available option when choosing a position for an employee.
7. Check the
Limit New Hire Access to Manager's
Company (EIN) Only box to limit a manager to hiring employees only into the same company as the manager.
Note: This restriction option only applies to organizations with more than one Company/EIN.
8. Check the
Disable Bulk Processing Options box to disable a management user's ability to simultaneously apply the same EAN status action (Approve, Reject, etc.) to multiple EANs.
9. Click the
Save button.
Result: After you save changes, the manager may approve all EAN types you moved to the Selected box. The manager may not approve EAN types that remain in the Available
box.
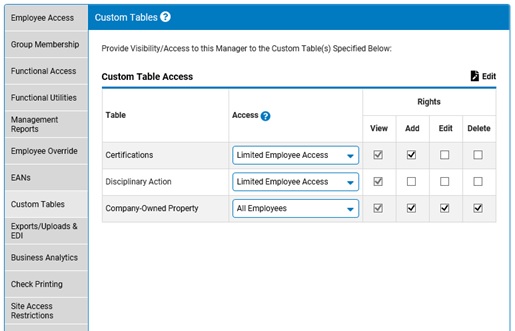
Granting Access to View/Edit Employee Custom TablesGranting Access to View/Edit Employee Custom Tables
Use the Custom Tables tab
provide
managers access to specific custom table data for employees within
your organization.
Through
this feature, a management user without grant access rights to Employee
Personnel Records can be provided access to custom table data. Additionally,
a management user can be provided adjusted custom table employee visibility
and data edit capabilities (in variance to the edit rights defined
in custom table setup.)
Note:
To allow the user access to the Custom Tables Utility, you must
also provide rights in Functional Utilities.
|
Each company device issued to employees is tracked in a custom employee table. The custom tables are contained on each employee's personnel record; however, the IT department issuing the devices is not permitted to see any information
contained on personnel records. By granting the IT department access to this specific custom table, they may add/edit entries through the Custom Employee Tables utility.
|
1. Click the Custom Tables tab.
The
Custom TablesCustom Tables tab will display.
2. To add or remove a specific custom table on the Custom Tables tab, click the
Add/Edit button.
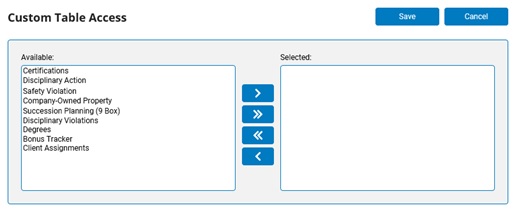
The
Custom
Table AccessCustom
Table Access page displays with each custom table that access rights have been specifically provided.
Select all desired custom tables and use the arrow keys to add them to (or remove them from) the user's accessibility in the Custom Employee Tables utility and click the Save button.
3. The Access drop-down selection provides the option to expand an employee's visibility of the table to display all employees within the organization. By default, the Limited Employee Access option
is selected, which limits custom table data visibility to just the employees included in the manager's access rights.
4. In the Rights section, check the
boxes to appropriately provide the user with access to add new rows,
edit existing information on a row, and/or delete an existing row
for the respective table.
Note: Within the configuration of a custom table, it is designated which user types are able to view, add, edit, and/or delete information on a custom respective table. The selections made in a user's grant
access rights override the table's configuration settings for the specific individual.
5. Click the
Save button once all changes have been made.
Related Help Topics:
Custom Employee Tables Utility
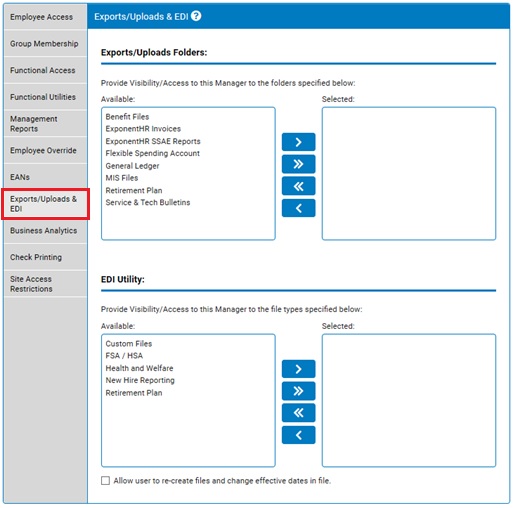
Granting Access to Exports/Uploads & EDIGranting Access to Exports/Uploads & EDI
Use this tab to grant managers access to files uploaded by ExponentHR for your company. Once access has been provided, the respective manager will receive a Message Center notification when a file has been posted and made available for view.
|
Your Payroll Representative needs access to the GL file that ExponentHR prepares at the conclusion of each payroll. By granting the Payroll Representative access to receive notification of Exported Files, the representative will be notified
when the GL file is uploaded and may then immediately download it for use.
|
Note: The
Human Resource Administrator functional role can access the downloads,
but must also be given grant access to exports/uploads & EDI to
get the notifications.
1. Click the
Exports/Uploads & EDI tab.
The Exports/Uploads
& EDIExports/Uploads
& EDI tab displays.
2. Select
the type of file to which you would like to provide this manager access
from the Available
box.
The type of file (e.g. General Ledger, ExponentHR Invoices, or Service & Tech Bulletins) you select will then be highlighted.
3. Click the right arrow button to move the type of file to the Selected box.
Note: You may remove types of files from the Selected box by selecting the type of file and clicking the left arrow button to move that type of file to the Available box.
4. In
the EDI Utility section of the Exports/Uploads & EDI tab, you
are able to designate if the management user will be provided the
additional access rights to generate non-schedule benefit file feeds
and enter alternate enrollment effective dates to be used on file
feeds for employees by activating the Allow
user to re-create fils and change effective dates in file option.
5. Click the
Save button.
Result: After you save changes, the manager you selected may access all files uploaded by ExponentHR that match the types of files to which you have given them access in the Selected box. The manager may not
access any files that match a type of file that remains in the Available box.
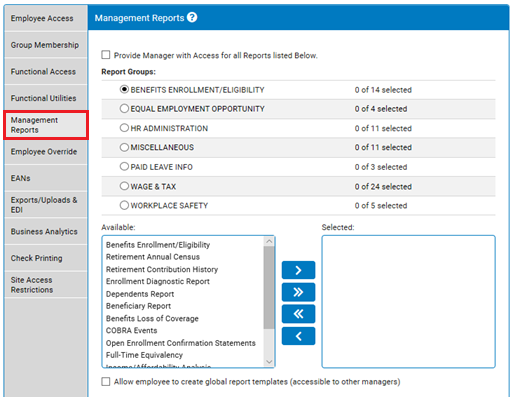
Granting Access to ReportsGranting Access to Reports
Use the Management Reports tab to grant managers access to specific reports within the Management view. These reports will only include information about employees to which the manager has access.
|
One of your HR managers is responsible for administering COBRA. As such, they need to monitor which employees have experienced a loss of benefits coverage and the reason why. The Benefits Loss of Coverage report will provide this detail, as
long as they have access to it.
|
1. Click the Management Reports tab.
The
Management
ReportsManagement
Reports tab displays.
2. Uncheck the
Provide Manager with Access for all
Reports Listed Below checkbox.
The Report Categories section of the page becomes available.
Note: To grant managers access to all reports in ExponentHR (including reports which may later be added), leave the Provide Manager with Access for All Reports Listed Below checkbox checked and skip all other
steps in this process.
3. Select the
Report Groups radio button next to the reports group to which you'd like to grant manager access.
The Available box at the bottom of the screen will display all reports in the group you selected (for example, all Benefits Enrollment/Eligibility reports).
4. Select the appropriate report in the Available box.
The report you selected will be highlighted.
5. Click the right arrow button to move the highlighted report to the Selected box (for example, you might move the Benefits Enrollment/Eligibility, Retirement Annual Census, and Retirement Contribution History
Reports to the Selected box, and leave the Open Enrollment Diagnostic report in the Available box).
Note: You may remove reports from the Selected box by selecting the report and clicking the left arrow button to move that report to the Available box.
6. To give the employee the right to create global templates for use by others with the same access right, select the Allow
employee to create global report templates (accessible to other managers) check box.
7. Click the
Save button.
Result: After you save changes, the manager you selected may access all reports you moved to the Selected box. The manager may not access any reports that remain in the
Available box.
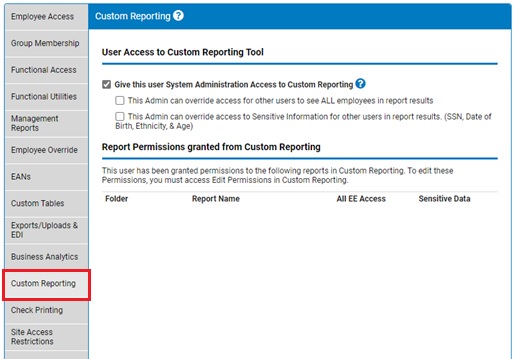
Granting Access to Custom ReportingGranting Access to Custom Reporting
Use this tab to grant a user administrative access within the Custom Reporting utility. As an administrator, the user will be able to perform the below tasks:
- Schedule reports for any management user in the system
- Provide rights to management users to run and view reports
- View all employees in all reports
- View all sensitive data in all reports
In addition, this tab may be used to extend an administrator's rights to also include the ability to:
- Override another user's access (on any specific report) to grant them visibility to all employees in the report's results
- Override another user's access (on any specific report) to greant them visibility to any sensitive information (SSN, DOB, age, and ethnicity) that is displayed within the report's results
This tab may also be used to view which reports the respective user has been granted permissions to view.
Note: Providing a user access to generate/receive any report is managed through the Custom Reporting utility. See: Administrating Custom Reporting Permissions
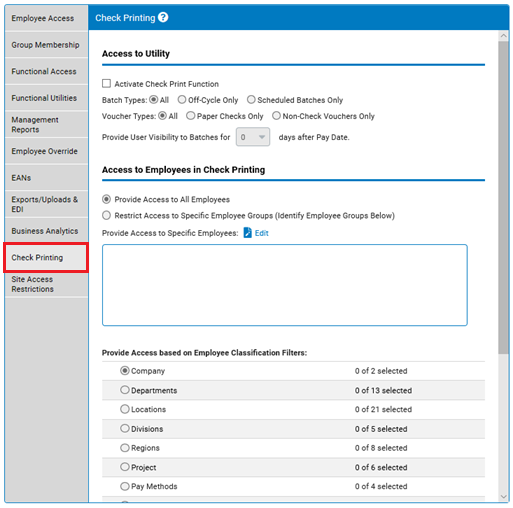
Granting Access to Check PrintingGranting Access to Check Printing
Use this tab to grant managers access to print payroll related vouchers in the Check Printing utility. A manager's printing capabilities within the Check Printing utility can be limited based on a number of different variables. The Check Printing
tab within an employee’s Grant Access setup controls what type of vouchers can be accessed, whose vouchers can be accessed, as well as how long the vouchers will be available to be accessed by the respective user.
Note: The employees a manager is provided access to print vouchers for is administered solely on the Check Printing tab, which is independent of all other tabs within an employee's setup of access rights.
To provide a manager rights to print vouchers:
1. Click the
Check Printing tab.
The Check
PrintingCheck
Printing tab displays.
2. Select
the Activate
Check Print FunctionActivate
Check Print Function check box to provide the manager to the Check Printing utility. .
3. Choose in the Batch
TypesBatch
Types section if the manager will have access to print payroll vouchers related to the regular scheduled pay cycle and/or to batches created outside of the normal schedule (Off-Cycle batches).
4. In the Voucher
TypesVoucher
Types section, designate if the manager should be able to print only paper checks, non-check vouchers, or have the ability to print both.
5. To limit the manager's view to payroll batches paid within a set number of days, make the appropriate selection in the Provide
User Visibility to Batches for # days after Pay DateProvide
User Visibility to Batches for # days after Pay Date drop-down list.
6. Click the Save button.
Result: After you save changes, the manager you selected may print payroll vouchers for all employees in your organization. To restrict this ability to group of employees, please follow the steps below.
To restrict access rights to only print
vouchers for a select group of employees:
1. Click the
Check Printing tab.
The Check
PrintingCheck
Printing tab displays.
2. To
restrict a manager's ability to only print vouchers for a group of
employees, select the Restrict
Access to Specific Employee Groups (Identify Employee Groups Below)Restrict
Access to Specific Employee Groups (Identify Employee Groups Below) option. .
3. If
restricting the manager's view of vouchers to only specific employees
(by employee name), click the Edit
icon in the Provide
Access to Specific EmployeesProvide
Access to Specific Employees section.
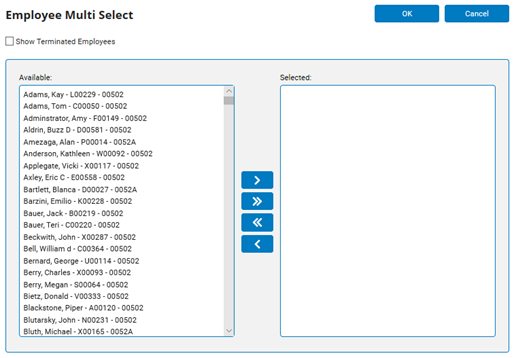
The Employee
Multi SelectEmployee
Multi Select page appears where you can move the desired employees into the Selected box and click the OK button to override which employees the user is able to view vouchers.
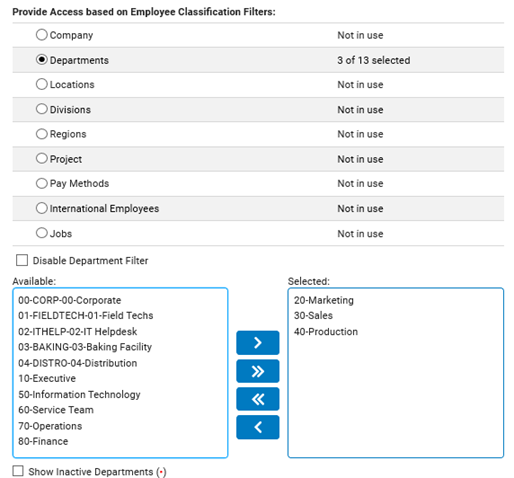
4. If restricting the user’s view of vouchers to only a specific group of employees (based on employment demographics), select the radio button next to the appropriate classification field in the Provide
Access based on Employee Classification FiltersProvide
Access based on Employee Classification Filters section and move the desired items to the Selected box after unchecking the Disable Company Filter option for that respective classification field.
5. Click the Save button.
Result: After you save changes, the manager you selected may print payroll vouchers for the employees provided rights for on the Check Printing tab.
Note: The employees a manager is provided access to print vouchers for is administered solely on the Check Printing tab, which is independent of all other tabs within an employee's setup of access rights.
Granting Access to Applicant TrackingGranting Access to Applicant Tracking
Use this tab to grant a user access within the ExponentATS utility.
Note: This section of the access rights becomes available once the ExponentATS utility has been activated.
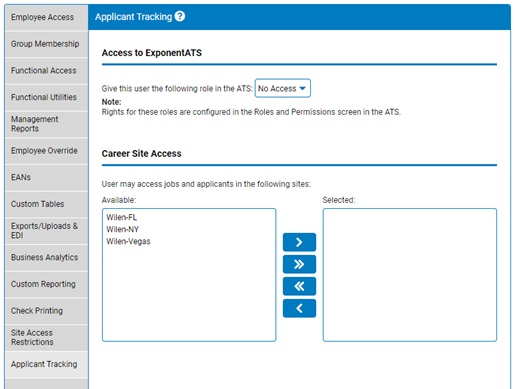
1. Click the Applicant Tracking tab.
The Applicant TrackingApplicant Tracking tab will display.
2. Select which role (read-only, reviewer, manager, or administrator) is to be provided to the respective employee/group.
Note: The obtained rights that are associated with each role are configured in the Roles and Administration screen within the ExponentATS utility.
3. Use the Career Site Access section to designate which career site(s) are accessible to the user.
Note: Published job openings can be spread out over various career sites (each branded to match the respective company, location, etc.) The Career Site Access section lets administrators control which career sites (and associated job openings) a user can manage (based on their assigned role in ExponentATS).