You may process payroll checks outside of the normal payroll schedule. The Off-Cycle Payroll Batch utility allows you to set up and submit the payroll batch with all of the required information. You can specify different types of earnings (hours-based pay and flat amount pay) and deductions for a single employee or for groups of employees. For individual employees included in the batch, you can display paid leave balances and time clock reports.
In addition, you can import all of the recurring earnings or deductions that would appear in the next paycheck. You can do this for all employees in the batch or for a single employee.
Note: You must have grant access rights to the Off-Cycle Payroll Batch functional utility.
One of your California employees just turned in notice that their last day of employment will be this coming Friday. Since you will be responsible for providing this employee a final check on their last day of employment, you need to request an off-cycle check to bring the employee to current pay. By requesting an off-cycle check from ExponentHR, you will be ensured delivery of the check by the employee's final day of employment.
To set up and create an off-cycle payroll batch:
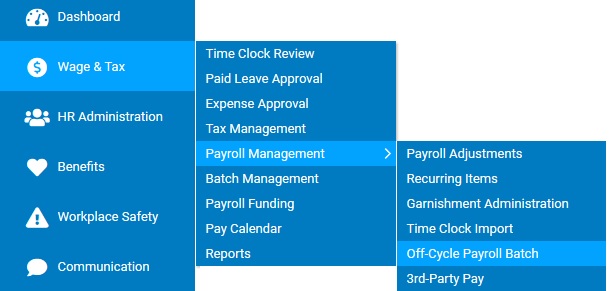
1. On the Management Navigation Menu, click WAGE & TAX > Payroll Management > Off-Cycle Payroll BatchWAGE & TAX > Payroll Management > Off-Cycle Payroll Batch.
The Off-Cycle Payroll BatchOff-Cycle Payroll Batch page displays, with any pending off-cycle payroll batches.
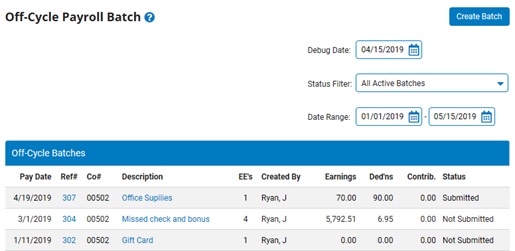
2. Click the Create BatchCreate Batch button.

The Off-Cycle Batch SetupOff-Cycle Batch Setup page displays.
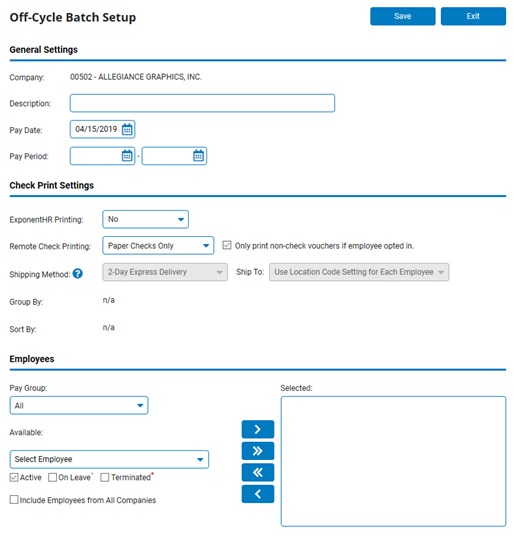
3. Set up the parameters for the off-cycle batch.
Setting Up an Off-Cycle Payroll BatchSetting Up an Off-Cycle Payroll Batch
Notes:
If you submit an off-cycle batch during the processing of a regularly scheduled batch, the off-cycle batch will not be processed until the completion of the regular batch.
To print payroll checks on-site, see the related Help topic.
To set up the batch:
1. Type a name for the off-cycle batch in the Description box.
2. Type the date of the disbursement of funds in the Pay Date box. (You may also select the date from a calendar by clicking on the CalendarCalendar button.)
![]()
3. To print an associated pay period on the check, type the start and end dates of the pay period. (You may also select the dates from a calendar by clicking on the CalendarCalendar buttons.)
![]()
Note: If the off-cycle batch is for a check supplemental to the regular paycheck, you may not have an associated pay period.
4. Make the desired selections in the Check Print Settings section.
ExponentHR PrintingExponentHR Printing
This option allows you to determine which voucher types ExponentHR will be responsible for printing and shipping to the designated location.
Note: When non-check vouchers are being printed, you can check the Only print non-check vouchers if the employee opted in option to limit the non-check vouchers printed to just those requested by employees through the Change Personal Information EAN field.
Remote Check PrintingRemote Check Printing
This option allows you to determine which voucher types you will be responsible for printing at your organization's facilities.
Note: When non-check vouchers are being printed, you can check the Only print non-check vouchers if the employee opted in option to limit the non-check vouchers printed to just those requested by employees through the Change Personal Information EAN field.
Shipping MethodShipping Method
When ExponentHR is selected to be responsible for printing paper check and/or non-check vouchers, the Shipping Method drop-down list is used to instruct ExponentHR of the preferred delivery option of those vouchers.
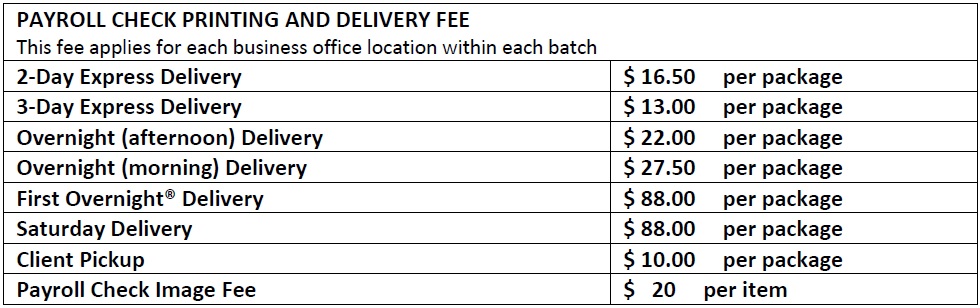
Note: Any associated shipping feesshipping fees will be added to the total funding amount for the associated payroll batch. There is no charge when choosing to print payroll checks on-site.
By default, any payroll vouchers printed by ExponentHR will be delivered to the mailing address of the employee's respective work location. The Ship To drop-down list allows you to select an alternative shipping location for ExponentHR to use when shipping the payroll vouchers.
By clicking the Edit button for the Group By section, you are able to control how the payroll vouchers generated from the Off-Cycle batch will be grouped. This applies to payroll vouchers printed by ExponentHR or remotely by your organization.
By clicking the Edit button for the Sort By section, you are able to control how the payroll vouchers generated from the Off-Cycle batch will be sorted. This applies to payroll vouchers printed by ExponentHR or remotely by your organization.
5. Select employees, pay types, and deduction types to include in the batch.
Selecting EmployeesSelecting Employees
1. Select the pay group in the Pay Group drop-down box to filter the list of available employees.
2. Select the employee you want to include in the batch in the Available drop-down box, and then click the -> button.
Notes:
To filter the list of available employees, select the Active, On Leave, or Terminated check boxes. If your organization has multiple companies, select the check box to include employees from all companies.
To include all available employees from the pay group in the batch, click the >>> button.
To remove an employee you have included in the batch, click the <- button.
To remove all employees you have included in the batch, click the <<< button.
All of the employees listed in the Include in Batch box will be displayed in the off-cycle batch.
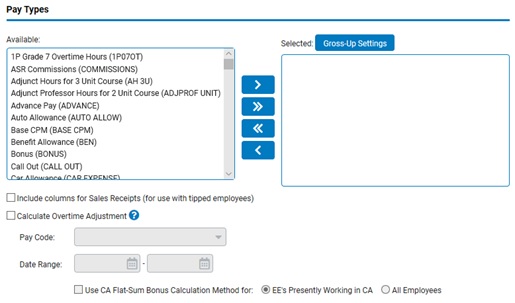
Selecting Pay TypesSelecting Pay Types
Select the pay type you want to include in the batch in the Available box in the Pay Types section, and then click the -> button.
Notes:
The list of available pay types includes the descriptions of the pay codes.
To include all available pay types in the batch, click the >>> button.
To remove a pay type you have included in the batch, click the <- button.
To remove all pay types you have included in the batch, click the <<< button.
Select the check box to include columns for sales receipts (for use with tipped employees). When checked, this adds a Sales Receipts section to the Batch Edit grid.
To automatically calculate/apply any overtime adjustments applicable for the respective time period in which the supplemental wages were earned, select the appropriate pay code and date range in the Calculate Overtime Adjustment field. (Note: If more than one pay code requires overtime adjustments, separate off-cycle batches will be necessary)
All of the pay types listed in the Include in Batch box will be displayed in the off-cycle batch.
Selecting Deduction TypesSelecting Deduction Types
Select the deduction type you want to include in the batch in the Available box in the Deduction Types section, and then click the -> button.
Notes:
The list of available deductions types includes the descriptions of the deductions codes.
If you selected to include only a reimbursement code in the batch, then no deductions are allowed.
To include retirement plan deductions (and any associated employer match contributions), select the Activate 401(k) Adjustment OptionActivate 401(k) Adjustment Option check box.
_Adjustment_.jpg)
To include all available deduction types in the batch, click the >>> button.
To remove a deduction type you have included in the batch, click the <- button.
To remove all deduction types you have included in the batch, click the <<< button.
All of the deduction types listed in the Include in Batch box will be displayed in the off-cycle batch.
Selecting Employer Contribution TypesSelecting Employer Contribution Types
Select the employer contribution type you want to include in the batch in the Available box in the ER Contribution Types section, and then click the -> button.
Notes:
To include all available employer contribution types in the batch, click the >>> button.
To remove an employer contribution type you have included in the batch, click the <- button.
To remove all employer contribution types you have included in the batch, click the <<< button.
All of the employer contribution types listed in the Include in Batch box will be displayed in the off-cycle batch.
Note: The off-cycle batch will create a voucher even if the only information on the voucher is for employer contribution information.
6. Click Save.
The Off-Cycle BatchOff-Cycle Batch page displays, with the employees, pay types, deduction types, retirement plan adjustments, and employer contribution types you specified in setup.
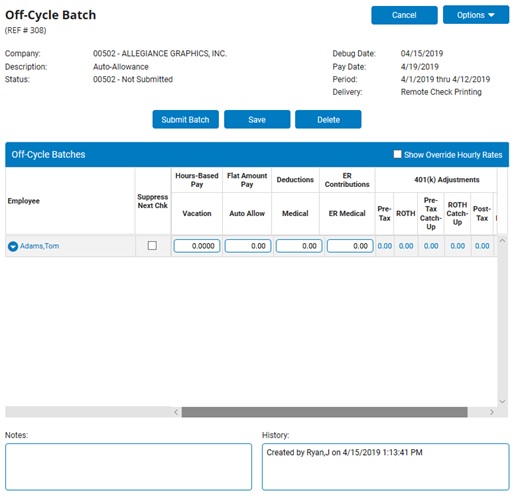
4. To suppress an employee's hours from Time Clock Review and thereby skip the employee's next paycheck, select the Suppress Next ChkSuppress Next Chk check box.

5. If necessary, override any batch settings, such as the check type or distribution method.
Overriding Batch SettingsOverriding Batch Settings
1. Click OptionsOptions in the top right corner of the Off-Cycle Batch page, and choose the Batch Override Settings option.

An Off-Cycle Batch SetupOff-Cycle Batch Setup page displays.
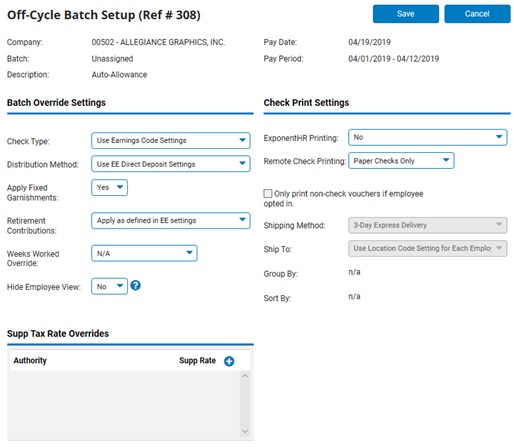
2. Select an option from the Check Type drop-down box.
Use Earnings Code Settings. If both regular and supplemental codes are in the batch, issues both check types (could result in an employee receiving two checks).
Regular Check. Ignores the earnings codes settings and pays all earnings on a single REG check using the employee's W4 withholding elections.
Supplemental Check. Ignores the earnings codes settings and pays all earnings on a single SUPP check using the employee's supplemental tax withholding settings (unless overrides are created).
2. Select an option from the Distribution Method drop-down box.
Use EE Direct Deposit Settings. Distributes the pay according to the direct deposit settings for each employee.
Force Paper Checks. Prints paper checks for all employees in the batch and does not process any direct deposits.
3. Select Yes from the Apply Fixed Garnishments drop-down box if any fixed-amount garnishment deductions should be included in the batch.
Notes:
This applies to all garnishment codes with a deduction type of Wage Garnishment.
Percent-based garnishments are always applied, regardless of this setting.
4. Select an option from the Retirement Contributions drop-down box.
Apply as Defined in EE Settings. Withholds employee contributions according to the employee elections and processes employer match according to setup rules.
Apply Election for Special Payroll Runs. Overrides standard/supplemental deferral elections with a custom amount elected specifically for specialized payroll runs (such as profit sharing or an annual bonus payout). This option is only available for selection when activated through via the Retirement Options section in the Company Configuration utility.
Suppress All. Suppresses employee contributions and employer match from all vouchers in the batch.
Suppress ER Match Only. Withholds employee contributions according to the employee elections, but does not process the employer match.
5. Select an option from the Weeks Worked Override drop-down box.
N/A. The Off-Cycle batch tax calculations are based upon the same pay frequency in which the applicable employee is assigned for regularly-scheduled payrolls.
Any other selection in this drop-down box uses that selection as an override to the pay frequency used to calculate taxes for wages and other earnings paid via the Off-Cycle payroll batch.
Note: Altering the Pay Frequency will only affect taxes that are annualized or have a tiered tax table. Tax types that are based off of a fixed rate or flat amount will remain the same.
6. To delay employee visibility to the vouchers in this batch until the day after the designated pay date, set the Hide Employee View option to Yes.
Note: Any paid leave accrual decrements and benefit FSA/HSA posting related to the posted voucher will remain visible on the website.
7. To set up a supplemental tax rate override, click the Add button, select the taxing authority, type the percentage, and click the Save button.
8. The ExponentHR Printing option allows you to determine which voucher types ExponentHR will be responsible for printing and shipping to the designated location.
Note: When non-check vouchers are being printed, you can check the Only print non-check vouchers if the employee opted in option to limit the non-check vouchers printed to just those requested by employees through the Change Personal Information EAN field.
9. The Remote Check Printing option allows you to determine which voucher types you will be responsible for printing at your organization's facilities.
Note: When non-check vouchers are being printed, you can check the Only print non-check vouchers if the employee opted in option to limit the non-check vouchers printed to just those requested by employees through the Change Personal Information EAN field.
10. When ExponentHR is selected to be responsible for printing paper check and/or non-check vouchers, the Shipping Method drop-down list is used to instruct ExponentHR of the preferred delivery option of those vouchers.
Note: Any associated shipping fees will be added to the total funding amount for the associated payroll batch. There is no charge when choosing to print payroll checks on-site.
11. By default, any payroll vouchers printed by ExponentHR will be delivered to the mailing address of the employee's respective work location. The Ship To drop-down list allows you to select an alternative shipping location for ExponentHR to use when shipping the payroll vouchers.
12. By clicking the Edit button for the Group By section, you are able to control how the payroll vouchers generated from the Off-Cycle batch will be grouped. This applies to payroll vouchers printed by ExponentHR or remotely by your organization.
13. By clicking the Edit button for the Sort By section, you are able to control how the payroll vouchers generated from the Off-Cycle batch will be sorted. This applies to payroll vouchers printed by ExponentHR or remotely by your organization.
14. Click the Save button when satisfied with the selections made.
6. View any employee's paid leave balance or Time Clock report.
Displaying Paid Leave Balances for an EmployeeDisplaying Paid Leave Balances for an Employee
1. Click the
icon  to the left of the employee name.
2. Select Display Paid Leave Balances from the menu.
Result: The Paid Leave SummaryPaid Leave Summary report for the selected employee displays.
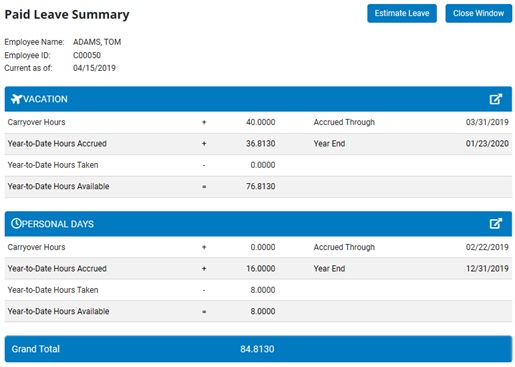
Note: You can access this same report by accessing Wage & Tax > Reports and choosing the Employee Paid Leave Summary report in the library of Paid Leave Info reports.
Displaying Time Clock Reports for an EmployeeDisplaying Time Clock Reports for an Employee
1. Click the
icon
to the left of the employee name.
2. Select Display Time Clock Report from the menu.
Result: The Time ClockTime Clock report for the selected employee displays.

Note: This is the same time clock that the employee sees for the most current reporting period.
7. Type in the amount in the appropriate text box to change an employee's hours-based pay (in hours), flat amount pay (in dollars), piecework pay (in number of pieces), tips, sales receipts, deductions, or employer contributions.
Note: As with all other payroll utilities, you can type a negative number to back out, or adjust, a previous entry.
8. Enter amounts for any retirement plan loans or adjustments.
Adjusting Retirement PlansAdjusting Retirement Plans
1. Click on the employee's name whose retirement plan you want to adjust.
The Edit Off-Cycle Employee DetailEdit Off-Cycle Employee Detail page displays.
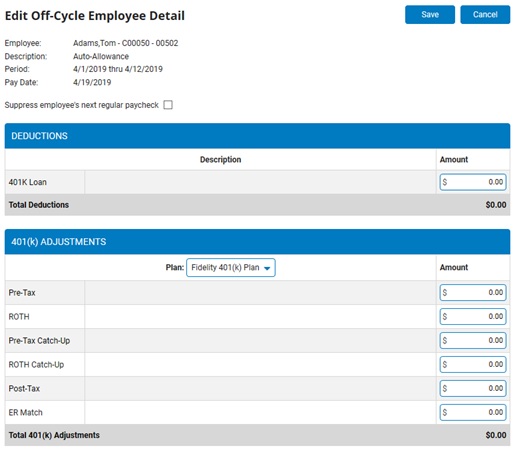
Note: The retirement plan fields are displayed only if the Activate 401(k) Adjustment OptionActivate 401(k) Adjustment Option is selected when setting up the Off-Cycle batch.
2. Enter the deduction amount for any loans.
3. Enter the positive or negative amount for any retirement plan adjustments.
Notes:
A positive amount is added to the employee's normal deferral calculation, whereas a negative amount is subtracted from the normal deferral calculation.
Retirement plan adjustments made through an off-cycle batch are not automatically capped at the annual deferral limit.
Adjustments to an employee's deferral do not automatically adjust any corresponding employer match amount. You must enter the match adjustment separately (in the ER Match field).
4. Click the Save button.
9. Edit the hourly rates (or piece rates), if necessary.
Overriding RatesOverriding Rates
1. Select the Show Override Hourly RatesShow Override Hourly Rates check box in the Edit Grid.

An Override RateOverride Rate column appears next to all hours-based (or piece-rate) pay codes.
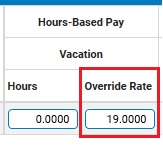
2. Type over the default rate.
Any Calculation Factor for the associated earnings code is ignored.
Setting Up Variable RatesSetting Up Variable Rates
1. Click on the employee's name who you would like to change or add additional variable rates.
The Edit Off-Cycle Employee DetailEdit Off-Cycle Employee Detail page displays.

2. Click the plus sign (+) next to the earning code you would like to add an additional rate for.
A new row is added for that earning code.
3. Type in the alternate rate the other set of hours/pieces using the same pay code.
10. If desired, you may view reports regarding the Off-Cycle prior to submission.
Batch Inventory ReportBatch Inventory Report
1. Click the OptionsOptions button and select the Print Report item.
The Report OptionsReport Options page displays.
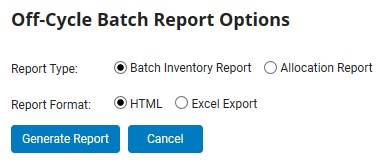
2. Select the Batch Inventory Report radio button.
3. If you would like results to generate into an Excel spreadsheet, select the Excel Export radio button.
4. Click the Generate Report button.
Allocation ReportAllocation Report
1. Click the OptionsOptions button and select the Print Report item.
The Report OptionsReport Options page displays.
2. Select the Allocation Report radio button.
3. If you would like results to generate into an Excel spreadsheet, select the Excel Export radio button.
4. Click the Generate Report button.
11. Type any notes about the batch that you want to record for informational purposes for internal review in the Notes text box.
12. Click Submit Batch.
A Confirmation window displays.
13. If no changes are needed, click Confirm.
Result: The off-cycle payroll batch is routed to ExponentHR. When the batch is processed, it must be approved in Batch Management (the same as with a regular payroll batch). See the Related Help Topic.
Notes:
To save the batch without submitting it, click Save.
To cancel the batch, click Cancel.
Related Help Topics:
Editing Off-Cycle Payroll Batches
Importing Off-Cycle Pay/Deductions from a File
Reviewing Off-Cycle Payroll Batches
Printing Payroll Vouchers Remotely
Testing Your Printer's Ability to Print Paper Checks