
You should use the New Hire Enrollment EAN when you want to add an employee to ExponentHR. The EAN serves as a submitted request to activate a new employee in payroll and HR systems on a specific date.
Notes:
Another manager may have used the New Hire Authorization Request EAN to enter preliminary information related to this employee prior to their start date. You may convert the information from that EAN to a New Hire Enrollment EAN. See Related Help Topics at the bottom of this page for more information.
You may want to leave some non-mandatory fields dealing with sensitive information for employees to complete on their own. An example is direct deposit setup and bank information, which employees often prefer to set up themselves.
If the employee is transferring from one company to another within the same organization (EIN to EIN), an Employee Company Transfer may be used to seamlessly transfer the employee and their personnel record items to the new company. (see the Related Help Topic).
Note on Completion: After the EAN is approved, it will immediately complete unless: It has a future effective date.
To check the expected completion date for the EAN, refer to the eAction Notice (EAN) Details page for the EAN. See the Related Help Topic.
To add a new personnel record to the ExponentHR system:
1. On the Menu, click HR Administration > eAction NoticeHR Administration > eAction Notice.
The eAction Notice (EAN) SummaryeAction Notice (EAN) Summary page displays.
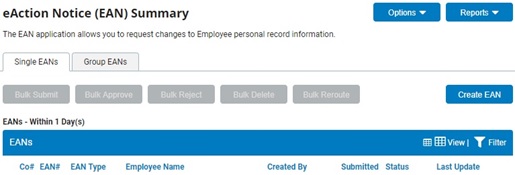
2. Click the Create EANCreate EAN button.

The Create New EAN(s)Create New EAN(s) window displays.

3. Select the New Hire Enrollment EAN from the EAN type selection box and click the Create EANCreate EAN button.
The New Hire EnrollmentNew Hire Enrollment page displays in a new window.
Notes:
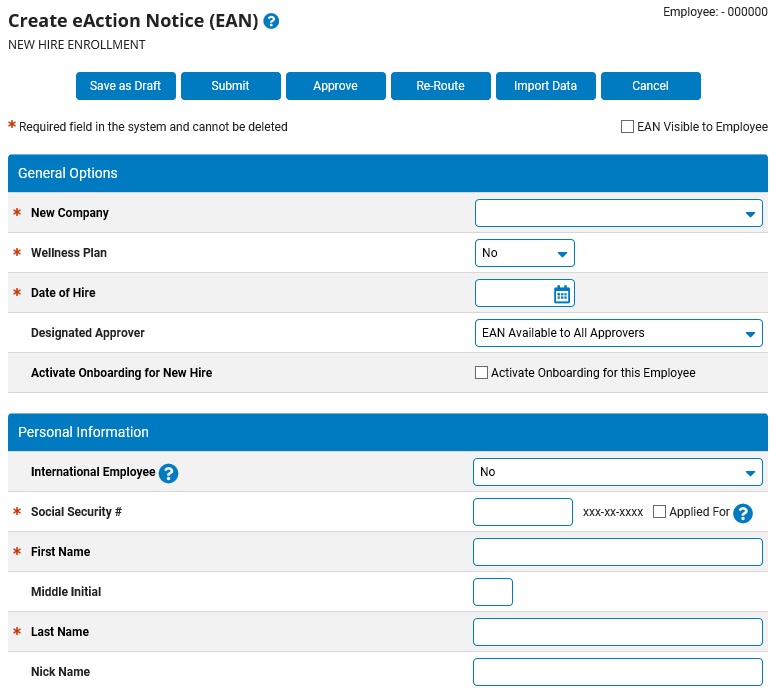
You do not need to select an existing employee before creating this EAN, as you will create a new employee within the EAN itself.
If your organization has child companies within it, you must select the new hire's company in the CompanyCompany drop-down box.

4. Enter the date to make the new employee active in ExponentHR in the Date of HireDate of Hire text box.

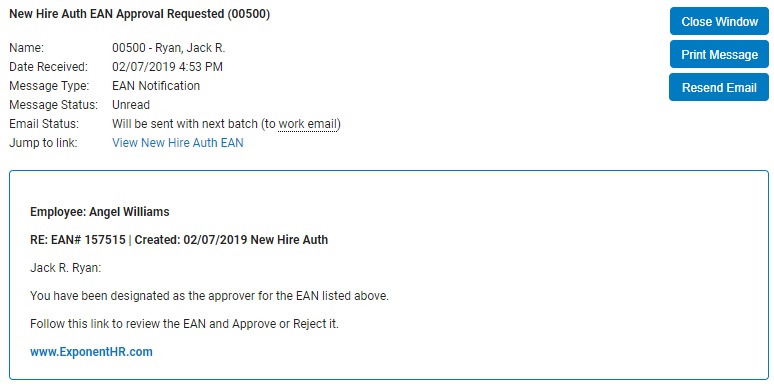
5. If a specific manager needs to be responsible for the review and approval of this new hire request, select the appropriated manager in the Designated ApproverDesignated Approver drop-down box.

Notes:
The individual assigned as the designated approver will receive a Message Center NotificationMessage Center Notification informing the manager of the pending EAN, including a link to the EAN utility where the EAN can be reviewed.
By default, the designated approver for all New Hire Enrollment EANs is set to EAN Available to All Approvers, which makes the pending EAN available to all managers with EAN approval rights.
HR Administrators with EAN Approval rights to the EAN will always be allowed to view and approve the EAN, regardless of the designated approver designation.
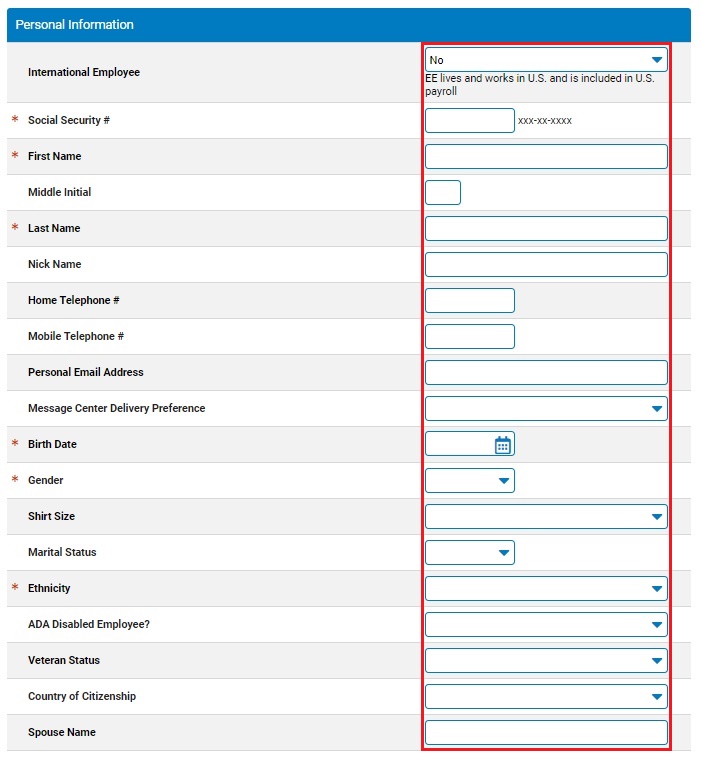
6. Complete the Personal InformationPersonal Information fields for the new employee as necessary.
Notes:
If a field has an asterisk (*) next to it, you must complete that field to submit the EAN. Fields without asterisks (*) are optional fields.
If there is an Action RequiredAction Required button next to any field that you want to edit, click it to view the required actions and supplemental instructions.

Check the Applied For option in the SSN field if the new hire has applied for an SSN but has not yet been assigned one. When checked, the ExponentHR system will bypass the SSN field requirement and automatically assign the individual a temporary (invalid) SSN beginning with a 900 upon completion (900-XX-XXXX). This unique identifier (visible only to management users) remains assigned to the employee and used for payroll processing until the actual assigned SSN becomes available and entered through a Change Personal Information EAN.
If the individual only has a single name (no first and last name) on their social security card or passport, enter "Unknown" as the employee's first name and their single name in the Last Name and the Nick Name field. This will result in a successful verification with the SSA and cause the site to display their single name instead of "Unknown."
HR Administrators or those with access to the HR function can select the veteran status.
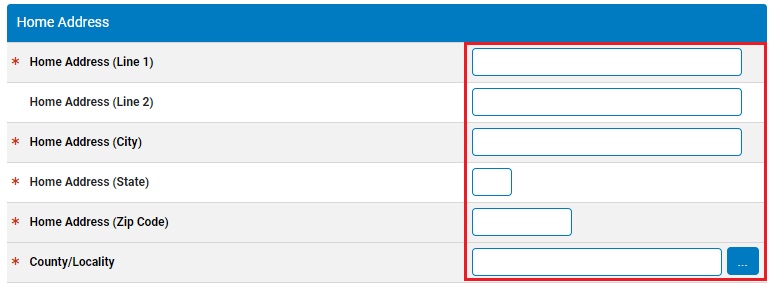
7. Complete the Home AddressHome Address fields for the new employee, as necessary.
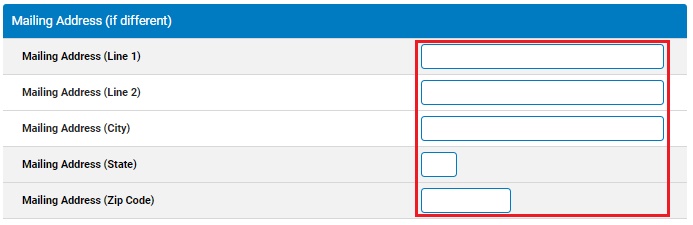
8. If necessary, complete the Mailing AddressMailing Address fields for the new employee if the employee's mailing address is different from their home address.
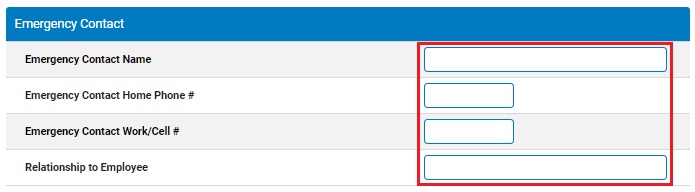
9. Complete the Emergency ContactEmergency Contact fields for the new employee, as necessary.
10. Click the Select New PositionSelect New Position button to select the new job to which the employee will be assigned from the Organizational Structure Management (OSM)Organizational Structure Management (OSM) page.
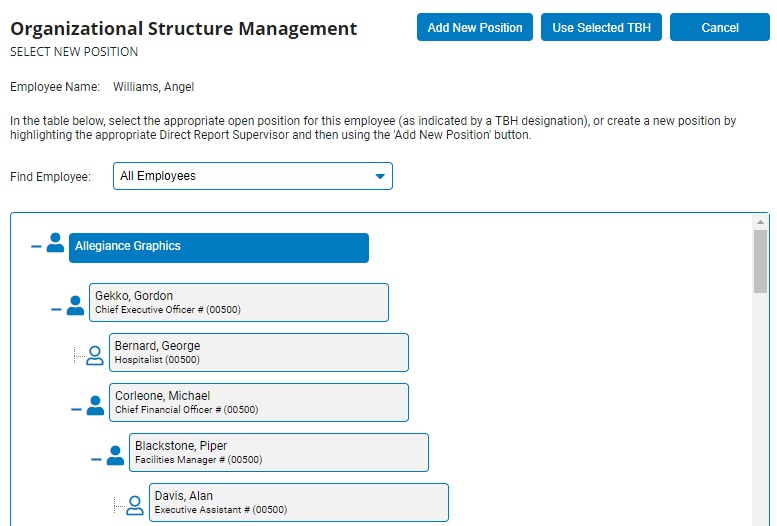

To Assign the Employee to an Existing PositionTo Assign the Employee to an Existing Position
1. Select the position the employee will now fill from an open position in the list open position in the list (marked in red)open position in the list (marked in red).

2. Click the Use Selected TBHUse Selected TBH button.

The Confirm Supervisor Selections page displays.
3. Click the Save & Return to EANSave & Return to EAN button.

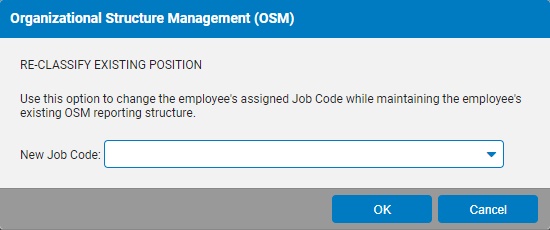
Note: An employee can be assigned to an open position without having to use the job code already assigned to that open position. To do so, after selecting the open position, click the Re-Classify Existing PosRe-Classify Existing Pos and choose the desired job title in the Re-Classify Exisiting PosRe-Classify Exisiting Pos drop-down box.

To Create a New Position for the EmployeeTo Create a New Position for the Employee
1. Select the employee's immediate supervisor from the OSM tree and then click the Add New PositionAdd New Position button.

The Add PositionAdd Position pop-up window will display.
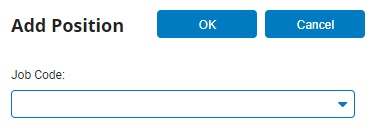
2. Select a job code for the new position from the Job CodeJob Code drop-down box and click the OKOK button.


The Confirm SupervisorsConfirm Supervisors page displays.
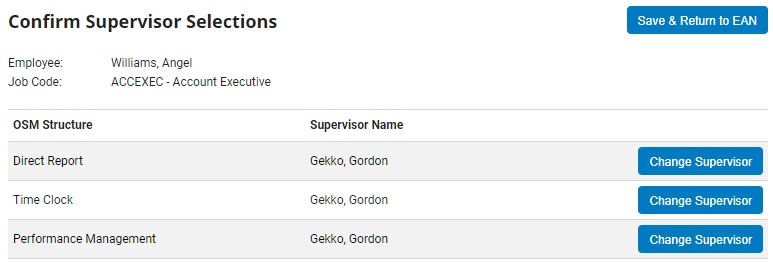
3. You may change the employee's direct report or time clock managers, if necessary.
Changing an Employee's Direct Report ManagerChanging an Employee's Direct Report Manager
1. Click the Change SupervisorChange Supervisor button.

The Organizational Structure Management (OSM) page will display.
2. Select the new direct report manager from the OSM tree.
The manager you selected will be highlighted.
3. Click the OKOK button.
The manager you selected will be assigned as the employee's direct report manager.
Changing an Employee's Time Clock ManagerChanging an Employee's Time Clock Manager
1. Click the Change SupervisorChange Supervisor button.
The Organizational Structure Management (OSM) page will display.
2. Select the new time clock manager from the OSM tree.
The manager you selected will be highlighted.
3. Click the OKOK button.
The manager you selected will be assigned as the employee's time clock manager.
4. Click the Save & Return to EANSave & Return to EAN button.
The employee will be assigned to the open position you selected from the OSM tree.
Note: FLSA status and Pay Grade are entered automatically when you choose a position.
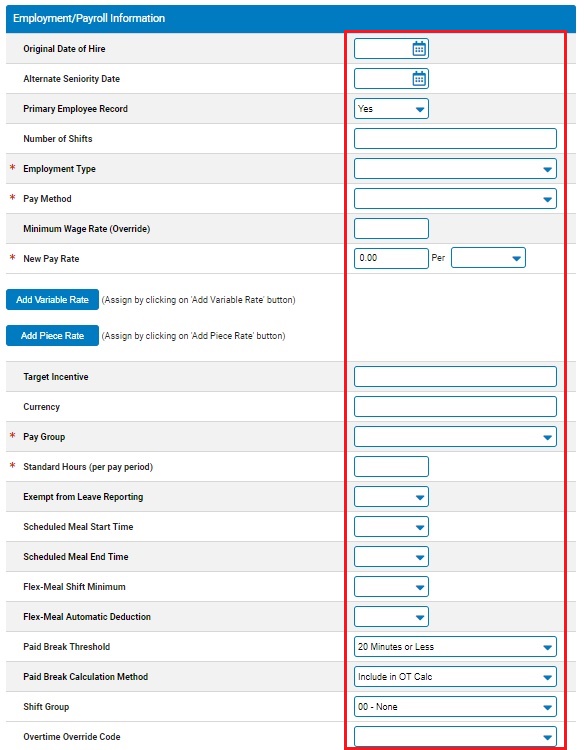
11. Complete the Employment/Payroll InformationEmployment/Payroll Information fields for the new employee, as necessary.
Notes:
If the employee has a hire date prior to the Date of Hire entered in Step 4, enter the date in the Original Hire Date field. (If you do not enter a date in this field, the Date of Hire is copied here.)
If you want to enter a date other than the employee's hire date as the date that determines the employee's seniority in your organization, list that date in the Alternate Seniority Date field. (If you do not enter a date in this field, the Date of Hire is copied here.)
Select the employee's status (full time, part time, and so on) from the Employment Type drop-down box.
Select the employee's pay type (salary, hour, and so on) from the Pay Method drop-down box.
For hourly or salary employees, specify if the employee receives tips in the Tipped Employee drop-down box. This employee will be able to report tips through Time Clock.
For tipped employees with a pay method of hourly or piecework only, specify if the minimum wage gross-up calculation should be used in Time Clock for this employee in the Use Minimum Wage Gross Up drop-down box.
Enter the employee's rate of pay (hourly, weekly, monthly, or other options) in the New Pay Rate fields.
Select the employee's pay group from the Pay Group drop-down box.
Enter the number of hours in the employee's standard pay period (40, 80, and so on) in the Standard Hours (per pay period) text box.
If the employee is eligible for a miscellaneous premium plan, select Yes from the Misc Prem Plan Eligible drop-down box.
If the employee is not required to report leave, select Yes from the Exempt from Leave Reporting drop-down box.
If the employee's meal breaks will be taken at the same time every day and automatically deducted from their reported hours using the Edit Meal Schedules tool:
Select Yes from the Use Auto-Meal Deduction drop-down box.
Enter a scheduled meal start and end time in the Scheduled Meal Start Time and Scheduled Meal End Time fields.
If the employee's meal breaks may be taken at any time during the day but the same amount of time will be deducted from their reported hours each day using the Edit Meal Schedules tool:
Select Yes from the Use Auto-Meal Deduction drop-down box
Enter the minimum number of hours the employee must work to receive a meal break in the Flex-Meal Shift Minimum field.
Enter the number of minutes the employee is allowed for the meal break in the Flex-Meal Automatic Deduction field.
If the employee is exempt from holiday pay, select Yes from the Holiday-Exempt field.
If your company allows employees to view paid leave requests from other employees and you wish to disable this employee's view of paid leave, select Yes from the Disable View of other Empl. Leave drop-down box.
If an employee's ability to record hours worked on the Time Clock Reporting page needs to be blocked (such as when on leave or temporary suspension), select Yes in the Disable Time Reporting Capability drop-down box.
If an employee's ability to submit their W-4 elections needs to be blocked, select Yes in the Disable Employee W-4 Self Service Option drop-down box.
If your organization utilizes the online performance review feature, the Exclude from Performance Mgmt field provides the option to remove the employee from being eligible to receive a performance review. (Excluded employees can still perform management functions, such as creating a review for someone else and providing input.)
The Only print non-check vouchers for employees who requested them field works in connection with your organization's check printing settings (administered through the Check Printing Setup utility). If your organization has opted to have only the direct deposit advice slips printed for the employees who are designated to receive them (instead of all employees), this field is used to designate if the respective employee has made such a request. This option may be desirable per your organization's business practicesorganization's business practices.
Designating employee requested vouchers
While many organizations desire to go completely paperless regarding employee non-check pay vouchers (employees who use direct deposit, or who receive no net pay), some states mandate that employers provide each employee working in the state with the opportunity to request paper copies of his/her direct deposit voucher. Also, some organizations may employ a small subsection of their workforce in locations where no internet access is available. To address these needs, the Only print non-check vouchers for employees who requested them field found on various EANs works in conjunction with the Check Printing utility.
When selecting the ”Only print non-check vouchers for employees who requested them” option in the Check Printing utility, ExponentHR will only print the direct deposit advice slips for those employees where the new Employee Requests Paper Payroll Voucher field is marked as Yes.
Enter the employee's identifying number in the Employee # field, if necessary. (If the feature is turned on for your organization, an employee number may be auto-generated.)
If the employee occupies an executive position in your organization, select this position from the Executive Level drop-down box.
To have a manager other than the Time Clock Supervisor be responsible for reviewing any paid leave request from the employee, select the manager who should be responsible in the Alt. Paid Leave Approver drop-down box. Selecting "(none)" will maintain the Time Clock Supervisor's role in reviewing any paid leave requests.
Enter the employee's primary salary for benefits in the Primary Salary Benefit field, if necessary.
If the employee is enrolled in a bonus plan, select the plan from the Bonus Plan drop-down box, then enter the target amount for the bonus and the date the employee is eligible for the bonus in the Bonus Target and Bonus Eligibility Date fields.
Enter information related to employee performance reviews and ratings in the Next Pay Rate Review and Next Performance Review fields.
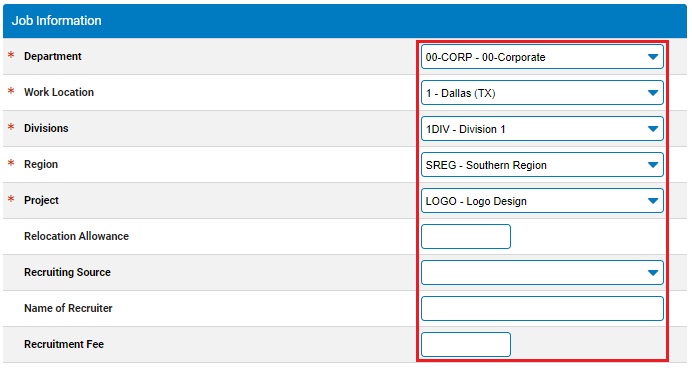
12. Complete the Job InformationJob Information fields for the new employee, as necessary.
Notes:
Select the employee's department from the drop-down box.
Select the employee's work location from the drop-down box.
If the employee has a relocation allowance, enter it in the Relocation Allowance field.
If you have recruiting information about the employee, enter it in the Recruiting Source, Name of Recruiter, and Recruitment Fee fields.
If the employee has an ownership role within the organization, make the appropriate designation in the Owernship Interest drop-down box.
If the employee is an officer in your organization, select Yes from the Officer of Company drop-down box.
If the employee is a member of a union, select the employee's union code from the Union Code drop-down box and enter their membership number in the Union Membership # field.
Enter the employee's work information (e-mail, telephone number, extension, and office number) in the appropriate fields.
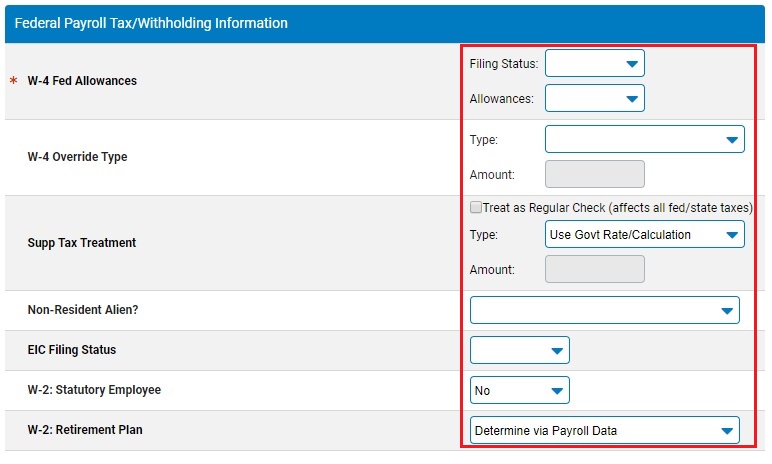
13. Complete the Federal Payroll Tax/Withholding InformationFederal Payroll Tax/Withholding Information fields for the new employee, as necessary.
Notes:
In the W-4 Fed Allowances, enter the employee's federal tax filing status by selecting options from the Filing Status and Allowances drop-down boxes.
If the employee has any additions or deductions to their taxes, in the W-4 Override Type area, select it from the Type drop-down box and enter the amount (in dollars) of the change in the Amount text box.
In the Supp Tax Treatment area, select the tax treatment of any supplemental income for the employee in the Type drop-down box.
You can choose to use the tax table (to be taxed at the same rate as regular earnings), specify a different fixed rate flat amount or percentage (usually 25% for the federal supplemental tax rate), or suppress federal withholding tax altogether. If you select to add/override the rate with a flat amount or percentage, enter the amount in the Amount text box.
Select if the employee should receive non-resident alien tax treatment in the Non-Resident Alien drop-down box.
Select Yes in the W-2: Statutory Employee drop-down box to check the associated Box 13 check box in the employee's W-2.
In the W-2: Retirement Plan drop-down box, specify if the Box 13 check box on the employee's W-2 should be checked (Force), not checked (Suppress), or checked only if the employee has deductions or employer contributions that are tied to specific code types (Determine Via Payroll Data).
14. Complete the State Payroll Tax/Withholding InformationState Payroll Tax/Withholding Information section, as necessary.

Adding state withholdingAdding state withholding
You can add as many states as needed for an employee.
1. Click the Add State button.
The Add/Edit State WithholdingAdd/Edit State Withholding page displays.

2. Select the state you want to add from the State drop-down box.
Depending on the state you select, different fields display.
3. Make the desired selections.
Note: The system applies the state supplemental tax rate to all supplemental checks; however, you can override it for an employee.
4. Click the Save button.
15. Complete the Local Payroll Tax/Withholding InformationLocal Payroll Tax/Withholding Information section, as necessary.

Adding local withholdingAdding local withholding
You can add as many localities as necessary for the employee.
1. Click the Add Local button.
The Add/Edit Local WithholdingAdd/Edit Local Withholding page displays.
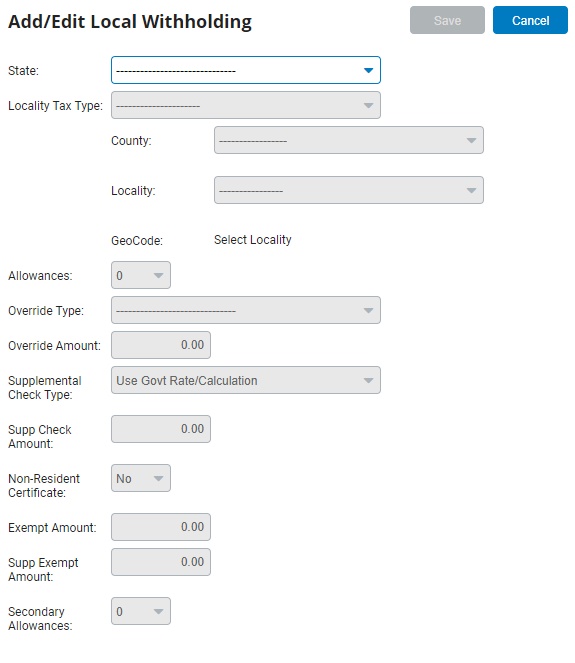
2. Select the state and locality tax type from the drop-down boxes.
Depending on the locality or city you select, different fields display.
3. Make the desired selections.
Note: The system applies the local supplemental tax rate to all supplemental checks; however, you can override it for an employee.
4. Click the Save button.
Adding school district withholdingAdding school district withholding
1. Click the SelectSelect button for the School District Code.

The Edit School DistrictEdit School District page displays.
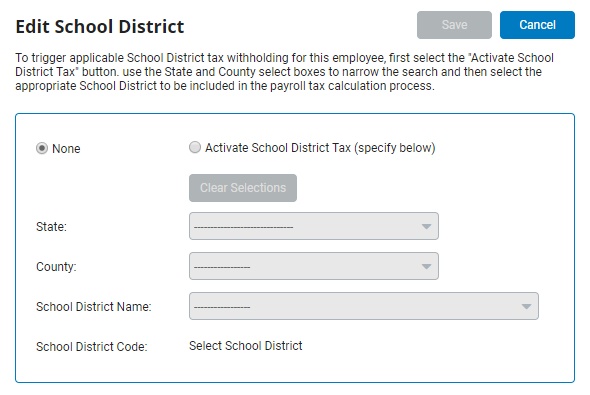
2. Mark the Activate School District Tax radio button.
3. Select the state, county, and school district name from the drop-down boxes.
The school district code displays.
16. Complete the Home/Work Location Tax OverridesHome/Work Location Tax Overrides section, as necessary.
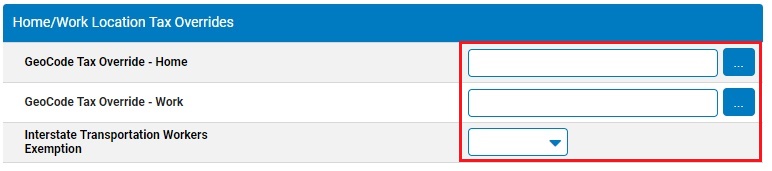
Override home localityOverride home locality
1. Click the SelectSelect button by GeoCode Tax Override - Home.

The Edit Tax GeoCode Override - Residence/HomeEdit Tax GeoCode Override - Residence/Home page displays.
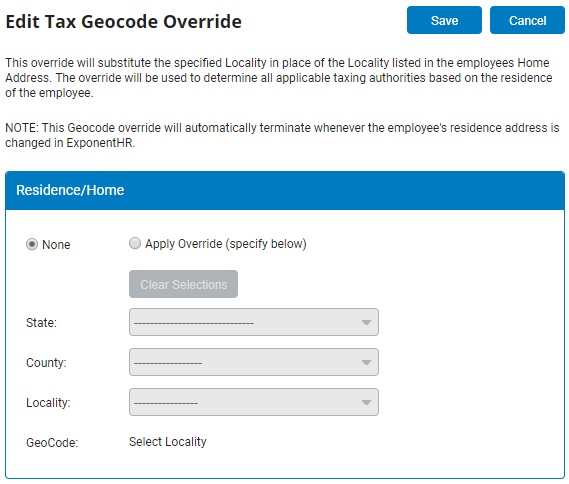
2. Mark the Apply Override radio button.
3. Select the state, county, and locality from the drop-down boxes.
The associated GeoCode displays.
4. Click the Save button.
Note: This override will automatically end if the employee's
residence address is changed in ExponentHR.
Override work localityOverride work locality
1. Click the SelectSelect button by GeoCode Tax Override - Work.

The Edit Tax GeoCode Override - Work LocationEdit Tax GeoCode Override - Work Location page displays.
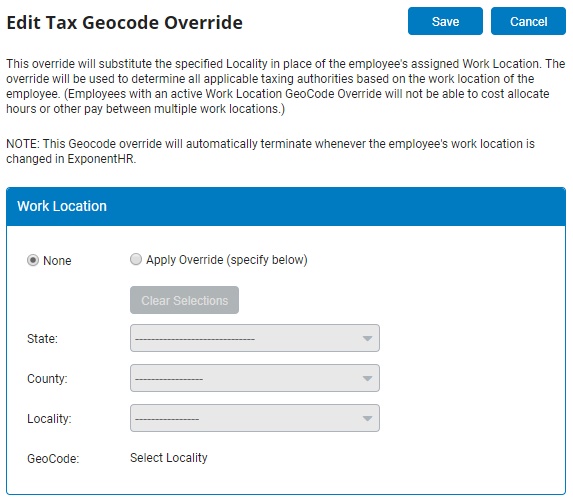
2. Mark the Apply Override radio button.
3. Select the state, county, and locality from the drop-down boxes.
The associated GeoCode displays.
4. Click the Save button.
Note: This override will automatically end if the employee's
work location is changed in ExponentHR.
17. Complete the Employment Eligibility InformationEmployment Eligibility Information fields for the new employee, as necessary.

Notes:
Select Yes from the Form I-9 Completed? drop-down box if the I-9 has been completed.
Click the Add I-9 DetailsAdd I-9 Details button if the employee compled Form I-9 outside of the ExponentHR Onboarding portal and populate the form and click Save when done.
Form I-9 Instructions may be found by clicking on the link on the top of this page.
If this employee completed a paperless I-9 in the Employee Onboarding portal, the paperless I-9 will overwite anything entered in this EAN.
IMPORTANT: Entering information here IS NOT A SUBSTITUTE for the employee's Form I-9. You must still retain the completed Form I-9. To use a paperless Form I-9 (with electronic signatures), use the Employee Onboarding Utility.
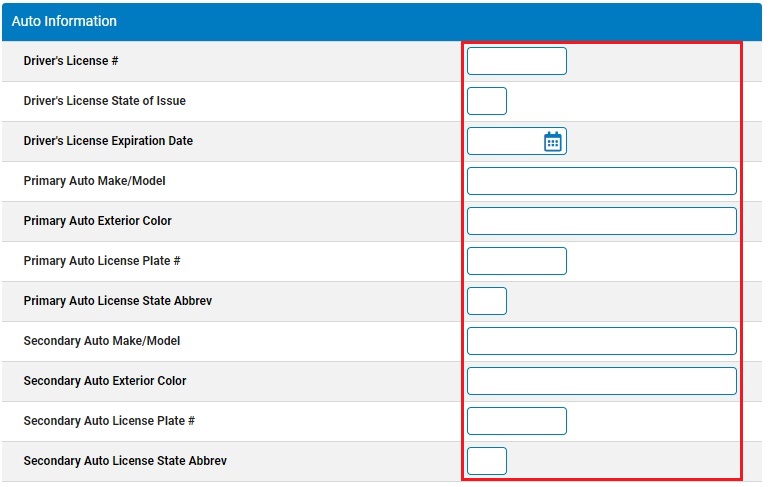
18. Complete the Auto InformationAuto Information fields for the new employee, as necessary, including the make and model of their vehicle(s), license plate numbers, and other related information.
19. Complete the Direct Deposit SetupDirect Deposit Setup fields for the new employee, as necessary.
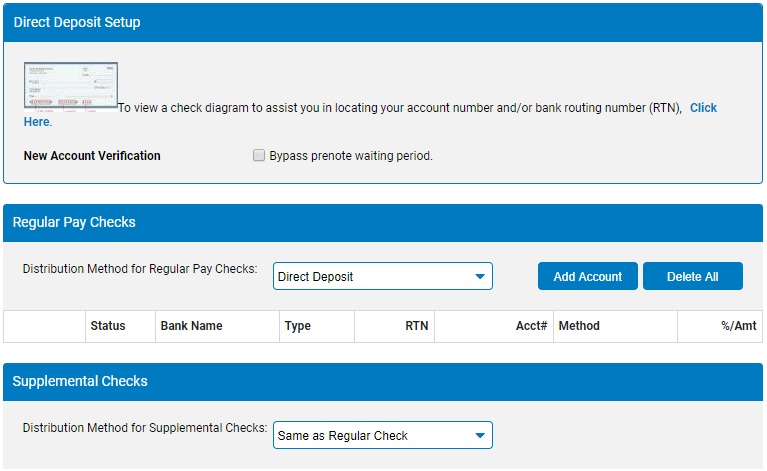
Notes:
Select Direct Deposit from the Distribution Method for Regular Pay Checks drop-down box, if a direct deposit account needs to be set up.
Click the Add AccountAdd Account button to add an account.

Employees will often set this up themselves by submitting an EAN.
If you check the box for the Bypass prenote waiting process, the employee's direct deposit will become active the moment the New Hire Enrollment EAN is approved. If you do not check the box, the EAN will be split into two EANs; the new standalone Direct Deposit EAN will remain in Approved status until the pre-note waiting period is over.
You can obtain the necessary bank routing information required for the employee to use direct deposit from one of the employee's personal checks -- further instructions are listed online in ExponentHR.
20. Enter any notes related to the EAN in the EAN Notes text box.
21. Click the Save as DraftSave as Draft button at the top or bottom of the page to keep the requested change in a drafted status so that it may be edited and submitted for completion at a later time.

Note: When an EAN is put in a drafted status, a Draft EAN NoticeDraft EAN Notice with a link to the unsubmitted EAN is provided on the ExponentHR Dashboard.
22. After entering all necessary changes to the New Hire Enrollment EAN, click the Submit button to submit the EAN for approval or click the Approve button, if available, to approve the EAN for completion.
Result: The EAN you just submitted or approved is now visible on the eAction Notice (EAN) Summary page. After the EAN is completed, the new employee you created may log in to ExponentHR (they will have to complete the first time log in procedures).
Note: If you need multiple managers to review this EAN before you submit it, you may re-route the EAN. See Related Help Topics for more information.
Related Help Topics:
Transferring Employees Among Companies
Checking the Expected Completion of an EAN
Demonstration
For additional information on this topic, click on the link below to view a demonstration.
New Hire Enrollment