The ExponentHR Recurring Items utility allows you to set up employer contribution records for employees that are to be applied in addition to the regular scheduled contributions. Through this utility you can create one-time or recurring adjustments for non-taxable contributions made to an employee by your organization (such as HSA contributions or a discretionary match to your retirement plan).
Note: Although you may add non-recurring (one-time) employer contributions through the Recurring Items utility, the preferred way to do a one-time employer contribution is to enter it as a Miscellaneous Adjustment on the Time Clock Review page. See the Related Help Topic.
To manage employer contributions:
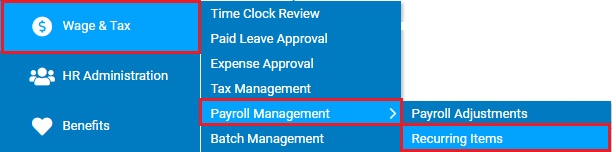
1. On the Management Navigation Menu, click Wage & Tax > Payroll Management > Recurring ItemsWage & Tax > Payroll Management > Recurring Items.
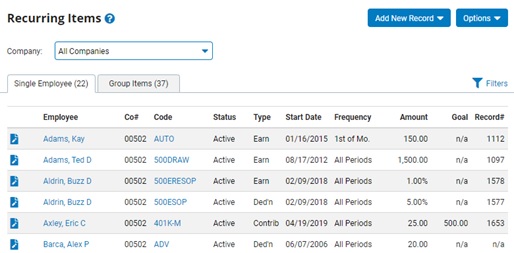
The Recurring ItemsRecurring Items page displays.
2. If necessary, filter the employer contributions further to display employer contributions according to a number of criteria.
Filtering Employer Contributions AdjustmentsFiltering Employer Contributions Adjustments
You may apply one or more filters to display only those adjustments you want to view by clicking on the Filters button and accessing the Filter OptionsFilter Options page.
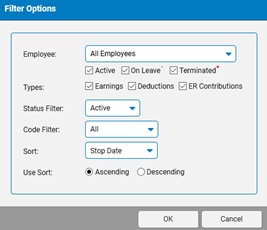
1. You may view all adjustments for a specific employee by selecting the employee from the Employee drop-down box.
The Recurring Items page will display all adjustments that have been submitted on behalf of the employee you selected.
2. If necessary, uncheck the Earnings, Deductions, and/or ER Contributions check box in the Type portion of the page.
Only employee selected adjustment types will display on the Recurring Items page.
3. Additional filter options include being able to refine the list by the status or for a specific code
Result: The Recurring Items page will display only adjustments that match the criteria you selected. The number displayed in the Single Employee and Group Items tab reflects the total amount adjustments under the respective tab that meet all the filtering requirements that were specified.
The Recurring Items page updates to display all employer contribution falling under the filter criteria you selected.
3. Set up recurring and non-recurring employer contribution, as necessary.
Setting Up Recurring Employer ContributionsSetting Up Recurring Employer Contributions
You may set up employer contribution adjustments that will be automatically recorded on an employee's paycheck as a memo item.
To set up a recurring or non-recurring employer contribution adjustment:
1. When creating an employer contribution adjustment, you have the option to create an adjustment for a single employee or an adjustment to be applied to a group of employees.
Click on the Single Employee or Group Items tab to create the respective type of employer contribution adjustment.
2. Click the Add New RecordAdd New Record button and select the ER Contributions option.
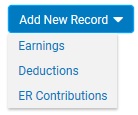
The ER Contribution - AddER Contribution - Add page displays.
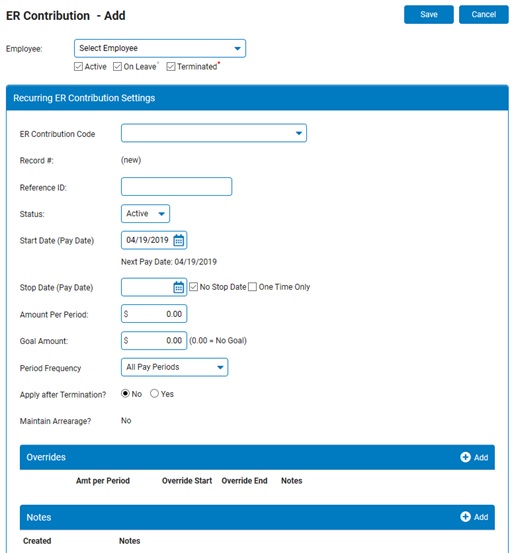
3. Select the employee to which you would like to apply the employer contribution adjustment from the Employee drop-down box. If creating a Group Recurring Item, click the Select Employees button to manage the list of employees that will be part of the recurring group.
4. Specify a code from the ER Contribution Code drop-down box.
Note: Only employer contribution codes set up with the Use as Recurring Code set to Yes appear in the list.
5. Type a number in the Reference ID box, if desired. This is an internal ID for your organization.
6. Select whether the adjustment is active or inactive from the Status drop-down box.
7. Enter the start date for the adjustment in the Start Date (Pay Date) field.
The adjustment you specify will be recorded on the employee's paycheck for the first time on the start date you entered.
Notes:
This date must be a valid pay date at your company.
The next scheduled company pay date is listed below the field.
8. Set a stop date for the adjustment or set a goal, as necessary. Or, set up a non-recurring adjustment.
To set a recurring adjustment to cease on a specific stop date:
1. Enter the date the adjustment should cease in the Stop Date (Pay Date)Stop Date (Pay Date) field.
![]()
Result: The adjustment amount you entered will be recorded on the employee's paychecks between the start date and stop date you entered.
Notes:
You may set an adjustment to never expire by checking the No Stop Date check box. The adjustment will continue to be recorded on employee paychecks after the start date until you deactivate it.
You may also set up a non-recurring adjustment by checking the One Time Only check box. See the topic below for more information.
To set a recurring adjustment to cease when a specific goal (or monetary amount) has been reached:
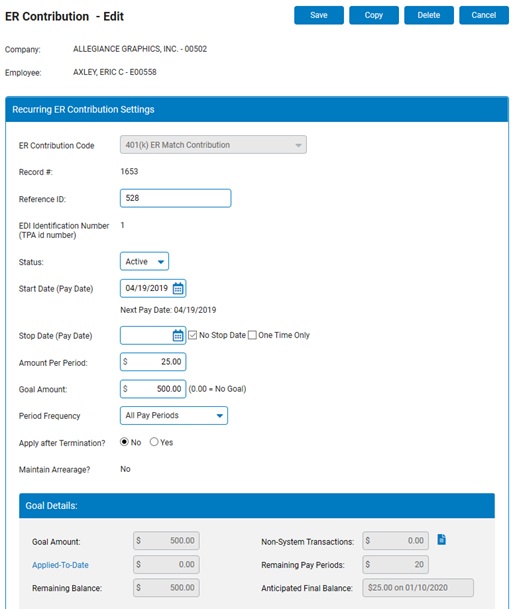
1. Enter a goal amount in the Goal AmountGoal Amount text box.

Result: The Anticipated Final Balance text box will adjust and display the amount of the last adjustment needed to reach the goal, as well as the pay date that the adjustment will be processed. The Number of Pay Periods field will show the number of pay periods after the start date required to reach the goal you entered.
The adjustment will automatically become inactive when the total monetary amount recorded on employee paychecks across multiple pay periods equals or exceeds a specific goal.
Note: If there is no goal amount and you want the adjustment to continue until inactivated, leave the Goal Amount set at 0.00.
Setting a Non-Recurring AdjustmentSetting a Non-Recurring Adjustment
1. Select the One Time Only check box to create a single non-recurring adjustment that will be applied to the paycheck you specified in the Start Date box.
The Stop Date (Pay Date) field will automatically be populated with the same pay date as the Start Date.
9. Enter the monetary amount to be recorded on the employee's paycheck each pay period in the Amount Per Period text box.
10. Specify how often the adjustment will be applied to the employee's paychecks by selecting an option from the Period Frequency drop-down box.
Note: You can choose all pay periods or specific payroll(s), such as the first payroll of each month. If you do not want the adjustment applied to a fifth paycheck in the month (if a calendar month includes five pay days), select the First 4 Payrolls of Month option.
11. If you want the adjustment to be recorded on the employee's paychecks even after the employee is terminated, set the Apply After Termination radio button to Yes.
12. Click the Add button to enter any notes related to the adjustment in the Notes text box.
13. When you have entered all necessary changes, click the Save button.
Result: The adjustment is saved, and the Recurring Items page displays. The new adjustment is now visible on the page and will be added to the first paycheck you specified.
Editing Employer Contribution AdjustmentsEditing Employer Contribution Adjustments
You may adjust previously created employer contribution adjustments.
To adjust a previously created adjustment:
1. Click the Edit button on the row listing the adjustment you want to edit.
The ER Contribution - EditER Contribution - Edit page displays.
2. If editing a Group Recurring Item, click on the Select Employees button to manage the list of employees that are receiving the recurring employer contribution.
Note: The View/Edit Records button on Group Recurring Items will display a list of all employees associated with the recurring employer contribution and the amount applied to date for each employee.
3. If necessary, you may activate the adjustment or make it inactive.
To activate an inactive adjustment, select Active from the Status drop-down box.
To suspend an active adjustment, select Inactive from the Status drop-down box (or use the Override option to identify a period of $0.00 pay; see the Related Help Topic).
4. Edit the fields of this page, as necessary, to make other corrections or changes to the adjustment.
Note: When editing an existing item, the Start Date must be set equal to the next pay date (or to a future pay date beyond that) in order for the edited information to be saved.
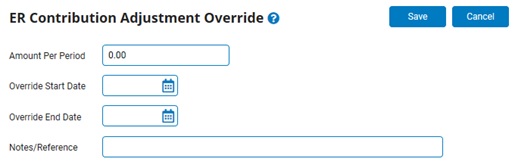
5. To make a temporary override to the scheduled employer contribution, click the Add button in the Overrides section.
The ER Contribution Adjustment OverrideER Contribution Adjustment Override page displays where you can indicate the amount to apply each applicable pay period, as well as the effective start and end dates (inclusive) where during which the override amount will be applied. See the Related Help Topic.
6. When you have entered all necessary changes, click the Save button.
Result: The adjustment is saved with your changes implemented.
Note: You may click the Cancel button to exit the page without saving your changes.
Deleting Employer Contribution AdjustmentsDeleting Employer Contribution Adjustments
You may delete previously created adjustments if necessary.
To delete an adjustment:
1. Click the Edit button on the row listing the adjustment you wish to delete.
The ER Contribution - EditER Contribution - Edit page displays.
2. Click the Delete button.
Result: The adjustment is deleted, and the Recurring Items page displays. The adjustment is no longer visible on the page.
Importing Employer Contributions for Multiple Employees
Related Help Topics:
Setting up Recurring Earning Adjustments
Setting up Recurring Deduction Adjustments
Setting Up Recurring Item Temporary Overrides
Making One-Time Retirement Plan Adjustments
Applying One-Time Miscellaneous Adjustments through Time Clock
Importing Recurring Items for Multiple Employees
Generating a Report on Recurring Items